
Entertainment Projector User's Manual HT510, HT410


E-7
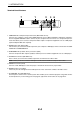
1. INTRODUCTION
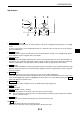
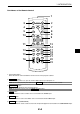
7. COMP. Button (COMPUTER)
Press this button to select a video source from computer or component equipment connected to your COM-
PUTER IN port.
8. AUTO Button (AUTO ADJ.)
Use this button to adjust an RGB source for an optimal picture. See page E-27.
9. SELECT 왖왔왗왘 Button
왖왔 : Use these buttons to select the menu of the item you wish to adjust.
왗왘 : Use these buttons to change the level of a selected menu item.
10. MENU Button
Displays the menu for various settings and adjustments.
11. ENTER Button
Use this button to enter your menu selection. It works the same as the ENTER button on the cabinet. See
page E-4.
12. EXIT Button
It works the same as the EXIT button on the cabinet. See page E-4.
13. ASPECT Button
Press this button once to display the Aspect Ratio select menu. Continue pressing to change aspect ratios.
See page E-37.
14. N.R. Button (NOISE RED.)
This button will turn on the noise reduction feature to reduce video noise.
15. MUTE Button (PIC-MUTE)
This button turns off the image and sound for a short period of time. Press again to restore the image and
sound.
16. VOLUME (+) (–) Button
Press (+) to increase the volume and (–) to decrease it.
17. PICTURE Button
Press this button to display the Picture menu. Each time this button is pressed, the option will be changed.
See page E-35.
18. FREEZE Button
This button will freeze a picture. Press again to resume motion.
19. TIMER Button (OFF TIMER)
This button will display eight options to turn off power automatically: Off, 0:30, 1:00, 2:00, 3:00, 4:00, 6:00 and
8:00. See page E-31.
20. KEYSTONE (+) (–) Button
Press this button to correct the keystone (trapezoidal) distortion, and make the image square. See page E-26.
21. HELP Button
Provides the information about the status of the projector.
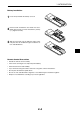
22. LIGHT Button
Use this button to turn on or off the button’s backlight. If another button is not pressed within 10 seconds while
the backlight is on, it will turn off to conserve the batteries.