
Operation Manual

E-37
* Recommended mode
NOTE: A 16:9 screen should be used.
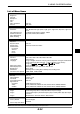
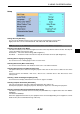
Adjusting Horizontal/Vertical Position, Clock and Phase [Position/Clock]
You can adjust the image manually for position and stability; “Horizontal”, “Vertical”, “Clock” and “Phase”.
[Horizontal/Vertical]
Adjusts the image location horizontally and vertically.
[Clock] (available for RGB signal only)
Use this item to fine tune the computer image or to remove any vertical banding that might appear. This
function adjusts the clock frequencies that eliminate the horizontal banding in the image. This adjustment may
be necessary when you connect your computer for the first time.
[Phase] (available for RGB signal only)
Use this item to adjust the clock phase or to reduce video noise, dot interference or cross talk. (This is evident
when part of your image appears to be shimmering.)
Use “Phase” only after the “Clock” is complete.
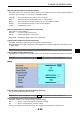
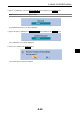
Normal
4:3 source 16:9 source
Full
Zoom
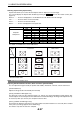
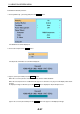
Mode
Input
*
*
*
Source
Computer
Component
VIDEO
S-VIDEO
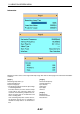
Signal Normal Full Zoom Native
RGB –
1080i ––––
720p ––––
480p –
576p –
480i –
576i –
–
–
For details on shaded areas, see the table below.
5. USING ON-SCREEN MENU
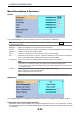
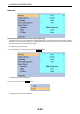
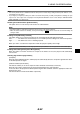
Selecting Aspect Ratio [Aspect Ratio]
Aspect Ratio allows you to select the best Aspect mode to display your source image.
You can also display the Aspect Ratio window by pressing the ASPECT button on the remote control. (See
page E-7).
Normal ........... Source is displayed in a 4:3 windowed area with black on the left and right.
Full ................. Sources fill the screen horizontally.
Zoom ............. Source is stretched vertically.
Native............. Source is displayed in true aspect ratio.