NEC-ADA201 Eng/Fr.
NEC-ADA201 Eng/Fr.
NEC-ADA201 Eng/Fr. manual 9/8/98 12:25 PM Page 3 Safety Precautions and Maintenance FOR OPTIMUM PERFORMANCE, PLEASE NOTE THE FOLLOWING WHEN SETTING UP AND USING THE MULTISYNC INTELLIBASE AUDIO: Read Instructions — All the safety and operating instructions should be read before the appliance is operated. Retain Instructions — The operating instructions should be retained for future reference. Heed Warning — All warnings on the appliance and in the operating instructions should be adhered to.
NEC-ADA201 Eng/Fr.
NEC-ADA201 Eng/Fr. manual 9/8/98 12:25 PM Page 5 Quick Start How to attach IntelliBase™ Audio to your MultiSync® brand monitor MAKE SURE THE MONITOR IS DISCONNECTED FROM THE SYSTEM AND IS UNPLUGGED FROM THE WALL OUTLET BEFORE ANY WORK IS DONE ON THE MONITOR. FOR 21-INCH MONITORS, IT IS ADVISED THAT TWO PEOPLE ARE INVOLVED DURING THE ENTIRE INSTALLATION PROCESS. To attach the IntelliBase to your MultiSync brand monitor, the original base must first be removed.
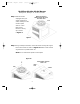
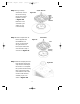
NEC-ADA201 Eng/Fr. manual 9/8/98 12:26 PM Page 6 MultiSync Monitor Model Names MultiSync 50, MultiSync 70, XV15 and XV15+ Step 1 With the monitor unplugged from your system and the wall outlet, carefully turn the monitor upside down on a firm table so that the base is facing up as shown in Figure 1. MONITOR IN POSITION TO REMOVE THE BASE AND ATTACH INTELLIBASE AUDIO BASE Figure 1 Step 2 Using a Phillips screwdriver, remove the screw securing the original base to the monitor as shown in Figure 2A.
NEC-ADA201 Eng/Fr. manual 9/8/98 12:26 PM Step 3 Locate Adapter Plate “A” that is supplied with the IntelliBase and secure it to the spindle using the screw that was removed in Step 2 as shown in Figure 2B.
NEC-ADA201 Eng/Fr. manual 9/8/98 12:26 PM Page 8 MultiSync Monitor Model Names MultiSync 90, XE15, XE17, XP15, XP17, XV17, XV17+, A500, A500+ A700, A700+, A900, E500, E700, E900, E900+, M500, M700 and P750 MONITOR IN POSITION TO REMOVE THE BASE AND ATTACH INTELLIBASE AUDIO Step 1 With the monitor unplugged from your system and wall outlet, carefully turn the monitor upside down on a firm table so that the base is facing up as shown in Figure 1.
NEC-ADA201 Eng/Fr. manual 9/8/98 12:26 PM Step 3 Using a Phillips screwdriver, remove the screw securing the two base halves together as shown in Figure 3B. Retain the screw and black nylon washer for use in the next step. Page 9 ORIGINAL MOUNTING Figure 3B Step 4 Locate Adapter Plate “B” that is supplied with the IntelliBase and secure it to the spindle using the screw and black nylon washer that was removed in Step 2 as shown in Figure 3C.
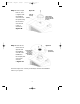
NEC-ADA201 Eng/Fr. manual Step 6 Locate the two screws that are supplied with the IntelliBase and attach the IntelliBase to the adapter plate and monitor as shown in Figure 3E. 9/8/98 12:26 PM Page 10 Figure 3E INTELLIBASE (BOTTOM VIEW) ROTATE ADAPTER PLATE UNTIL IT ALIGNS WITH THROUGH HOLES ON THE BASE Proceed to Page 10 to connect your MultiSync monitor with IntelliBase Audio to your system.
NEC-ADA201 Eng/Fr. manual 9/8/98 12:26 PM Page 11 Step 2 Using a Phillips screwdriver, remove the three screws securing the original base to the monitor. Remove the base by sliding and lifting as shown in Figure 4A. Save these screws for use in Step 5. Save the original base for possible future use. Figure 4A ORIGINAL MOUNTING Step 3 Using a Phillips screwdriver, remove the screw securing the two base halves together as shown in Figure 4B.
NEC-ADA201 Eng/Fr. manual 9/8/98 12:26 PM Step 5 After the adapter plate has been attached to the base, snap the base assembly to the monitor. To accomplish this, position all the locking tabs on the base so they mate with the holes in the monitor. Slide the base assembly in place as shown in Figure 4D. Page 12 Figure 4D Step 6 Using two of the screws that were Figure 4E removed in Step 2, attach the adapter plate assembly to the monitor.
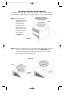
NEC-ADA201 Eng/Fr. manual 9/8/98 12:26 PM Step 8 Locate the two screws that are supplied with the IntelliBase ROTATE ADAPTER PLATE UNTIL IT and attach the ALIGNS WITH IntelliBase to THROUGH HOLES ON THE BASE the adapter plate and monitor as shown in Figure 4G. Page 13 Figure 4G INTELLIBASE (BOTTOM VIEW) Proceed below to connect your MultiSync monitor with IntelliBase Audio to your system.
NEC-ADA201 Eng/Fr. manual 9/8/98 12:27 PM Page 14 Step 2 Connect one end of the supplied audio cable to the audio input jack on the rear of the IntelliBase (Detail B) and the other end to the audio (line) output jack of your computer system (Detail A) as shown in Figure 6.
NEC-ADA201 Eng/Fr. manual 9/8/98 12:27 PM Page 15 Controls POWER: Press the power button to turn the IntelliBase™ on or off. An indicator light above the button will glow to show power is on. MUTE: If it is necessary to temporarily mute the sound, press this button. When the indicator light above the button glows, the sound is muted. Press the button again to restore sound. VOLUME: Turn this control clockwise to increase volume level. Turn counterclockwise to decrease volume level.
NEC-ADA201 Eng/Fr. manual 9/8/98 12:27 PM Page 16 Specifications Speakers One 75 mm / 3 inch woofer Four 28 mm / 1.1 inch full range Power (Satellites) 4 + 4 Watts @ 4 Ohms with 10% THD Power (Subwoofer) 5 Watts @ 4 Ohms with 10% THD Input Impedance >10k Ohms Input Sensitivity 300mV input for full output Frequency Response 80Hz - 20kHz S/N Ratio > 60 dB Power Requirements AC 110-120V / 60Hz Current Rating 0.2A @ 120V Headphone Output Impedance 32 Ohms Headphone Jack Type 3.
NEC-ADA201 Eng/Fr. manual 9/8/98 12:27 PM Page 17 Troubleshooting SYMPTOMS POSSIBLE PROBLEM SOLUTION NOTE No Sound From Speakers No power to unit. Make sure all connecting plugs between the IntelliBase and computer are fully seated. Make sure the wall power outlet or power strip has power. Make sure the power switches on the power strip and IntelliBase are turned on.
NEC-ADA201 Eng/Fr. manual 9/8/98 12:27 PM Page 18 References • BBS (978) 742-8706 NEC Technologies Remote Bulletin Board System is an electronic service accessible with your system and a modem. Communication parameters are: 300/1200/2400/9600/14.4k/28.8k bps, no parity, 8-data bits, 1 stop bit • Customer Service Technical Support (800) 632-4662 Fax (978) 742-7049 • Electronic Channels: Internet e-mail: tech-support@nectech.com Internet ftp site: ftp.nectech.com World Wide Web: http://www.nec.
NEC-ADA201 Eng/Fr. manual 9/8/98 12:27 PM Page 19 Limited Warranty NEC Technologies, Inc. (hereinafter “NECTECH”), warrants this Product to be free from defects in material and workmanship and, subject to the conditions set forth below, agrees to repair or replace (at NECTECH’s sole option) any part of the enclosed unit which proves defective for a period of three (3) years from the date of first consumer purchase. Spare parts are warranted for ninety (90) days.
NEC-ADA201 Eng/Fr.
NEC-ADA201 Eng/Fr. manual 9/8/98 12:27 PM Page 21 Consignes de sécurité et entretien POUR UNE PERFORMANCE OPTIMALE, PRIÈRE DE NOTER CE QUI SUIT LORS DE L’INSTALLATION ET DE L’UTILISATION DU PRODUIT MULTISYNC INTELLIBASE AUDIO : Lire les instructions — Il convient de lire toutes les instructions de sécurité et de fonctionnement avant d’utiliser l’appareil. Conserver les instructions — Les instructions de fonctionnement doivent être conservées pour consultation future.
NEC-ADA201 Eng/Fr. manual 9/8/98 12:27 PM Page 22 Contenu Votre nouveau carton* MultiSync® IntelliBasemc Audio de NEC Technologies doit contenir ce qui suit : • • • • • • MultiSync IntelliBase Audio (IB-AUDIO) Adaptateur c.a. • Plaque adaptatrice A Manuel d’instructions • Plaque adaptatrice B Carte d’enregistrement Adaptateur c.a.
NEC-ADA201 Eng/Fr. manual 9/8/98 12:27 PM Page 23 Démarrage rapide Mode de fixation du système IntelliBasemc Audio à votre moniteur de marque MultiSync® S’ASSURER QUE LE MONITEUR EST DÉBRANCHÉ DU SYSTÈME ET DÉBRANCHÉ DE LA PRISE DE COURANT AVANT D’EFFECTUER QUELQUE TRAVAIL QUE CE SOIT SUR LE MONITEUR. POUR LES MONITEURS DE 21 POUCES, IL EST RECOMMANDÉ DE FAIRE PARTICIPER DEUX PERSONNES À L’ENSEMBLE DU PROCESSUS D’INSTALLATION.
NEC-ADA201 Eng/Fr. manual 9/8/98 12:27 PM Page 24 Noms des modèles de moniteurs MultiSync MultiSync 50, MultiSync 70, XV15 et XV15+ Étape 1 Le moniteur étant débranché du système et de la prise de courant, renverser soigneusement le moniteur sur une table solide de manière à ce que la base soit dirigée vers le haut comme illustré à la Figure 1.
NEC-ADA201 Eng/Fr. manual 9/8/98 12:27 PM Étape 3 Repérer la plaque adaptatrice « A » fournie avec l’IntelliBase, et la fixer à l’axe à l’aide de la vis qui a été déposée à l étape 2, comme illustré à la Figure 2B. Étape 4 Repérer les deux vis qui sont fournies avec l’IntelliBase, et fixer l’IntelliBase à la plaque adaptatrice et au moniteur comme illustré à la Figure 2C.
NEC-ADA201 Eng/Fr. manual 9/8/98 12:27 PM Page 26 Noms des modèles de moniteurs MultiSync MultiSync 90, XE15, XE17, XP15, XP17, XV17, XV17+, A500, A500+ A700, A700+, A900, E500, E700, E900, E900+, M500, M700 et P750 MONITEUR EN POSITION POUR RETIRER LA BASE ET FIXER L’INTELLIBASE Étape 1 Le moniteur étant débranché du système et de la prise de courant, renverser soigneusement le moniteur sur une table solide de manière à ce que la base soit dirigée vers le haut comme illustré à la Figure 1.
NEC-ADA201 Eng/Fr. manual 9/8/98 12:27 PM Page 27 Étape 3 À l’aide d’un tournevis à Figure 3B empreinte cruciforme, retirer la vis retenant les deux moitiés de base ensemble comme illustré à la Figure 3B. Conserver la vis et la rondelle en nylon noir pour utilisation à l’étape suivante. Étape 4 Repérer la plaque Figure 3C adaptatrice « B » fournie avec l’IntelliBase, et la fixer à l’axe à l’aide de la vis et de la rondelle en nylon noir qui ont été déposées à l’étape 2, comme illustré à la Figure 3C.
NEC-ADA201 Eng/Fr. manual 9/8/98 12:27 PM Étape 6 Repérer les deux vis qui sont fournies avec FAIRE TOURNER LA PLAQUE ADAPTATRICE l’IntelliBase, JUSQU’À CE QU’ELLE SOIT ALIGNÉE À et fixer TRAVERS LES TROUS DE LA BASE. l’IntelliBase à la plaque adaptatrice et au moniteur comme illustré à la Figure 3E. Page 28 Figure 3E INTELLIBASE (VUE DEPUIS LE BAS) Passer à la page 28 pour raccorder le moniteur MultiSync avec IntelliBase Audio à votre système.
NEC-ADA201 Eng/Fr. manual 9/8/98 12:28 PM Page 29 Étape 2 À l’aide d’un tournevis à empreinte cruciforme, retirer les trois vis retenant la base d’origine au moniteur. Retirer la base en la faisant glisser et en la soulevant comme illustré à la Figure 4A. Conserver ces vis pour utilisation à l’étape 5. Conserver la base d’origine en vue d’une éventuelle utilisation future.
NEC-ADA201 Eng/Fr. manual 9/8/98 12:28 PM Étape 5 Une fois la plaque adaptatrice fixée à la base, enclencher l’ensemble de base au moniteur. À cette fin, positionner toutes les pattes de blocage sur la base de manière à les assortir aux trous du moniteur. Faire glisser l’ensemble de base en place comme illustré à la Figure 4D. Page 30 Figure 4D Étape 6 En utilisant deux des vis qui ont été retirées Figure 4E à l’étape 2, fixer l’ensemble de plaque adaptatrice au moniteur.
NEC-ADA201 Eng/Fr. manual 9/8/98 12:28 PM Étape 8 Repérer les deux vis qui sont fournies avec FAIRE TOURNER LA ADAPTATRICE l’IntelliBase, PLAQUE JUSQU’À CE QU’ELLE SOIT ALIGNÉE et fixer À TRAVERS LES TROUS DE LA BASE. l’IntelliBase à la plaque adaptatrice et au moniteur comme illustré à la Figure 4G. Page 31 Figure 4G INTELLIBASE (VUE DEPUIS LE BAS) Passer à la section ci-après pour raccorder le moniteur MultiSync avec IntelliBase Audio à votre système.
NEC-ADA201 Eng/Fr. manual 9/8/98 12:28 PM Page 32 Étape 2 Brancher une extrémité du câble audio fourni à la prise d’entrée audio située à l’arrière de l’IntelliBase (Détail B) et l’autre extrémité à la prise de sortie audio (ligne) de votre système informatique (Détail A) comme illustré à la Figure 6. Figure 6 – VUE ARRIERE SORTIE DE LIGNE AUDIO DETAIL A VOIR DÉTAIL A VOIR DÉTAIL B Étape 3 Brancher une extrémité de l’adaptateur c.a. fourni à la prise d’entrée c.c.
NEC-ADA201 Eng/Fr. manual 9/8/98 12:28 PM Page 33 Commandes POWER : Appuyer sur le bouton POWER pour mettre l’IntelliBasemc en marche ou à l’arrêt. Un témoin lumineux au-dessus du bouton s’allumera pour montrer que l’appareil est sous tension. MUTE : Appuyer sur ce bouton pour couper temporairement le son. Le son est coupé lorsque le témoin lumineux au-dessus du bouton s’allume. Appuyer à nouveau sur ce bouton pour remettre le son.
NEC-ADA201 Eng/Fr.
NEC-ADA201 Eng/Fr. manual 9/8/98 12:28 PM Page 35 Dépannage SYMPTÔME PROBLÈME POSSIBLE SOLUTION REMARQUE Pas de son dans les hautparleurs L’appareil n’est pas branché. S’assurer que toutes les prises de connexion entre l’IntelliBase et l’ordinateur sont bien enfoncées. Vérifier que la prise électrique murale ou la multiprise est alimentée en courant. S’assurer que les interrupteurs de la multiprise et l’IntelliBase sont bien ouverts.
NEC-ADA201 Eng/Fr. manual 9/8/98 12:28 PM Page 36 Références • BBS (978) 742-8706 Le NEC Technologies Remote Bulletin Board System est un service électronique accessible par l’intermédiaire de votre système et d’un modem.
NEC-ADA201 Eng/Fr. manual 9/8/98 12:28 PM Page 37 Garantie limitée NEC Technologies, Inc. (ci-après « NECTECH ») garantit que ce produit est exempt de vices de matériaux et d’exécution et, sous réserve des conditions énoncées ci-après, convient de réparer ou de remplacer (au choix exclusif de NECTECH) toute pièce de l’appareil qui s’avère défectueuse pendant une période de trois (3) ans depuis la date d’achat par le consommateur d’origine.
NEC-ADA201 Eng/Fr.
NEC-ADA201 Eng/Fr.
NEC-ADA201 Eng/Fr. manual 9/8/98 12:28 PM Page 40 PROPRIETARY NOTICE AND LIABILITY DISCLAIMER The information disclosed in this document, including all designs and related materials, is the valuable property of NEC Technologies and/or its licensors, as appropriate, reserve all patent, copyright and other proprietary rights to this document, including all design, manufacturing, reproduction, use and sales rights thereto, except to the extent said rights are expressly granted to others.