AccuSync LCD22WMGX AccuSync LCD24WMCX User’s Manual
TO PREVENT FIRE OR SHOCK HAZARDS, DO NOT EXPOSE THIS UNIT TO RAIN OR MOISTURE. ALSO, DO NOT USE THIS UNIT’S POLARIZED PLUG WITH AN EXTENSION CORD RECEPTACLE OR OTHER OUTLETS UNLESS THE PRONGS CAN BE FULLY INSERTED. REFRAIN FROM OPENING THE CABINET AS THERE ARE HIGH VOLTAGE COMPONENTS INSIDE. REFER SERVICING TO QUALIFIED SERVICE PERSONNEL. CAUTION RISK OF ELECTRIC SHOCK • DO NOT OPEN CAUTION: TO REDUCE THE RISK OF ELECTRIC SHOCK, DO NOT REMOVE COVER (OR BACK). NO USER SERVICEABLE PARTS INSIDE.
For the Customer to use in U.S.A. or Canada Canadian Department of Communications Compliance Statement DOC: This Class B digital apparatus meets all requirements of the Canadian Interference-Causing Equipment Regulations. Cet appareil numérique de la classe B respecte toutes les exigences du Règlement sur le matériel brouiller du Canada. C-UL: Bears the C-UL Mark and is in compliance with Canadian Safety Regulations according to CSA C22.2 No. 60950-1.
English Contents Your new NEC LCD monitor box* should contain the following: • LCD monitor with tilt base • Power Cord • Video Signal Cable (15-pin mini D-SUB to 15-pin mini D-SUB male) • Video Signal Cable (DVI-D to DVI-D) • Audio Cable • User’s Manual • CD-ROM • Base Stand • Cable Holder DVI-D to DVI-D User’s Manual * Power Cord 15-pin mini D-SUB to 15-pin mini D-SUB male Audio Cable Cable Holder CD-ROM LCD monitor (Stand not connected) Remember to save your original box and pac
LCD22WMGX LCD24WMCX 1 SPDIF OUT Outputs the Digital audio signal from HDMI (COAXIAL). 2 Component (Audio) Connects Component Audio. 3 Component (Video) Connects Component Video. 4 Headphone Jack Connects headphones to the monitor. 5 AUDIO IN Connects audio input from PC. 6 D-SUB Connects to analog RGB input. 7 DVI-D Connects to digital RGB input. 8 HDMI Connects to digital HDMI signals. 9 AC IN Connects power cord to monitor.
4. To attach the Cable Holder: Attach the Cable Holder on to the Base. Insert the hooks on the Cable Holder into the holes at the back of the Stand and slide the Cable Holder downward into place (Figure B.1). NOTE: Please confirm that the tabs are completely secure. NOTE: Adjust position of cable that place under the Cable holder to avoid damage for cable or monitor. NOTE: Please refer to Caution section of this manual for proper selection of power cord. 5.
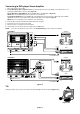
Connecting to DVD player, Stereo Amplifier 1. Turn off the power to the monitor. 2. For the DVD player with component out: Connect the Component connecter (RCA) on the LCD monitor, use a separately available RCA connector cable (Figure D). For the DVD Player with HDMI out: Connect HDMI cable to the DVD player (Figure D). NOTE: Refer to your DVD player user’s manual for more information. For the Stereo Amplifier: Connect HDMI cable to the DVD player.
English Remove Monitor Stand for Mounting To prepare the monitor for alternative mounting purposes: 1. Disconnect all cables. 2. Place monitor face down on a non-abrasive surface (Figure R.1). 3. Remove the 3 screws connecting the monitor to the stand and remove the stand as indicated (Figure R.1). The monitor is now ready for mounting in an alternative manner. 4. Connect the AC cord to the back of the monitor (Figure R.2). 5. Reverse this process to re-attach stand.
Controls OSD (On-Screen Display) control buttons on the front of the monitor function as follows: 1. Basic Key function SOURCE Button OSD Off Select Signal OSD ON -/< AUTO +/> Active Auto Shortcut to volume Adjustment function window. (Press over 2 seconds) Shortcut to volume window.
Color Temp. Contrast Normal Contrast from Digital-register. Recalls Normal Color Temperature. (RGB value is non-adjustable). Brightness Backlight Adjustment. Warm DV Mode Recalls Warm Color Temperature. (RGB value is non-adjustable). Adjusts picture as following.
Demo DDC/CI Enhances Area in half Picture. Whether DEMO on or off, it is effected Full Enhance, Nature-Skin, Green-Field, Sky-blue, Auto Detect displays in the left side screen. Turns on or off the two-way communication between the graphics card and the monitor. With DDC/CI turned on, some monitor settings can be adjusted through the graphics card using a computer. Picture Boost Reset Clears each old status of Auto-configuration and sets the color temperature to Warm and recall.
Safety Precautions and Maintenance FOR OPTIMUM PERFORMANCE, PLEASE NOTE THE FOLLOWING WHEN SETTING UP AND USING THE LCD COLOUR MONITOR: • DO NOT OPEN THE MONITOR. There are no user serviceable parts inside and opening or removing covers may expose you to dangerous shock hazards or other risks. Refer all servicing to qualified service personnel. • Do not spill any liquids into the cabinet or use your monitor near water.
CORRECT PLACEMENT AND ADJUSTMENT OF THE MONITOR CAN REDUCE EYE, SHOULDER AND NECK FATIGUE. CHECK THE FOLLOWING WHEN YOU POSITION THE MONITOR: • • • For optimum performance, allow 20 minutes for warm-up. Adjust the monitor height so that the top of the screen is at or slightly below eye level. Your eyes should look slightly downward when viewing the middle of the screen. Position your monitor no closer than 40 cm and no further away than 70 cm from your eyes. The optimal distance is 50 cm.
Monitor Specifications AccuSync LCD22WMGX Monitor LCD Module Diagonal: 55.9 cm/22 inches Viewable Image Size: 55.9 cm/22 inches Native Resolution (Pixel Count): 1680 x 1050 Input Signal Head phone: Stereo Mini Jack Digital Audio: S/PDIF 0.5Vp-p (HDMI input source only) Display Colours 16,7 M Depends on display card used. Synchronization Range Horizontal: 30 kHz to 83.
Specifications - LCD24WMCX Monitor Specifications AccuSync LCD24WMCX Monitor LCD Module Diagonal: 61 cm/24 inches Viewable Image Size: 61 cm/24 inches Native Resolution (Pixel Count): 1920 x 1200 Input Signal Active matrix; thin film transistor (TFT) liquid crystal display (LCD); 0.270 mm dot pitch; 400 cd/m2 white luminance, 1000:1 contrast ratio, typical, response time: 5 ms. PC INPUT: Video: Analog Input: 0.7 Vp-p/75 Ohms Digital Input: DVI Sync: Separate sync.
Reduced Footprint: Provides the ideal solution for environments requiring superior image quality but with size and weight limitations. The small footprint and low weight allow it to be moved or transported easily from one location to another. No-touch Auto Adjust: No-touch Auto Adjust automatically adjusts the monitor to optimal settings upon initial setup.
Troubleshooting No picture • The signal cable should be completely connected to the display card/computer. • The display card should be completely seated in its slot. • Check front power Switch and computer power switch should be in the ON position. • Check to make sure that a supported mode has been selected on the display card or system being used. (Please consult display card or system manual to change graphics mode.
English TCO’06 (LCD24WMCX Only) Congratulations! The product you have just purchased carries the TCO’06 Media Displays label. This means that your display is designed and manufactured according to some of the strictest performance and environmental criteria in the world. The manufacturer of this display has selected it to be certified to TCO’06 Media Displays as a sign of usability, high performance and reduced impact on the natural environment.
Manufacturer’s Recycling and Energy Information NEC DISPLAY SOLUTIONS is strongly committed to environmental protection and sees recycling as one of the company’s top priorities in trying to minimize the burden placed on the environment. We are engaged in developing environmentallyfriendly products, and always strive to help define and comply with the latest independent standards from agencies such as ISO (International Organisation for Standardization) and TCO (Swedish Trades Union).