
Operation Manual

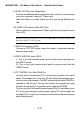


Table Of Contents
- INTRODUCTION
- INSTALLATION AND CONNECTIONS
- PROJECTING AN IMAGE
- CONVENIENT FEATURES
- USING THE VIEWER
- USING ON-SCREEN MENU
- Basic Menu Operation
- Menu Descriptions & Functions
- Source Select
- Picture (not available for Viewer and LAN)
- Volume
- Image Options
- Selecting Aspect Ratio (not available for Viewer and LAN)
- Masking Unwanted Area (Blanking)
- Adjusting Position and Clock
- Selecting Resolution
- Selecting Overscan Percentage
- Selecting Video Filter Level (not available for Video, Viewer and LAN)
- Selecting Noise Reduction Level (not available for RGB, Viewer and LAN)
- Picture Management
- Projector Options
- Tools
- Help
- Returning to Factory Default
- MAINTENANCE
- TROUBLESHOOTING
- SPECIFICATIONS
- APPENDIX
E-17
INTRODUCTION
⬎
Part Names of the Remote Control
17. ASPECT Button
Press this button to display the Aspect Ratio select screen. See page
E-86.
18. FREEZE Button
This button will freeze a picture. Press again to resume motion.
19. 3D REFORM Button
Press this button to enter 3D Reform to correct the keystone (trapezoi-
dal) distortion, and make the image square. See page E-45.
20. HELP Button
Provides the online help or the set information.
21. POINTER Button
Press this button to display one of the eight pointers; press again to
hide the pointer. You can move your pointer icon to the area you want
on the screen using the Select button. See page E-55.
22. VOLUME (+) (–) Button
Press (+) to increase the volume and (–) to decrease it.
23. MAGNIFY (+) (–) Button
Use this button to adjust the image size up to 400%. When the pointer
is displayed, the image is magnified about the center of the pointer.
When the pointer is not displayed, the image is magnified about the
center of the screen. When the image is magnified, the pointer is
changed to the magnifying icon. See page E-56.
24. PICTURE Button
Press this button to display the Picture adjustement screen such as
Brightness, Contrast, Color, Hue, and Sharpness. See page E-85.