
Operation Manual


65
3. Convenient Features
10
.Dragtheselected[•]marktothepointyouwishtocor-
rectanddropit.
• Whenyouclicksomewherewithintheprojectimagearea,
the nearest [ •] markwillgo tothe positionwhere the
mouse cursor is.
11
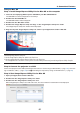
.RepeatStep9and10tocorrectthedistortionofthepro-
jectedimage.
12
.Aftercompleting,right-clickthemouse.
The green frame and the mouse pointer will disappear from the projected image area. This will complete the cor-
rection.
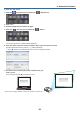
13
.Clickthe“X”(close)buttononthe“4-pointCorrection”window.
The“4-pointCorrection”windowwilldisappearandthe4-pointcorrectionwilltakeeffect.
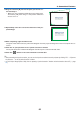
14
.Clickthe“ ”buttononthecontrolwindowtoexittheGCT.
TIP:
• Afterperformingthe4-pointcorrection,youcansavethe4-pointcorrectiondatatotheprojectorbyclicking“File”→“Exportto
theprojector…”onthe“4-pointCorrection”window.
• SeetheHelpofImageExpressUtilityLiteforoperating“4-pointCorrection”windowandotherfunctionsthanGCT.(→page
58)