USER'S MANUAL 22" DiamondtronUWG RDF225WG 20" Viewable Image Size www.mitsubishidisplay.
Index Warning .................................................................................................................... 1 Features .................................................................................................................. 2 Contents ................................................................................................................. 3 Quick Start .............................................................................................................
WARNING TO PREVENT FIRE OR SHOCK HAZARDS, DO NOT EXPOSE THIS UNIT TO RAIN OR MOISTURE. ALSO, DO NOT USE THIS UNIT'S POLARIZED PLUG WITH AN EXTENSION CORD RECEPTACLE OR OTHER OUTLETS UNLESS THE PRONGS CAN BE FULLY INSERTED. REFRAIN FROM OPENING THE CABINET AS THERE ARE HIGH VOLTAGE COMPONENTS INSIDE. REFER SERVICING TO QUALIFIED SERVICE PERSONNEL. CAUTION RISK OF ELECTRIC SHOCK • DO NOT OPEN CAUTION: TO REDUCE THE RISK OF ELECTRIC SHOCK, DO NOT REMOVE COVER (OR BACK). NO USER SERVICEABLE PARTS INSIDE.
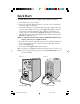
Contents Your new RDF225WG monitor box* should contain the following: • • • • RDF225WG monitor with tilt/swivel base Power Cord Video Signal Cable (D-Sub to D-Sub) User’s Manual Video Signal Cable Power Cord User’s Manual * Remember to save your original box and packing material to transport or ship the monitor. 2 RDF225WGmanual051804.
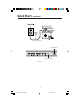
Quick Start To attach the monitor to your system, follow these instructions: 1. Turn off the power to your computer. 2. If necessary, install the display card into your system. For more information, refer to the display card manual. 3. For the PC: Connect the 15-pin mini D-SUB of the captive signal cable to the connector of the display card in your system (Figure A.1). Tighten all screws. For the Mac: Connect the Macintosh cable adapter (not included) to the monitor connector on the Macintosh (Figure B.1).
Quick Start –continued Figure C.1 Power Button Power Indicator Figure D.1 4 RDF225WGmanual051804.
Controls OSD (On-Screen Display) control buttons on the front of the monitor function as follows: Main Menu Exits the OSD menu. EXIT Sub-Menu Exits to the OSD controls main menu. Note : Deactivates the OSD menu and activates the OSD menu when the OSD is turned off. CONTROL / Moves the highlighted area left/right to select one of the sub-menus. CONTROL –/+ Has no function. Moves the highlighted area left/right to select one of the controls.
Controls –continued Color Control System Color presets selects the desired color setting. The bar is replaced by the color setting choice. Each color setting is adjusted at the factory to the stated Kelvin. If a setting is adjusted, the name of the setting will change from Kelvin to Custom except sRGB mode. Red, Green, Blue: AccuColor Control System decreases or increases the monitor's red, green or blue color guns depending upon which is selected.
Controls –continued Corner Purity Control: Eliminates picture impurities that may result from the earth’s magnetic field. While in the sub-menus (TL: Top Left, TR: Top Right, BL: Bottom Left, BR: Bottom Right or L/R: Left/Right, use the –/+ control buttons to fine tune the Corner Purity corrections. NOTE: We recommend that you perform Corner Purity correction while running a typical application such as a spreadsheet or text document. Tools 2 Language: OSD controls menus are available in 6 languages.
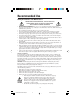
Recommended Use Safety Precautions and Maintenance FOR OPTIMUM PERFORMANCE, PLEASE NOTE THE FOLLOWING WHEN SETTING UP AND USING THE MITSUBISHI COLOR MONITOR: • DO NOT OPEN THE MONITOR. There are no user serviceable parts inside and opening or removing covers may expose you to dangerous shock hazards or other risks. Refer all servicing to qualified service personnel. • Do not spill any liquids into the cabinet or use your monitor near water.
Recommended Use –continued CORRECT PLACEMENT AND ADJUSTMENT OF THE MONITOR CAN REDUCE EYE, SHOULDER AND NECK FATIGUE. CHECK THE FOLLOWING WHEN YOU POSITION THE MONITOR: • Adjust the monitor height so that the top of the screen is at or slightly below eye level. Your eyes should look slightly downward when viewing the middle of the screen. • Position your monitor no closer than 16 inches and no further away than 24 inches from your eyes. The optimal distance is 20 inches.
Specifications Monitor Specifications Picture Tube Diagonal: Viewable Image Size: Radius: RDF225WG Monitor Notes 22 inch/550mm 20 inch/508mm 50,000 mm 90° deflection, 0.24 mm grille pitch, wide color gamut phosphor, aperture grille CRT, G-WARAS coating Luminanace (peak) 100cd/m2 @ 9300K 80cd/m2 @ 6500K 70cd/m2 @ 5000K Color Coordinates Red: x=0.650, y=0.321 Green: x=0.208, y=0.690 – long phosphor persistance time Blue: x=0.151, y=0.070 Color Gamut 97.6% of Adobe RGB 93.
Features Wide color gamut 22-inch CRT monitor that supports Adobe RGB. Designed for use in high-end graphics applications including Digital Still Camera and imaging, provides the highest level of color matching to other output devices. Flat Aperture Grille CRT: Delivers an unparalleled viewing experience with a virtually flat image, eliminating distortion and reducing glare so that what you see on-screen is what you get on your printed output.
Troubleshooting No picture • • • • Display card should be completely seated in its slot. Power Button and computer power switch should be in the ON position. Signal cable should be completely connected to display card/computer. Check connector for bent or pushed-in pins. Image is scrolling or unstable • Signal cable should be completely attached to the computer. • Check pin assignments and signal timings of the monitor and your display card with respect to recommended timings and pin assignments.
References NEC-Mitsubishi Monitor Customer Service & Support Customer Service and Technical Support: (800) 632-4662 Fax: (800) 695-3044 Parts and Accessories/Macintosh Cable Adapter: (888) NEC-MITS [888-632-6487] Customer Service Policies & Processes: http://www.necmitsubishi.com/ css/ServicePolicies/ServicePolicies.htm Online Technical Support Knowledge Base: http://www.necmitsubishi.com/ css/knowledgebase.cfm Customer Service & Technical Support Email: http://www.necmitsubishi.com/ css/techform.
Limited Warranty NEC-Mitsubishi Electronics Display of America, Inc. (hereinafter “NMD-A”) warrants this Product to be free from defects in material and workmanship and, subject to the conditions set forth below, agrees to repair or replace (at NMD-A’s sole option) any part of the enclosed unit which proves defective for a period of three (3) years from the date of first consumer purchase. Spare parts are warranted for ninety (90) days.
AVERTISSEMENT AFIN D’ÉVITER TOUT RISQUE D’INCENDIE OU D’ÉLECTROCUTION, NE PAS EXPOSER CET APPAREIL À LA PLUIE OU À L’HUMIDITÉ. NE PAS UTILISER LA FICHE D’ALIMENTATION POLARISÉE AVEC UNE PRISE DE CORDON DE RALLONGE OU AUTRE PRISE SAUF SI LES BROCHES PEUVENT ÊTRE ENTIÈREMENT INTRODUITES. NE PAS OUVRIR LE BOÎTIER, LEQUEL CONTIENT DES COMPOSANTS À HAUTE TENSION. CONFIER TOUS TRAVAUX À DU PERSONNEL TECHNIQUE QUALIFIÉ.
Contenu La boîte* de votre nouveau moniteur RDF335WG contient : • Moniteur RDF225WG avec base pivotante/inclinable • Câble pour le signal vidéo • Cordon d’alimentation • Manuel de l’utilisateur Câble pour le signal vidéo Cordon d’alimentation Manuel de l’utilisateur * Ne pas oublier de conserver la boîte et le matériel d’emballage d’origine pour transporter ou expédier le moniteur. 16 RDF225WGmanual051804.
Mise en marche rapide Pour raccorder le moniteur au système, suivre les directives ci-après : 1. Mettre l'ordinateur hors tension. 2. Si nécessaire, installer la carte vidéo dans le système. Pour plus d'informations, se reporter au guide de l’utilisateur de la carte vidéo. 3. Pour le PC : Connecter la mini-fiche D-SUB à 15 broches du câble de signal captif au connecteur de la carte vidéo du système (Figure A.1). Serrer toutes les vis.
Mise en march rapide (suite) Figure C.1 Commutateur d’alimentation Power Button Power d’alimentation Indicator Voyant Figure D.1 18 RDF225WGmanual051804.
Commandes Les touches de commandes OSD à l'avant du moniteur fonctionnent comme suit : Menu principal Sous-menu EXIT Quitte le menu OSD. Retour au menu principal OSD. Remarque : Désactive le menu OSD et active le menu OSD lorsque l’OSD est éteint. CONTROL / Déplace la zone en surbrillance vers Déplace la zone en surbrillance vers gauche/droite pour sélectionner une gauche/droite pour sélectionner une des sous-menu. des commandes.
Commandes (suite) Petit/Grand : Augmente ou diminue le format vertical de l'image. Systèmes de contrôle de couleur Le mode de préréglage des couleurs permet de sélectionner les paramétres de couleur désirés. La barre de couleurs est remplacée par le choix des paramétres couleur. Chaque paramétre couleur est ajusté à l’usine afin de correspondre au standard Kelvin. Lorsqu’un des paramétres est modifié, le nom de la configuration change et Kelvin est remplacé par «custom», excepté en mode sRGB.
Commandes Commandes (suite) Convergence : Aligne les trois couleurs (R, V, B) pour composer une seule couleur (blanc). Cette commande a pour but d’assurer qu’une ligne blanche dessinée à l’écran est aussi précise et nette que possible. • En utilisant le réglage ‹‹horizontal››, vous ajustez l’alignement des lignes dans le sens haut/bas. • En utilisant le réglage ‹‹vertical››, vous ajustez l’alignement des lignes dans le sens gauche/droite.
Commandes (suite) Touches directes : Cette sélection vous permet d’utiliser pour contrôler la luminosité et –/+ pour contrôler le contraste. Préréglage usine : Cette fonction vous permet de remettre tous les paramètres de l’OSD à leur état d’origine. Une fenêtre d’alerte vous demandera de confirmer si vous désirez rappeller tous les réglages usine. Les réglages individuels peuvent être réinitialisés en mettant en surbrillance la commande à réinitialiser, puis en appuyant sur le bouton RESET.
Usage recommandé Consignes de sécurité et d’entretien POUR UN FONCTIONNEMENT OPTIMAL, PRIÈRE DE NOTER CE QUI SUIT POUR LE RÉGLAGE ET L'UTILISATION DU MONITEUR COULEUR MITSUBISHI: • NE PAS OUVRIR LE MONITEUR. Aucune pièce intérieure ne nécessite l'intervention de l'utilisateur, et l'ouverture ou la dépose des couvercles peut entraîner des risques de décharges électriques dangereuses ou d'autres risques. Confier tous travaux à du personnel technique qualifié.
Usage recommandé (suite) LA MODIFICATION DE LA POSITION ET DU RÉGLAGE DU MONITEUR PEUT RÉDUIRE LA FATIGUE DES YEUX, DES ÉPAULES ET DE LA NUQUE. OBSERVER LES DIRECTIVES CI-APRÈS LORS DU POSITIONNEMENT DU MONITEUR : • Régler la hauteur du moniteur de sorte que le dessus de l'écran soit au niveau ou légèrement endessous du niveau des yeux. Les yeux doivent regarder légèrement vers le bas lorsque l'on regarde le milieu de l'écran.
Fiche technique Caractér.
Fonctions Moniteur CRT 22 po à large gamme de couleurs qui supporte RVB Adobe. Conçu pour une utilisation d’applications graphiques haut de gamme y compris les caméras fixes numérique et l’imagerie, offre le niveau le plus élevé de reproduction de couleurs à d’autres dispositifs de sortie.
Fonctions (suite) Technologie multifréquences : Ajuste automatiquement le moniteur à la fréquence de balayage de la carte vidéo, affichant ainsi la résolution requise. Capabilité FullScan : Vous permet d’utiliser le champ d’écran entier dans la plupart des résolutions, ce qui augmente considérablement la taille de l’image.
Dépannage Pas d'image • La carte vidéo doit être complètement introduite dans son logement. • La touche d'alimentation et le commutateur d'alimentation de l'ordinateur doivent être en position ON (Marche). • Le câble d’interface doit être bien connecté à la carte vidéo/l'ordinateur. • Vérifier si les broches du connecteur ne sont pas pliées ou renfoncées. L'image défile ou est instable • Le câble d’interface doit être bien fixé à l'ordinateur.
Références Service à la clientèle et assistance technique du moniteur MEC-Mitsubishi Service à la clientèle et assistance technique: (800) 632-4662 Télécopieur: (800) 695-3044 Pièces et accessoires/adaptateur de câble Macintosh: Politiques et processus du service à la clientèle: Base de connaissance de l’assistance technique en lign: Adresse électronique du service à la clientèle et de l’assistance technique: (888) NEC-MITS [888-632-6487] http://www.necmitsubishi.com/ css/ServicePolicies/ServicePolicies.
Garantie limitée NEC-Mitsubishi Electronics Display of America, Inc. (ci-après «NMD-A») garantit que ce produit est exempt de vice de fabrication et de main-d’oeuvre et, selon les conditions énoncées ci-dessous, accepte de réparer ou remplacer, à sa discrétion, toute pièce de l’appareil concerné qui s’avérerait défectueuse et ce, pendant une période de trois (3) ans à partir de la date d’achat initial. Les pièces de rechange sont garanties pendant quatre-vingt dix (90) jours.
DiamondtronUWG RDF225WG AVIS DE PROPRIÉTÉ EXCLUSIVE ET DE DÉGAGEMENT DE RESPONSABILITÉ Les informations contenues dans ce document, y compris tous les designs et matériel s'y rapportant, sont la propriété de NEC-Mitsubishi Electronics Display of America et/ou ses concédants.
DiamondtronUWG RDF225WG PROPRIETARY NOTICE AND LIABILITY DISCLAIMER The information disclosed in this document, including all designs and related materials, is the valuable property of NEC-Mitsubishi Electronics Display of America and/or its licensors, as appropriate, reserve all patent, copyright and other proprietary rights to this document, including all design, manufacturing, reproduction, use and sales rights thereto, except to the extent said rights are expressly granted to others.