MultiSync FE1250+ User’s Manual
Canadian Department of Communications Compliance Statement DOC: This Class B digital apparatus meets all requirements of the Canadian Interference-Causing Equipment Regulations. C-UL: Bears the C-UL Mark and is in compliance with Canadian Safety Regulations according to CSA C22.2 #950. FCC Information 1. 2. Use the attached specified cables with the MultiSync NSV1117STTKW colour monitor so as not to interfere with radio and television reception.
Declaration Declaration of the Manufacturer We hereby certify that the color monitor MultiSync FE1250+ (NSV1117STTKW) is in compliance with Council Directive 73/23/EEC: - EN 60950 Council Directive 89/336/EEC: - EN 55022 - EN 61000-3-2 - EN 61000-3-3 - EN 55024 and marked with NEC-Mitsubishi Electric Visual Systems Corporation 4-13-23, Shibaura, Minato-Ku Tokyo 108-0023, JAPAN English-2
WARNING TO PREVENT FIRE OR SHOCK HAZARDS, DO NOT EXPOSE THIS UNIT TO RAIN OR MOISTURE. ALSO, DO NOT USE THIS UNIT’S POLARIZED PLUG WITH AN EXTENSION CORD RECEPTACLE OR OTHER OUTLETS UNLESS THE PRONGS CAN BE FULLY INSERTED. REFRAIN FROM OPENING THE CABINET AS THERE ARE HIGH VOLTAGE COMPONENTS INSIDE. REFER SERVICING TO QUALIFIED SERVICE PERSONNEL. CAUTION RISK OF ELECTRIC SHOCK • DO NOT OPEN TO REDUCE THE RISK OF ELECTRIC SHOCK, MAKE SURE POWER CORD IS UNPLUGGED FROM WALL SOCKET.
TCO’99 Congratulations! You have just purchased a TCO’99 approved and labeled product! Your choice has provided you with a product developed for professional use. Your purchase has also contributed to reducing the burden on the environment and also to the further development of environmentally adapted electronics products.
The energy requirements include a demand that the computer and/or display, after a certain period of inactivity, shall reduce its power consumption to a lower level in one or more stages. The length of time to reactivate the computer shall be reasonable for the user. Labelled products must meet strict environmental demands, for example, in respect of the reduction of electric and magnetic fields, physical and visual ergonomics and good usability.
The relevant TCO’99 demand requires that plastic components weighing more than 25 grams must not contain flame retardants with organically bound bromine or chlorine. Flame retardants are allowed in the printed circuit boards since no substitutes are available. Cadmium** Cadmium is present in rechargeable batteries and in the colourgenerating layers of certain computer displays. Cadmium damages the nervous system and is toxic in high doses.
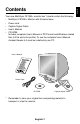
English Contents Your new MultiSync FE1250+ monitor box* should contain the following: • MultiSync FE1250+ Monitor with tilt/swivel base • Power cord • Captive Signal Cable • User’s Manual • CD-ROM: Includes complete User’s Manual in PDF format and Windows related files (Inf file and color profile). To see the complete User’s Manual, Acrobat Reader 4.0 must be installed at your PC.
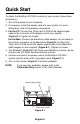
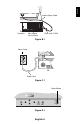
Quick Start To attach the MultiSync FE1250+ monitor to your system, follow these instructions: 1. Turn off the power to your computer. 2. If necessary, install the display card into your system. For more information, refer to the display card manual. 3. For the PC: Connect the 15-pin mini D-SUB of the captive signal cable to the connector of the display card in your system (Figure A.1). Tighten all screws.
English Captive Signal Cable Computer Mac Adapter (not included) 15-pin mini D-SUB Figure B.1 Power Outlet Power Cord Figure C.1 Power Button Figure D.
Controls OSM (On-Screen Manager) control buttons on the front of the monitor function as follows: EXIT Main Menu Sub-Menu Exits the OSM menu. Exits to the OSM main menu. CONTROL ▲/▼ Moves the highlighted area up/down to select one of the controls. Moves the highlighted area up/down to select one of the controls. CONTROL -/+ Moves highlighted area left/right to select one of the controls. Moves the bar in the - or + direction to decrease or increase the adjustment. PROCEED Has no function.
Left/Right: Moves the image horizontally (left or right). Down/Up: Moves the image vertically (up or down). Narrow/Wide: Decreases or increases the horizontal size of the image. Short/Tall: Decreases or increases the vertical size of the image. Color Control/Color Control System Color presets 1 through 5 selects the desired color setting. The bar is replaced by the color setting choice. Each color setting is adjusted at the factory to the stated Kelvin.
Left/Right: Moves the image horizontally (left or right). Down/Up: Moves the image vertically (up or down). Narrow/Wide: Decreases or increases the horizontal size of the image. Short/Tall: Decreases or increases the vertical size of the image. Color Control/Color Control System Color presets 1 through 5 selects the desired color setting. The bar is replaced by the color setting choice. Each color setting is adjusted at the factory to the stated Kelvin.
Factory Preset: Selecting Factory Preset allows you a reset most OSM control settings back to the factory settings. A warning statement will appear to confirm that you do want to reset ALL settings. Individual settings can be reset by high-lighting the control to be reset and pressing the RESET button. Tools 2 Language: OSM controls menus are available in six languages. OSM Position: You can choose where you would like the OSM controls menu to appear on your screen.
Information Display Mode: Indicates the current mode and frequency setting of the monitor. Monitor Info: Indicates the model and serial numbers of your monitor. Refresh Notifier: A message will advise you if the refresh rate of the signal being applied to the monitor by the computer is too low. For further information, please refer to your display card or system manual.
Safety Precautions and Maintenance: FOR OPTIMUM PERFORMANCE, PLEASE NOTE THE FOLLOWING WHEN SETTING UP AND USING THE MULTISYNC FE1250+ COLOR MONITOR: • DO NOT OPEN THE MONITOR. There are no user serviceable parts inside and opening or removing covers may expose you to dangerous shock hazards or other risks. Refer all servicing to qualified service personnel. • Do not spill any liquids into the cabinet or use your monitor near water.
CAUTION • Allow adequate ventilation around the monitor so that heat can properly dissipate. Do not block ventilated openings or place the monitor near a radiator or other heat sources. Do not put anything on top of monitor. • The power cable connector is the primary means of detaching the system from the power supply. The monitor should be installed close to a power outlet which is easily accessible. • Handle with care when transporting. Save packaging for transporting.
English Specifications Monitor Specifications MultiSync FE1250+ Notes Picture Tube Diagonal: Viewable Image Size: 55 cm/22 inch 50.8 cm/20 inch 90° deflection, 0.24 mm grill pitch, medium short persistence phosphor, aperture grille CRT, multi-layered, anti-static screen coating, dark-tint screen and OptiClear screen. Input Signal Video: Sync: Display Colours Analog input: Synchronization Range Horizontal: Vertical: ANALOG 0.7 Vp-p/75 Ohms Separate sync. TTL Level Horizontal sync.
Features Flat Aperture Grille CRT: Delivers an unparalleled viewing experience with a virtually flat image, eliminating distortion and reducing glare so that what you see on-screen is what you get on your printed output. The striped phosphor alignment of the CRT delivers superior vertical definition with improved bright-ness for more uniform image contrast. OptiClear Screen Surface: Reduces reflection and glare and increases contrast without sacrificing focus level, clarity or brightness.
Multiple Frequency Technology: Automatically adjusts monitor to the display card’s scanning frequency, thus displaying the resolution required. FullScan Capability: Allows you to use the entire screen area in most resolutions, significantly expanding image size. GlobalSync/Corner Purity Control: Allows you to easily adjust impurities in the four corners of your monitor. GTF Auto Adjust: Allows you to easily and quickly adjust the suitable horizontal and vertical size and position settings.
Troubleshooting No picture • Display card should be completely seated in its slot. • Power Button and computer power switch should be in the ON position. • Signal cable should be completely connected to display card/ computer. • Check connector for bent or pushed-in pins. Image is scrolling or unstable • Signal cable should be completely attached to the computer. • Check pin assignments and signal timings of the monitor and your display card with respect to recommended timings and pin assignments.
Thin horizontal lines appear on your screen • Thin horizontal lines are normal for an aperture grille CRT and are not a malfunction. These are shadows from the damper wires used to stabilize the aperture grille and are most noticeable when the screen’s background is light (usually white). Black vertical lines are visible on the screen • Thin vertical black lines on one or both sides of the screen. This minor condition is caused by grille element overlap which can occur during shipping.