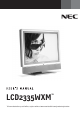
LCD2335WXM TM To learn about other special offers, register online at www.necmitsubishi.
Inde Indexx Important Information ................................................................................................................................................................ 1 Safety Precautions, Maintenance, & Recommended Use ....................................................................................................... 2 Contents .....................................................................................................................................................
Imp or ormat ion Impor ortt ant Inf Informat ormation WARNING TO PREVENT FIRE OR SHOCK HAZARDS, DO NOT EXPOSE THIS UNIT TO RAIN OR MOISTURE. ALSO, DO NOT USE THIS UNIT'S POLARIZED PLUG WITH AN EXTENSION CORD RECEPTACLE OR OTHER OUTLETS UNLESS THE PRONGS CAN BE FULLY INSERTED. REFRAIN FROM OPENING THE CABINET AS THERE ARE HIGH VOLTAGE COMPONENTS INSIDE. REFER SERVICING TO QUALIFIED SERVICE PERSONNEL. CAUTION CAUTION:TO REDUCE THE RISK OF ELECTRIC SHOCK, MAKE SURE POWER CORD IS UNPLUGGED FROM WALL SOCKET.
S af e ty P r e c aut ions e nance & R e comafe autions ions,, Maint Mainte Re me nde d Us e mende nded Use Safety P recautions and Maintenance Precautions FOR OPTIMUM PERFORMANCE, PLEASE NOTE THE FOLLOWING WHEN SETTING UP AND USING THE LCD2335WXM COLOR MONITOR: • DO NOT OPEN THE MONITOR. There are no user serviceable parts inside and opening or removing covers may expose you to dangerous shock hazards or other risks. Refer all servicing to qualified service personnel.
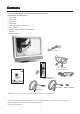
C ont ent onte ntss Your new NEC MultiSync® LCD2335WXMTM monitor box* contains the following items: • • • • • • • • LCD monitor Power Cord AC Adapter Audio Cable Video Signal Cable – VGA to VGA User’s Manual Wireless Remote Control and AA Batteries RF Cable • Relay Connector Power Cord Video Signal Cable (D-SUB to D-SUB Cable) Wireless Remote Control and AA Batteries AC Adapter User’s Manual RF cable Relay connector Audio Cable *Remember to save your original box and packing material to transport
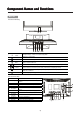
C omp one nt Name unc ompone onent Namess and FFunc uncttions Main Unit Front view of main body LED lights Green color --- Power is ON. LED lights Orange --- Monitor is in "Power Saving Mode". LED is off --- Power is OFF. 1 Indicator for Power 2 IR receiver IR receiver. 3 Power Turn on or off the main body. 4 Menu Open or Close the OSD menu. 5 Channel Select the next lower channel / higher channel (TV/AV mode) ; OSD function for selecting (PC mode).
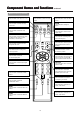
C omp one nt Name unc ompone onent Namess and FFunc uncttions continued Remote Control TV TUNER LED INDICATION POWER ON/OFF SOURCE SELECT SLEEP CH-LOCK ZOOM ASPECT CCD (Close Caption Display) PIP SWAP STILL VOLUME UP / DN (ST) CH UP / DN (ST) MUTE MENU LAST-CH PROGRAM / ADJUST (WX) SELECT (ST) ENTER DISPLAY MTS NUMBER KEYPAD AV2 AV1 AV3 RGB-1VGA AV4 RGB-2 DVI Installing the Batteries Handling the Remote Control Use the remote control within about 16 feet from front of the unit’s remote
C omp one nt Name unc ompone onent Namess and FFunc uncttions continued Remote Control (continued) POWER TV Source Press this button to turn the TV on or off. Press this button to choose TV as the source. Press this button to select the INPUT Source. SLEEP ZOOM Press this button to activate the Sleep Timer menu. Press this button to change the picture CH-LOCK CCD Press this button to select the V-chip function. Press this button to show the Close Caption menu.
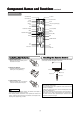
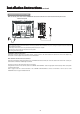
Ins ion Ins truc Instt allat llation Instruc tructtions Viewing Angle Adjustment This product is designed to allow users to have a comfortable viewing angle. The viewing angle can be adjusted from -5°to +20°. Warning: Do not force the LCD Monitor over its maximum viewing angle as stated above. Attempting this will result in damaging the Monitor and Monitor stand.
Ins ion Ins truc Instt allat llation Instruc tructtions continued Connecting to a Antenna / Cable Make sure that the power switch of the LCD MONITOR is turned off and that the unit is disconnected from the AC power source. Monitor rear panel Antenna Precautions when connecting the antenna Use a coaxial cable which is free from interference. Avoid using a parallel flat wire as interference may occur, causing the reception to become unstable and noise to appear on the screen.
Ins ion Ins truc Instt allat llation Instruc tructtions continued Connecting to a Video Components 1. Make sure that the power switch of the LCD MONITOR is turned off. 2. Make sure that the power switch of the Video component is turned off.
Ins ion Ins truc Instt allat llation Instruc tructtions continued Connecting to a PC Choose an appropriate site and install the product on a level table where the stand is secure. Ensure that a power socket is readily accessible near the place where you install the LCD MONITOR. Make sure that the power switch of this device is turned off. 1. Make sure that the display signal of the personal computer to be used is compatible with the specifications of this device.
Op erat ing Ins truc Ope ating Instruc tructtions Turning Power On and Off Power Lamp To turn the LCD MONITOR power ON/OFF, press the POWER button or the ON/OFF button on the remote control. The power lamp will light and turn to green, the LCD MONITOR will turn on. Note: During normal use, the main power switch is set in the ON position. z Power lamp Power lamp Power lamp Off Off Lights green On Operation The OFF button on the remote control or the POWER button is OFF.
Op erat ing Ins truc Ope ating Instruc tructtions continued SOURCE button Volume Adjustment VOLUME buttons ENTER TV>AV>PC CH The volume can be adjusted by pressing the S and T buttons of the remote control. MENU Volume setting value Adjustment status guide TV z When the volume buttons are pressed, the volume adjustment status guide will be displayed. z The volume will increase when the VOL+ (or S) button is pressed while SOURCE the guide is being displayed.
Op e rat ing Ins truc Ope ating Instruc tructtions continued Main buttons: 1. PICTURE PARAMETERS MENU 2. PC PARAMETERS MENU 3. AUDIO SETTING MENU 4. PICTURE-in-PICTURE MENU 5. CHANNEL SETTING MENU 6. PARENTAL CONTROLS MENU 7. GENERAL SETTING MENU Picture Parameters BRIGHTNESS CONTRAST COLOR TINT COLOR TEMP FLESHTONE SHARPNESS WARM NORMAL COOL USER USER R 0 USER G USER B 1. Press the “MENU” button to display the Main Menu screen. 2.
Op erat ing Ins truc Ope ating Instruc tructtions continued PC Parameters AUTO CLOCK YES NO PHASE POSITION Selected characters W Setup hint X AUTO Press the light on. ENTER button to make the word “YES” Normally set to NO mode. Adjust automatically for clock, phase, and CLOCK Reduces the dot clock. Increases the dot clock. Adjust for maximum character clarity. PHASE Slows the dot clock Phase Advances the dot clock Phase Adjust for clear character visibility.
Op e rat ing Ins truc Ope ating Instruc tructtions continued Channel Setting *Note: The TV must be in TV mode for access to this Menu. When operating the TV at first time, its TV system is at “default factory mode” and this mode cannot display the image normally on the screen. In order to watch the TV program without problem, please refer to the follow steps to setup the TV system accordingly for normally display 1.
Op e rat ing Ins truc Ope ating Instruc tructtions continued Channel Setting (Continued) 4.Channel Edit setting CHANNEL ADD: Change the OSD channel number from Red to Green SELECT: ENTER: ADJUST: 12 12 12 12 RETURN: MENU CHANNEL DELETE:Change the OSD channel number from Green to Red SELECT: ENTER: ADJUST: Selected characters W 1. SYSTEM AUTO PROGRAM FINE TUNE CHANNEL EDIT RETURN: MENU X ANTENNA 2. CABLE 1.Antenna or cable TV system selection. 2.
Op e rat ing Ins truc Ope ating Instruc tructtions continued ASPECT The ASPECT button will select how the video image appears on the TV’s screen. There are 4 selections. ASPECT 16.9 Display a wide screen image. 4.3 Displays a 4:3 square picture with letterbox bands PANORAMIC CINEMA ZOOM Stretches the picture to increase the size of Images in the center of the picture. Magnifies the image to fill the screen with a picture.
Op erat ing Ins truc Ope ating Instruc tructtions continued Picture-in-Picture OFF PIP PBP POP OFF OFF PIP PIP SMALL PBP PBP MEDIUM POP POP LARGE MULTI 1+12 AUDIO SOURCE AUDIO SOURCE PIP POSITION MULTI 1+3 MULTI 1+1 PIP function description W Selected OFF PIP POSITION Press SMALL X Enter button to turn off. MEDIUM LARGE Setup hint Turn off Picture-in-Picture function PIP POSITION Change PIP display size & position.
Op e rat ing Ins truc Ope ating Instruc tructtions continued PICTURE IN PICTURE (Continued) Selecting PIP size SOURCE When the PIP button on the remote control is pressed, a black box will appear on the screen. PIP SELECTSandT Each time the PIP button is pressed, the size of box changes as follows. SMALL SMALL MEDIUM MEDIUM LARGE LARGE PIP POSITION PBP Selecting PIP Source While a black box appears on the screen, press SOURCE button and PIP SOURCE menu appears.
Op erat ing Ins truc Ope ating Instruc tructtions continued PICTUREʳIN PICTURE (Continued) Setting Up PIP through On Screen Main Menu 1.Press the "MENU" button to display the Main Menu screen. 2.Select " PICTURE IN PICTURE" Menu with W XʳADJUST button and press ENTER button, then following menu will appear. OFF PIP PBP POP AUDIO SOURCE Select PIP size 1. Press ENTER button. 2. Select the PIP size withʳS T SELECT button. 3. Press ENTER button. 4.
Op e rat ing Ins truc Ope ating Instruc tructtions continued PICTURE IN PICTURE (Continued) Change PIP Position PICTURE IN PICTURE After selecting PIP and PIP Source, 1. 2. 3. 4. 5. Press the "MENU" button to display on the On Screen Main Menu. Select "PICTURE IN PICTURE" Menu withW X ADJUST button. Press ENTER button. The following Menu and a diagram will appear. Select “PIP” with S T SELECT button.
Op erat ing Ins truc Ope ating Instruc tructtions continued Other Functions The MTS button is used only when using the TV channel selector. z Stereo and SAP (2nd Audio program) sound program When a bilingual program is received, the sound mode display appears as shown on the right. Press the MTS button to select the sound to be heard. Each time the button is pressed, Stereo, SAP or Mono appears on the screen.
Op e rat ing Ins truc Ope ating Instruc tructtions continued Parental Controls Press “MENU” button and select PARENTAL CONTROLS menu with the W X PROGRAM ADJUST buttons, then press the Enter the V chip Password: the factory preset code is 1111. ENTER button. MPAA RATING ENTER button. Select rating by pressing the T S SELECT buttons. Press the A second Menu appears. Select MPAA by pressing the ENTER button to enter the rating. Press “MENU” button twice to return to parental controls.
Op erat ing Ins truc Ope ating Instruc tructtions continued Parental Controls (Continued) PASSWORD 1.Press “MENU” button and select PARENTAL CONTROLS menu with the W X PROGRAM ADJUST buttons, then press the button. Enter the V chip Password: the factory preset code is 1111. 2.A second Menu appears. Select password by pressing theT SELECT button, press the the numbers on the TV’s remote control. ENTER ENTER button, Enter the new password using 3.Enter the password a second time to continue. 4.
Op erat ing Ins truc Ope ating Instruc tructtions continued TV PG RATING This is to prevent viewing of any TV program that you feel may be inappropriate due to its content. Use the S or T SELECT buttons to highlight the category that you want to block. Press the OK button to block the TV PG RATING that you have selected. Press the RETURN button to return to the previous menu. TV Parental Guide Ratings Chart TV-Y TV-Y7 TV-G TV-PG TV-14 TV-MA All children.
Op e rat ing Ins truc Ope ating Instruc tructtions continued General Setting OSD POSITION OSD TIMEOUT OSD LANGUAGE OSD MENU LOCK SLEEP TIMER I/P INFO FACTORY RESET TRANSPARENCY Selected characters T S Setup hint OSD POSITION Use the S T and W X buttons to adjust the OSD position OSD TIMEOUT 10SEC--30SEC—1 MIN Adjusts OSD display and on-screen time OSD LANGUAGE English—Japan—Espanol—Francais OSD MENU LOCK ON Sets the language for the OSD. 1. Select “ON” to lock OSD MENU.
Op erat ing Ins truc Ope ating Instruc tructtions continued Captions Menu Setup Closed Caption Press the CCD button on the remote control then press the ENTER button. Select MODE menu by pressing the SELECT button and press the ENTER button. Select the closed caption by pressing the SELECT buttons. Press the ENTER button. To exit Captions Menu, press the MENU button twice.
Fe atu Featu aturre s 23” diagonal screen size adds a new option to information display visual offerings. 1280 x 768 resolution allows for crisp text and precise images. No permanent phosphor image burn-in contributes to optimal screen performance and longer monitor life. XtraView®technology allows for wide-angle viewing. User-friendly, efficient design features the currently proposed VESA-standard mounting and an overall lightweight construction for easy transport and installation.
Troub le sho ot ing ouble lesho shoot oting No picture • • The signal cable should be completely connected to the display card/computer. The display card should be completely seated in its slot. • Front Power Switch and computer power switch should be in the ON position. • Check to make sure that a supported mode has been selected on the display card or system being used. (Please consult display card or system manual to change graphics mode.
Troub le sho ot ing continued ouble lesho shoot oting Symptoms If the solution does not correct the symptoms, please contact your local Service center for assistance. WARNING DO NOT OPEN THE MONITOR. Self servicing can be hazardous. There are no user serviceable parts inside and opening or removing covers may expose you to dangerous shock hazards or other risks. Refer all servicing to qualified personnel. Symptom Point to check Check to see that the power cable is properly connected.
Troub le sho ot ing continued ouble lesho shoot oting Symptoms(continued) Symptom Point to check The temperature of the display panel surface is warm. The LCD display panel works by lighting phosphors. In some cases, this may cause the temperature of the panel surface to increase. Please note that this is not a malfunction. Points that do not light, points with brightness different from that of the periphery, points with color different from that of the periphery, etc.
Troub le sho ot ing continued ouble lesho shoot oting Symptoms(continued) Make the checks suggested below depending on the symptoms observed. If the symptoms remain unresolved, contact your dealer. WARNING Symptom snowy picture - poor sound DO NOT OPEN THE MONITOR. Self servicing can be hazardous. There are no user serviceable parts inside and opening or removing covers may expose you to dangerous shock hazards or other risks. Refer all servicing to qualified personnel.
Re fe rence ncess NEC-Mitsubishi Monitor Customer Service & Support Customer Service and Technical Support: (800) 632-4662 Fax: (800) 695-3044 Parts and Accessories/Macintosh Cable Adapter: (888) NEC-MITS [888-632-6487] Warranty Information: www.necmitsubishi.com/warranty OnlineTechnicalSupport www.necmitsubishi.
Sp e c if ic at ions ific icat ations LCD Module Diagonal : Viewable Image Size : Native Resolution (Pixel Count) : Input Signal PC INPUT Video : Sync : Active matrix; thin film transistor (TFT) liquid crystal display (LCD); 0.390 mm dot pitch; 500cd/m2 white luminance; 500:1 contrast ratio, typical ANALOG 0.7 Vp-p/75 Ohms Digital Input: DVI Separate sync. TTL Level Horizontal sync. Positive/Negative Vertical sync. Positive/Negative VIDEO INPUT Composite 1.
Limit ed W ar Limite War arrrant antyy NEC-Mitsubishi Electronics Display of America, Inc. (hereinafter “NMD-A”) warrants this Product to be free from defects in material and workmanship and, subject to the conditions set forth below, agrees to repair or replace (at NMD-A’s sole option) any part of the enclosed unit which proves defective for a period of one (1) year from the date of first consumer purchase. Spare parts are warranted for ninety (90) days.
TCO’99 Congratulations! You have just purchased a TCO’99 approved and labelled product! Your choice has provided you with a product developed for professional use. Your purchase has also contributed to reducing the burden on the environment and also to the further development of environmentally adapted electronics products.
TCO’99 –continued accumulative* processes. Flame retardants have been found in human blood and researchers fear that disturbances in foetus development may occur. TCO’99 demand requires that plastic components weighing more than 25 grams must not contain flame retardants with organically bound chlorine and bromine. Flame retardants are allowed in the printed circuit boards since no substitutes are available. Lead** Lead can be found in picture tubes, display screens, solders and capacitors.
Declaration of the Manufacturer We hereby certify that the color monitors LCD2335WXM is in compliance with Council Directive 73/23/EEC: – EN 60950-1 Council Directive 89/336/EEC: — EN 55022 — EN 61000-3-2 — EN 61000-3-3 — EN 55024 and marked with NEC-Mitsubishi Electric Visual Systems Corporation 4-13-23, Shibaura, Minato-Ku Tokyo 108-0023, Japan
NEC LCD2335WXM PROPRIETARY NOTICE AND LIABILITY DISCLAIMER The information disclosed in this document, including all designs and related materials, is the valuable property of NEC-Mitsubishi Electronics Display of America and/or its licensors, as appropriate, reserve all patent, copyright and other proprietary rights to this document, including all design, manufacturing, reproduction, use and sales rights thereto, except to the extent said rights are expressly granted to others.