MultiSync LCD1550V User’s Manual
TO PREVENT FIRE OR SHOCK HAZARDS, DO NOT EXPOSE THIS UNIT TO RAIN OR MOISTURE. ALSO, DO NOT USE THIS UNIT’S POLARIZED PLUG WITH AN EXTENSION CORD RECEPTACLE OR OTHER OUTLETS UNLESS THE PRONGS CAN BE FULLY INSERTED. REFRAIN FROM OPENING THE CABINET AS THERE ARE HIGH VOLTAGE COMPONENTS INSIDE. REFER SERVICING TO QUALIFIED SERVICE PERSONNEL. CAUTION RISK OF ELECTRIC SHOCK • DO NOT OPEN CAUTION TO REDUCE THE RISK OF ELECTRIC SHOCK, DO NOT REMOVE COVER (OR BACK). NO USER SERVICEABLE PARTS INSIDE.
Declaration Declaration of the Manufacturer We hereby certify that the colour monitor MultiSync LCD1550V (LA-15R02) is in compliance with Council Directive 73/23/EEC: – EN 60950 Council Directive 89/336/EEC: – EN 55022 – EN 61000-3-2 – EN 61000-3-3 – EN 55024 and marked with NEC-Mitsubishi Electric Visual Systems, Corp. MS Shibaura Bldg., 13-23, Shibaura 4-chome, Minato-Ku, Tokyo 108-0023, Japan Power consumption of the monitor is less than 3W when in power-saving mode.
Canadian Department of Communications Compliance Statement DOC: This Class B digital apparatus meets all requirements of the Canadian Interference-Causing Equipment Regulations. Cet appareil numérique de la classe B respecte toutes les exigences du Règlement sur le matériel brouiller du Canada. C-UL: Bears the C-UL Mark and is in compliance with Canadian Safety Regulations according to CSA C22.2 #950. Ce produit porte la marque ‘C-UL’ et se conforme aux règlements de sûrele Canadiens selon CAN/CSA C22.2 No.
2. This equipment has been tested and found to comply with the limits for a Class B digital device, pursuant to part 15 of the FCC Rules. These limits are designed to provide reasonable protection against harmful interference in a residential installation. This equipment generates, uses, and can radiate radio frequency energy, and, if not installed and used in accordance with the instructions, may cause harmful interference to radio communications.
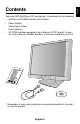
English Contents Your new NEC MultiSync LCD monitor box* should contain the following: • MultiSync LCD1550V monitor with tilt base • Power Cord(s) • Video Signal Cable • User’s Manual • CD ROM (includes complete User’s Manual in PDF format). To see the User’s Manual, Acrobat Reader 4.0 must be installed on your PC. 1550V * Remember to save your original box and packing material to transport or ship the monitor.
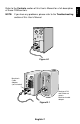
Quick Start To attach the MultiSync LCD monitor to your system, follow these instructions: 1. Turn off the power to your computer. 2. Remove connector cover and cable cover. 3. For PC: Connect the 15-pin mini D-SUB of the appropriate signal cable to the connector for the display card in your system (Figure A.1). Tighten all screws. For Mac: Connect the MultiSync LCD1550V Macintosh cable adapter to the computer (Figure B.1).
NOTE: If you have any problems, please refer to the Troubleshooting section of this User’s Manual. Figure A.1 Macintosh Cable Adapter (not included) Macintosh G3 and G4 do not need a Macintosh cable adapter Figure B.1 English-7 English Refer to the Controls section of this User’s Manual for a full description of these OSM controls.
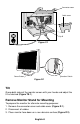
Connector cover Cable cover Clip B Figure C.1 1550V Vacation Switch Power Button Figure D.1 Tilt Grasp both sides of the monitor screen with your hands and adjust the tilt as desired (Figure TS.1). Remove Monitor Stand for Mounting To prepare the monitor for alternate mounting purposes: 1. Remove the connector cover and cable cover (Figure R.1). 2. Disconnect all cables. 3. Place monitor face down on a non-abrasive surface (Figure R.2).
NOTE: Use only VESA-compatible alternative mounting method. Figure TS.1 Figure R.1 English-9 English 4. Remove the 4 screws connecting the monitor to the stand and lift off the stand assembly (Figure R.2) the monitor is now ready for mounting in an alternate manner. 5. Connect the AC cord and signal cable to the back of the monitor (Figure R.3). 6. Reverse this process to reattach stand.
Non-abrasive surface Figure R.2 Figure R.3 7. This LCD monitor is designed for use with a flexible arm. Please use the attached screws (4pcs) when mounting. To meet the safety requirements the monitor must be mounted to an arm which guaranties the necessary stability under consideration of the weight of the monitor. The LCD monitor shall only be used with an approved arm (e.g. GS mark).
Thickness of bracket (arm) 2.0 ~ 3.2 mm Tighten all screws 75 mm 75 mm 4 SCREWS (M4) (MAX depth: 8.5 mm) If use other screw, check depth of hole. Weight of LCD assembly: 3.
Controls OSM (On-Screen-Manager) Controls The OSM controls on the front of the monitor function as follows: To access OSM press any of the control buttons ( , , -, +, NEXT). Control Menu EXIT Exits the OSM controls. Exits to the OSM main menu. CONTROL / Moves the highlighted area left/right to select control menus. Moves the highlighted area up/down to select one of the controls. ADJUST -/+ Moves the bar left/right to increase or decrease the adjustment. Activates Auto Adjust function.
Automatically adjusts the Image Position, the H. Size and Fine setting. Position Controls LEFT/RIGHT Controls Horizontal Image Position within the display area of the LCD. DOWN/UP Controls Vertical Image Position within the display area of the LCD. H. SIZE Adjusts the horizontal size by increasing or decreasing this setting. FINE Improves focus, clarity and image stability by increasing or decreasing this setting. Colour Control Systems Five colour presets select the desired colour setting.
OSM TURN OFF The OSM control menu will stay on as long as it is use. In the OSM Turn Off submenu, you can select how long the monitor waits after the last touch of a button to shut off the OSM control menu. The preset choices are 10, 20, 30, 45, 60 and 120 seconds. OSM LOCK OUT This control completely locks out access to all OSM control functions. When attempting to activate OSM controls while in the Lock Out mode, a screen will appear indicating the OSM controls are locked out.
OSM Warning menus disappear with Exit button. NO SIGNAL: This function gives a warning when there is no signal present. After power is turned on or when there is a change of input signal or video is inactive, the No Signal window will appear. RESOLUTION NOTIFIER: This function gives a warning of use with optimized resolution. After power is turned on or when there is a change of input signal or the video signal doesn’t have proper resolution, the Resolution Notifier window will open.
Recommended Use Safety Precautions and Maintenance FOR OPTIMUM PERFORMANCE, PLEASE NOTE THE FOLLOWING WHEN SETTING UP AND USING THE MULTISYNC LCD COLOUR MONITOR: • • • • • • • DO NOT OPEN THE MONITOR. There are no user serviceable parts inside and opening or removing covers may expose you to dangerous shock hazards or other risks. Refer all servicing to qualified service personnel. Do not spill any liquids into the cabinet or use your monitor near water.
CAUTION • • Allow adequate ventilation around the monitor so that heat can properly dissipate. Do not block ventilated openings or place the monitor near a radiator or other heat sources. Do not put anything on top of monitor. The power cable connector is the primary means of detaching the system from the power supply. The monitor should be installed close to a power outlet which is easily accessible. Handle with care when transporting. Save packaging for transporting.
• • Avoid displaying fixed patterns on the monitor for long periods of time to avoid image persistence (after-image effects). Get regular eye checkups. Ergonomics To realize the maximum ergonomics benefits, we recommend the following: • Use the preset Size and Position controls with standard signals. • Use the preset Colour Setting. • Use non-interlaced signals with a vertical refresh rate between 60-75 Hz.
Monitor Specifications MultiSync LCD1550V Monitor LCD Module Diagonal: 38 cm/15 inches Viewable Image Size: 38 cm/15 inches Native Resolution (Pixel Count): 1024 x 768 Input Signal Display Colours Notes Active matrix; thin film transistor (TFT) liquid crystal display (LCD); 0.30 mm dot pitch; 200cd/m2 white luminence, typical; 300:1 contrast ratio, typical. Video: ANALOG 0.7 Vp-p/75 Ohms Sync: Separate sync.TTL Level Horizontal sync. Positive/Negative Vertical sync.
Features Reduced Footprint: Provides the ideal solution for environments requiring superior image quality but with size and weight limitations. The monitor’s small footprint and low weight allow it to be moved or transported easily from one location to another. Colour Control System: Allows you to adjust the colours on your screen and customize the colour accuracy of your monitor to a variety of standards.
English-21 English VESA Standard Mounting Interface: Allows users to connect their MultiSync monitor to any VESA standard (75 mm pitch) third party mounting arm or bracket. Allows for the monitor to be mounted on a wall or an arm using any third party compliant device.
Troubleshooting No picture • The signal cable should be completely connected to the display card/ computer. • The display card should be completely seated in its slot. • Check the Vacation Switch should be in the ON Position. Front power Switch and computer power switch should be in the ON position. • Check to make sure that a supported mode has been selected on the display card or system being used. (Please consult display card or system manual to change graphics mode.
• Signal cable should be completely attached to the computer. • Use the OSM Image Adjust controls to focus and adjust display by increasing or decreasing the fine total. When the display mode is changed, the OSM Image Adjust settings may need to be readjusted. • Check the monitor and your display card with respect to compatibility and recommended signal timings. • If your text is garbled, change the video mode to non-interlace and use 60 Hz refresh rate.
TCO’99 This is a translation of the original English TCO'99 document. MultiSync LCD1550V (LA-15R02) Congratulations! You have just purchased a TCO’99 approved and labeled product! Your choice has provided you with a product developed for professional use. Your purchase has also contributed to reducing the burden on the environment and also to the further development of environmentally adapted electronics products.
The environmental demands concern restrictions on the presence and use of heavy metals, brominated and chlorinated flame retardants, CFCs (freons) and chlorinated solvents, among other things. The product must be prepared for recycling and the manufacturer is obliged to have an environmental plan which must be adhered to in each country where the company implements its operational policy.
Cadmium** Cadmium is present in rechargeable batteries and in the colourgenerating layers of certain computer displays. Cadmium damages the nervous system and is toxic in high doses. TCO’99 requirement states that batteries, the colourgenerating layers of display screens and the electrical or electronics components must not contain any cadmium. Mercury** Mercury is sometimes found in batteries, relays and switches, Mercury damages the nervous system and is toxic in high doses.