AUTO-SCANNING WITH DIGITAL CONTROL LCD COLOR DISPLAY MONITOR MultiSync® LCD1800™ USER’S GUIDE SIGNAL A/B SELECT ADJUST - + OSD OFF For future reference, record the serial number of your display monitor in the space below: SERIAL No. The serial number is located on the rear cover of the monitor. Internet Home Page: http://www.necmitsubishi.com/ Supplying Windows 95/98 INF File download service,new products information, etc.
As an ENERGY STAR Partner, NEC-MITSUBISHI Electronics Display of America, Inc. has determined that this product meets the ENERGY STAR guidelines for energy efficiency. RADIO INTERFERENCE REGULATIONS STATEMENT FOR U.S.A. This equipment has been tested and found to comply with the limits for a Class B digital device, pursuant to Part 15 of the FCC Rules. These limits are designed to provide reasonable protection against harmful interference in a residential installation.
Below you will find a brief summary of the environmental requirements met by this product. The complete environmental criteria document may be ordered from: Congratulations! You have just purchased a TCO’99 approved and labelled product! Your choice has provided you with a product developed for professional use. Your purchase has also contributed to reducing the burden on the environment and also to the further development of environmentally adapted electronics products.
CAUTION Do not remove the monitor cabinet as this can expose you to very high voltages and other hazards.
1 INTRODUCTION Congratulations on your purchase of the MultiSync LCD1800™ high resolution color LCD monitor. This guide tells you how to connect, adjust and care for your MultiSync LCD1800 monitor. This guide also provides technical specifications and instructions for troubleshooting any basic problems you may experience with your monitor. 1.1 Features The MultiSync LCD1800 is a 46cm/18.
1.3 IPM™(Intelligent Power Manager) System When the horizontal sync signal and/or vertical sync signal is off, after about 10 seconds the monitor is switched to a power saving mode which reduces the monitor power consumption to less than 3W. When the monitor is in power saving mode, the screen is off and the power indicator will illuminate at amber. After the signals are restored, picture will be displayed within about 3 seconds. Check your computer's manual for setting this function. 1.
1.10 AccuColor® Control Function 1.13 Unpacking The following color modes are available: 1. sRGB: sRGB mode dramatically improves the color fidelity in the desktop environment by a single standard RGB color space. With this color supported environment, the operator could easily and confidently communicates color without further color management overhead in the most common situations. We recommend you set the monitor to "Graphics" mode. (Unadjustable.) 2. VIDEO: Suitable for motion picture.
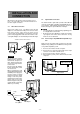
1.15 Quick Operation Chart ENGLISH To summarize the steps in connecting your computer and adapter with MultiSync LCD1800™ color LCD monitor and setting the necessary controls and switches, refer to the chart below. Connect the power cord to the MultiSync LCD1800 color LCD monitor and the signal cable between the MultiSync LCD1800 and the computer. Turn on the monitor. Turn on the computer. Set the controls and switches. If a problem appears. OK OK See 6. TROUBLESHOOTING If the problem persists.
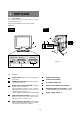
2 PART NAME 2.1 Control Names See Figures 3 and 4 for the location of the user controls, indicator and connectors. Each part is identified by number and described individually. REAR FRONT - SIGNAL A/B + SELECT ADJUST - + Figure 4 OSD OFF Figure 3 2.2 Function POWER SWITCH: A push-on / push-off switch for power input. POWER-ON INDICATOR: This indicator illuminates when power is on. SIGNAL A/B and OSD OFF BUTTON: This button has two functions, as follows.
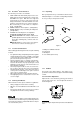
CONNECTION On the back of the monitor are three plug-in connections: one for the DC power connection and others for the video signal connection. 3.1 AC Power Connection Remove the cable covers. The DC jack from the AC Adapter is connected into the DC power connector on the back of the monitor. One end of the power cord is connected into the AC Adapter, and another end of the power cord is plugged into a AC outlet. The monitor’s autosensing AC Adapter can automatically follow the AC input.
3.2.2 Connecting to An Apple Macintosh Computer Figure 6 shows the signal cable and Macintosh Adapter to the video port in an Apple Macintosh. 1. 2. 3. 4. 5. Power off, both the monitor and the computer. Connect the 15-pin (D-SUB-15P) end of the Macintosh Adapter to the straight 15-pin connector on the Macintosh video port on the computer or on the video board. Connect the sub-miniature 15-pin (D-SUB-15P) end of the Macintosh Adapter to the signal cable. Power on the monitor, then the Macintosh.
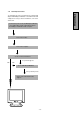
5 FUNCTION Two methods, "AUTO SETUP" and "OSM™ Adjustment" are available for adjusting the screen. (For the "OSM Adjustment", see 5. OSM (On Screen Manager) FUNCTIONS.) Conduct the "AUTO SETUP" first. And then, do the "OSM Adjustment" if necessary. How to Adjust the Screen The monitor has an OSM (On Screen Manager) function. The following procedure shows how to adjust the screen with using the OSM function.
Press "ALL RESET" to restore to the factory preset level. Press and buttons together, to restore to the factory preset level. Set data by each timing. Set data does not change by the changing of the signal timing. Group Icon Item Icon Item Press the Minus Button: Press the Plus Button: User Presets Adjustment Items Factory Presets 5.1 BRIGHTNESS To decrease the brightness. To increase the brightness. ○ ○ ○ ○ CONTRAST To decrease the contrast. To increase the contrast.
Item Press the Minus Button: Press the Plus Button: To restore to the factory preset mode. ALL RESET - 1. - - To move the OSD position for 5 places. ○ ○ ○ POWER SAVE To select the constant power mode. To select the power save mode. ○ ○ ○ AUTO SELECT To off the Auto Adjustment Function. To on the Auto Select Function. ○ ○ ○ ○ ○ CONTROL LOCK Mode Operation Press the right of select button and minus of adjust button together, the "CONTROL LOCK" screen appears.
Before calling your Authorized Product Support, please check that the items below are properly connected or set. In case of using a non-standard signal, please check the pin assignments and the signal timing of your computer with the specification outlined in 7. SPECIFICATIONS. 6 TROUBLESHOOTING PROBLEM ITEMS TO CHECK LOCATION • Contrast and brightness controls. • Front LED Off • Power switch. • Power cord disconnected. • Front • Rear LED On (Amber) • Signal cable disconnected.
SPECIFICATIONS LCD Panel Type Resolution Pixel Pitch Color Filter Face Finishing Viewing Angle Video Sync Input Impedance 46cm/18.1" Color TFT Panel Active Matrix 1280 dots x 1024 lines 0.28mm LCD MODULE R, G, B vertical stripe type Anti-glare, Hard Coated ±80°(Horizontal/Vertical) CR 5 0.7Vp-p analog RGB Sync.on Green or Separated H,V or Composite sync. INPUT SIGNAL Video 75 Ω Sync 2.2k Ω SCANNING Horizontal 24.0 - 80.0kHz FREQUENCY Vertical 50.0 - 86.0Hz DISPLAY SIZE HxV 359mm x 287.
LIMITED WARRANTY NEC-Mitsubishi (hereinafter “NEC-MITSUBISHI”), warrants this Product to be free from defects in material and workmanship and, subject to the conditions set forth below, agrees to repair or replace (at NEC-MITSUBISHI’s sole option) any part of the enclosed unit which proves defective for a period of three (3) years from the date of first consumer purchase. Spare parts are warranted for ninety (90) days.