USER’S MANUAL MANUEL D’UTILISATION MANUAL DEL USUARIO MultiSync® LCD1990FXp™ To learn about other special offers, register online at www.necdisplay.com. Pour en savoir plus long sur d’autres offres spéciales, inscrivez-vous en ligne à www.necdisplay.com. Para informarse sobre otras ofertas especiales, regístrese en línea en www.necdisplay.
Index Warning ..................................................................................................................................................1 Contents................................................................................................................................................ 2 Quick Start ........................................................................................................................................... 3 Controls ................................
WARNING TO PREVENT FIRE OR SHOCK HAZARDS, DO NOT EXPOSE THIS UNIT TO RAIN OR MOISTURE. ALSO, DO NOT USE THIS UNITʼS POLARIZED PLUG WITH AN EXTENSION CORD RECEPTACLE OR OTHER OUTLETS UNLESS THE PRONGS CAN BE FULLY INSERTED. REFRAIN FROM OPENING THE CABINET AS THERE ARE HIGH VOLTAGE COMPONENTS INSIDE. REFER SERVICING TO QUALIFIED SERVICE PERSONNEL. CAUTION CAUTION: TO REDUCE THE RISK OF ELECTRIC SHOCK, MAKE SURE POWER CORD IS UNPLUGGED FROM WALL SOCKET.
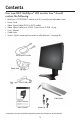
Contents Your new NEC MultiSync® LCD monitor box* should contain the following: • • • • • • • MultiSync LCD1990FXp™ monitor with tilt/swivel/pivot/adjustable stand Power Cord Video Signal Cable (DVI-D to DVI-D cable) Video Signal Cable (mini D-SUB 15 pin to mini D-SUB 15 pin) User’s Manual Cable cover Screws (4) (for mounting the monitor to a flexible arm - see page 8) DVI-D to DVI-D cable Power Cord Mini D-SUB cable Cable Cover User’s Manual Screws (4) * Remember to save your original box and packin
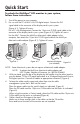
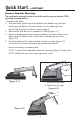
Quick Start To attach the MultiSync® LCD monitor to your system, follow these instructions: 1. Turn off the power to your computer. 2. For use with the PC or MAC with DVI digital output: Connect the DVI signal cable to the connector of the display card in your system (Figure A.1). Tighten all screws. For a PC with Analog output:Connect the 15-pin mini D-SUB signal cable to the connector of the display card in your system (Figure A.2). Tighten all screws.
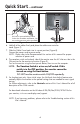
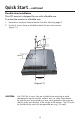
Quick Start – continued 30 Tilt Highest Stand Position DVI-I D-SUB power card (DC out for optional NEC products such as the Soundbar attachment. Do not use thisconnector unless specified.) Figure 5 Figure 4 6. Hold all of the cables firmly and place the cable cover onto the stand (Figure 7). 7. Slide the Cable Cover back into its correct position (Figure 8). Connect the power cord to power outlet. NOTE: Please refer to the Recommended Use section of this manual for proper selection of power cord. 8.
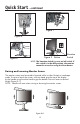
Quick Start – continued Figure 7 Figure 6 OFF Position ON Position Figure 8 Figure 9 Power Button Vacation Switch NOTE: The Vacation Switch is a true on/off switch. If this switch is in the OFF position, the monitor cannot be turned on using the front button. Raising and Lowering Monitor Screen The monitor screen may be raised or lowered while in either Portrait or Landscape mode.
Quick Start – continued Screen Rotation Before rotating, the screen must be raised to the highest level to avoid accidentally damaging the screen and to avoid pinching fingers. With one hand, grip the top of the display by the handle using the other hand to grip the bottom Lift up to the highest position. (Figure RL.1). To rotate screen, place hands on each side of the monitor screen and turn clockwise from Landscape to Portrait or counter-clockwise from Portrait to Landscape (Figure R.1).
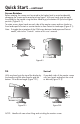
Quick Start – continued Remove Stand for Mounting The stand can be removed in order to mount the monitor using an alternate, VESA approved, mounting method. 1.Disconnect all cables. 2. With one hand, grip the top of the display by the handle using the other hand to grip the bottom. Raise the monitor up to the highest position (see Raising and Lowering Monitor Screen page 5). 3. Place monitor face down on a nonabrasive surface (Figure S.1). 4.
Quick Start – continued Flexible Arm Installation This LCD monitor is designed for use with a flexible arm. To mount the monitor to a flexible arm: 1. Remove the stand (see Remove Monitor Stand for Mounting page 7). 2. Use the 4 screws that are included to attach the arm to the monitor (Figure F.1). 100mm 100mm (Figure F.1) CAUTION: Use ONLY the 4 screws that are included when mounting to avoid damaging the monitor and the stand or arm.
Controls OSM® (On-Screen Manager) control buttons, located on the front of the monitor, function as follows: To access OSM menu, press any of the following control buttons: MENU, LEFT, RIGHT, UP, or DOWN. To change the input source signal when the OSM is closed, press the SELECT button.
Controls – continued Brightness/Contrast Controls BRIGHTNESS: Adjusts the overall image and background screen brightness. CONTRAST: Adjusts the image brightness in relation to the background. AUTO CONTRAST (Analog input only): Adjusts the image displayed for non-standard video inputs. ECO MODE: Decreases the amount of power consumed by reducing the brightness level. 1: Decreases the brightness by 25%. 2: Decreases the brightness by 50%. CUSTOM: Decreases the brightness level as determined by the user.
Controls – continued Image Controls LEFT / RIGHT (Analog input only): Controls Horizontal Image Position within the LCD’s display area. DOWN / UP (Analog input only): Controls Vertical Image Position within the LCD’s display area. H.SIZE (V.SIZE) (Analog input only): Increases or decreases the horizontal (or vertical) size. If the “Auto Adjust function” does not provide a satisfactory picture, further tuning can be performed manually using the “H. Size (or V. Size)” function (dot clock).
Controls – continued AccuColor® Control Systems AccuColor Control Systems: Six color presets select the desired color setting (sRGB and NATIVE color presets are standard and cannot be changed). R,G,B: Increases or decreases Red, Green or Blue color depending upon which is selected. The change in color will appear on screen and the direction (increase or decrease) will be shown by the bars. NATIVE: Original color presented by the LCD panel that is unadjustable.
Controls – continued OFF TIMER: Monitor will automatically power down after a user-determined length of time passes. Before powering off, a message will appear on the screen asking the user if they want to delay the turn off time by 60 minutes. Press any OSM button to delay the turn off time. IPM: The Intelligent Power Manager allows the monitor to enter into a power saving mode after a period of inactivity. The IPM has two settings.
Controls – continued OSM TURN OFF: The OSM control menu will stay on as long as it is use. You can select how long the monitor waits after the last touch of a button to shut off the OSM control menu. Time can be set between10-120 seconds, in 5 second increments. OSM LOCK OUT: This control completely locks out access to some of or to all of the OSM control functions. When attempting to activate OSM controls while in the Lock Out mode, a screen will appear indicating the OSM controls are locked out.
Controls – continued Information Provides information about the current resolution being displayed by the monitor. Also provides technical information including which preset timing is being used as well as the horizontal and vertical frequencies. OSM WARNINGS: OSM Warning menus alert the user when there are problems with the input signal. These warnings will disappear when the Exit button is pressed. NO SIGNAL: This warning appears when there is no Horizontal or Vertical Sync.
Advanced OSM Controls In addition to the standard On Screen Menu (OSM), the Advanced OSM Control menu allows the user to have much more control over regular OSM functions as well as access to functions not available in the standard OSM. To use the advanced menu • Turn off your monitor using the front "POWER" button. • Turn on your monitor by pushing the “POWER” and “SELECT” button simultaneously for at least one second. Then press one of the following front OSM buttons:MENU, LEFT, RIGHT, UP, or DOWN.
Advanced OSM Controls – continued Tag 3 Tag 4 H. POSITION (Analog input only) Sets Horizontal Image Position within the display area of the LCD. Press “Left” or “Right” to adjust. V. POSITION (Analog input only) Sets Vertical Image Position within the display area of the LCD. Press “Left” or “Right” to adjust. H. SIZE (Analog input only) Increases or decreases the horizontal (or vertical) size.
Advanced OSM Controls – continued Tag 5 DVI SELECTION This function selects the DVI input mode. If the DVI selection changes, you must restart your computer. DIGITAL: DVI digital input is available. ANALOG: DVI analog input is available. VIDEO DETECT Selects the method of video detection when more than one video input is connected. FIRST: If “FIRST” is selected as the VIDEO DETECT option, the monitor displays the signal from the first input port.
Advanced OSM Controls – continued Tag 5 LED BRIGHTNESS Controls the brightness of the LED on the front of the monitor. LED COLOR The LED on the front can be blue or green. SCREEN SAVER MOTION Use the SCREEN SAVER to reduce the risk of image persistence. The screen image moves periodically in 4 directions to reduce the risk of image persistence. The SCREEN SAVER can be set to move the screen image in intervals ranging from 10 to 900 seconds, in 10-second increments.
Advanced OSM Controls – continued Tag 6 continued Tag 7 OSM LOCKOUT 2: OSM LOCK OUT with no control: This mode prevents access to all OSM functions. To activate, press the SELECT and “Right” buttons simultaneously. To deactivate, press the SELECT and “Right” buttons simultaneously, while in the OSM menu. 3: OSM LOCK OUT with BRIGHTNESS (only) control: This mode locks all OSM functions except for BRIGHTNESS. To activate, press the SELECT, “Left” and “Down” buttons simultaneously, while in the OSM menu.
Using the Auto Brightness function The brightness of the LCD screen can be set to increase or decrease depending on the amount of ambient light within the room. If the room is bright, the monitor becomes correspondingly bright. If the room is dim, then the monitor will dim accordingly. The purpose of this function is to make the viewing experience more comfortable to the eye in a variety of lighting conditions. The Auto Brightness function is set to OFF by default.
Using the Auto Brightness function - cont. When the “Auto Brightness” function is enabled, the Brightness level of the screen changes automatically according to the lighting conditions of the room (Figure 4). BRIGHTNESS level set for the monitor to use when ambient lighting level is high. BRIGHTNESS level set for the monitor to use when ambient lighting level is low.
Recommended Use Safety Precautions and Maintenance FOR OPTIMUM PERFORMANCE, PLEASE NOTE THE FOLLOWING WHEN SETTING UP AND USING THE MULTISYNC® LCD COLOR MONITOR: • DO NOT OPEN THE MONITOR. There are no user serviceable parts inside and opening or removing covers may expose you to dangerous shock hazards or other risks. Refer all servicing to qualified service personnel. • Do not spill any liquids into the cabinet or use your monitor near water.
Recommended Use – continued CORRECT PLACEMENT AND ADJUSTMENT OF THE MONITOR CAN REDUCE EYE, SHOULDER AND NECK FATIGUE. CHECK THE FOLLOWING WHEN YOU POSITION THE MONITOR: • For optimum performance, allow 20 minutes for warm-up. • Adjust the monitor height so that the top of the screen is at or slightly below eye level. Your eyes should look slightly downward when viewing the middle of the screen. • Position your monitor no closer than 16 inches and no further away than 28 inches from your eyes.
Recommended Use – continued Ergonomics To realize the maximum ergonomics benefits, we recommend the following: • Adjust the Brightness until the background raster disappears. • Do not position the Contrast control to its maximum setting. • Use the preset Size and Position controls with standard signals. • Use the preset Color Setting. • Use non-interlaced signals with a vertical refresh rate more than 60Hz.
Specifications Monitor Specifications LCD Module MultiSync® LCD1990FXp Diagonal: Viewable Image Size: Native Resolution (Pixel Count): Input Signal Video: Sync: Display Colors Notes 19,0 inch 19,0 inch Active matrix; thin film transistor (TFT) liquid crystal display(LCD); 0.294 mm dot 1280x1024 pitch; 250cd/m2 white luminance; XtraView+™ technology; 1500:1 contrast ratio, typical ANALOG 0.7 Vp-p/75 Ohms Digital Input: DVI Separate sync. TTL Level Positive/Negative Composite sync.
Features Ambix® Technology: Dual input technology allowing both analog and digital inputs off of one connector (DVI-I) as well as additional legacy analog support off of a traditional 15-pin mini D-SUB connector. Provides traditional MultiSync technology compatibility for analog as well as TMDS.-based (Transition Minimized Differential Signaling) digital compatibility for digital inputs. TMDS-based digital interfaces include DVI-D,DFP and P&D.
Features – continued IPM® (Intelligent Power Manager) System: Provides innovative power-saving methods that allow the monitor to lower the power consumption level when on but not in use, saving two-thirds of your monitor energy costs, reducing emissions and lowering the air conditioning costs of the workplace. Multiple Frequency Technology: Automatically adjusts monitor to the display cardʼs scanning frequency, thus displaying the resolution required.
Troubleshooting No picture • The signal cable should be completely connected to the display card/computer. • The display card should be completely seated in its slot. • Make sure the vacation switch is in ON position. • Front Power Switch and computer power switch should be in the ON position. • Check to make sure that a supported mode has been selected on the display card or system being used. (Consult display card or system manual to change graphics mode.
References NEC Monitor Customer Service & Support Customer Service and Technical Support: (800) 632-4662 Fax: (800) 695-3044 Parts and Accessories/Macintosh Cable Adapter: (800) 632-4662 Warranty Information: www.necdisplay.com Online Technical Support www.necdisplay.com Sales and Product Information Sales Information Line: (888) 632-6487 Canadian Customers: (866) 771-0266, Ext#: 4037 Government Sales: (800) 284-6320 Government Sales email: gov@necdisplay.
Limited Warranty NEC Display Solutions of America, Inc. (hereinafter “NEC DISPLAY SOLUTIONS”) warrants this Product to be free from defects in material and workmanship and, subject to the conditions set forth below, agrees to repair or replace (at NEC DISPLAY SOLUTIONSʼ sole option) any part of the enclosed unit which proves defective for a period of three (3) years from the date of first consumer purchase. Spare parts are warranted for ninety (90) days.
TCO’03 Congratulations! The display you have just purchased carries the TCOʼ03 Displays label. This means that your display is designed, manufactured and tested according to some of the strictest quality and environmental requirements in the world. This makes for a high performance product, designed with the user in focus that also minimizes the impact on our natural environment.
Manufacturer’s Recycling and Energy Information NEC DISPLAY SOLUTIONS is strongly committed to environmental protection and sees recycling as one of the companyʼs top priorities in trying to minimize the burden placed on the environment. We are engaged in developing environmentally-friendly products, and always strive to help define and comply with the latest independent standards from agencies such as ISO (International Organization for Standardization) and TCO (Swedish Trades Union).
AVERTISSEMENT AFIN DʼÉVITER TOUT RISQUE DʼINCENDIE ET DʼÉLECTROCUTION, NE PAS EXPOSER CET APPAREIL À LA PLUIE OU À LʼHUMIDITÉ. NE PAS UTILISER LA FICHE POLARISÉE DE CET APPAREIL AVEC UNE PRISE DE RALLONGE ÉLECTRIQUE OU TOUTE AUTRE PRISE DANS LAQUELLE LES BROCHES NE PEUVENT PAS TOUTES ÊTRE INSÉRÉES. LE BOÎTIER DE LʼAPPAREIL CONTIENT DES COMPOSANTS À HAUTE TENSION ET NE DOIT EN AUCUN CAS ÊTRE OUVERT. TOUT TRAVAIL DʼENTRETIEN DOIT ÊTRE CONFIÉ À UN TECHNICIEN QUALIFIÉ.
Contenu Votre nouvelle boîte* de moniteur NEC MultiSync ACL doit contenir les éléments suivants : •Un moniteur MultiSync LCD1990FXpMD avec une base inclinable et pivotante à hauteur réglable • Cordon d’alimentation • Câble de signal vidéo (DVI-D au câble DVI-D) • Câble de signal vidéo (mini D-SUB 15 broches vers mini D-SUB 15 broches) • Manuel de l’utilisateur • Protecteur de câble • Vis (4) (pour monter le moniteur à un bras flexible – voir page 41) Câble DVI-D à DVI-D Câble d’alimentation Mini D-SUB mâl
Mise en train Suivez ces instructions pour fixer le moniteur ACL MultiSync à votre système : 1. Mettre l’ordinateur hors tension. 2. Pour utilisation avec un PC ou un MAC à sortie numérique DVI Connectez le câble de signal DVI au connecteur de la carte d’affichage de votre système (Figure A.1). Serrer toutes les vis. Pour un PC avec sortie analogique: Branchez le câble signal 15-broches mini DSUB sur le connecteur de la carte d’affichage de votre système (Figure A.2). Serrez toutes les vis.
Mise en train – Suite 30 Tilt Highest Stand Position DVI-I D-SUB (C.C-out pour produits NEC en option tel que la fixation de barre de son. Ne pas utiliser ce connecteur sauf indication contraire.) Figure 4 Figure 5 Assurez vous de laisser assez de distance dans les câbles pour que l’inclinaison et les fonctions de relèvement et de descente du moniteur ne soient pas entravées. 6. Maintenez tous les câbles fortement et placez la gaine de câble dans le support (Figure 7). 7.
Mise en train – Suite Figure 7 Figure 6 OFF Position ON Position Veille Interrupteur Figure 9 Figure 8 Alimentation Bouton REMARQUE : Le commutateur de veille est un réel commutateur de mise sous/hors tension. Si ce Bouton est en position arrêt, le moniteur ne peut pas se mettre sous tension en utilisant le bouton frontal. Élévation et descente de l’écran du moniteur L’écran du moniteur peut être élevé ou descendu en mode portrait ou paysage.
Mise en train – Suite Rotation d’écran Avant la rotation, l’écran doit être relevé au niveau le plus haut pour éviter les dommages accidentels de l’écran et pour éviter le pincement des doigts. Pour relever l’écran,avec une main, attrapez le haut de l’écran par sa poignée, et à l’aide de l’autre main, saisissez le bas. Soulevez jusqu’à la position la plus haute. (Figure RL.1).
Mise en train – Suite Retrait du support pour le montage Le support peut être enlever pour monter le moniteur avec une autre méthode de montage VESA, approuvée. 1. Déconnectez tous les câbles. 2. Avec une main, attrapez le haut de l’écran par sa poignée, et à l’aide de l’autre main, saisissez le bas.(voir Élévation et descente de l’écran du moniteur page 38). 3. Placez le moniteur avec l’écran vers le bas sur une surface non abrasive (Figure S.1). 4.
Mise en train – Suite Installation du bras flexible Ce moniteur ACL a été conçu pour être utilisé avec un bras flexible. Montage du moniteur sur bras flexible : 1. Enlevez le support (voir Retrait du socle du moniteur page 40). 2. Utilisez les 4 vis qui sont incluses pour fixer le bras du moniteur (Figure F.1). 100mm 100mm (Figure F.1) MISE EN GARDE : Utilisez uniquement les 4 vis qui sont incluses pour le montage afin d’éviter d’endommager le moniteur, le support ou le bras.
Commandes Commandes OSM (gestionnaire à l’écran) Situés à l’avant du moniteur, fonctionnent de la manière suivante : Pour accéder au menu OSM, appuyez sur une des touches de commande : MENU, GAUCHE, DROITE, HAUT, BAS. Pour changer le signal de source d’entrée quand l’OSM est fermé, appuyez sur la touche de SÉLECTION.
Commandes – suite Commandes de luminosité/contraste LUMINOSITÉ : Ajuste la luminosité globale de l’image et du fond. CONTRASTE : Ajuste la luminosité de l’image par rapport au fond. CONTRASTE AUTO. (Entrée analogique seulement) : Ajuste l’image affichée pour les entrées vidéo non standard. MODE ÉCO : Diminue le niveau d’énergie consommée en réduisant le niveau de luminosité. 1: Diminue la luminosité de 25 %. 2: Diminue la luminosité de 50 %. PERSO.
Commandes – suite Commandes d’image GAUCHE/DROITE (Entrée analogique seulement) : Contrôle la position horizontale de l’image dans la zone d’affichage de l’ACL. BAS/HAUT (Entrée analogique seulement) : Contrôle la position verticale de l’image dans la zone d’affichage de l’ACL. HAUTEUR (LARGEUR) (Entrée analogique seulement) : Augmente ou diminue la taille verticale ou horizontale.
Commandes – suite Systèmes de commande AccuColor® Systèmes de commande AccuColor: Six préréglages de couleurs sélectionnent le réglage de couleurs souhaité (sRGB et les préréglages de couleurs NATIVE sont standard et ne peuvent pas être modifiés). R,G,B: Augmente ou diminue la couleur rouge, verte ou bleue selon ce qui est sélectionné. La modification de couleur apparaît à l’écran et la direction (diminution ou augmentation) s’affiche parles barres.
Commandes – suite ARRÊT PROGRAMMATEUR : Le moniteur s’éteint automatiquement après la période d’inactivité programmée par l’utilisateur. Avant de mettre, un message semblera sur l’écran demandant à l’utilisateur s’ils hors tension veulent retarder le tour outre du temps par 60 minutes. Appuyez sur n’importe quel bouton d’OSM pour retarder le tour outre du temps. IPM : Le système Intelligent power manager permet au moniteur d’entrer en mode économique après une période inactivité.
Commandes – suite VERROUILLAGE OSM : Cette commande verrouille complètement l’accès de certaines ou de toutes les commandes OSM. Toute tentative d’activation d’une commande OSM en mode verrouillage OSM entraîne l’affichage d’un écran indiquant que l’accès à ces commandes est interdit. Il existe 4 façons d’utiliser la commande de VERROUILLAGE OSM : 1. VERROUILLAGE OSM avec contrôle de LUMINOSITÉ et de CONTRASTE : Ce mode verrouille tous les contrôles d’OSM, exceptées pour la LUMINOSITÉ et le CONTRASTE.
Commandes – suite Information Fournit des informations sur la résolution actuellement affichée par le moniteur. Fournit aussi les informations techniques incluant des informations sur la synchronisation programmée utilisée ainsi que les fréquences horizontales et verticales. AVERTISSEMENT OSM : Les menus d’avertissement OSM mettent en garde l’utilisateur quand des problèmes interviennent dans le signal d’entrée. Ces avertissements disparaissent quand la touche QUITTER est appuyée.
Commandes OSM-Option avancée En plus du standard sur le menu d’écran OSM, le menu des commandes OSM option avancée permet à l’utilisateur d’avoir plus de contrôle sur les commandes OSM régulières et donne accès à des commandes non disponibles dans l’OSM standard. Pour utiliser le menu option avancée • Mettre sous tension en utilisant la touche frontale de votre moniteur. • Mettez votre moniteur en marche en appuyant simultanément sur les boutons « MARCHE » et « SÉLECTION » pendant au moins une seconde.
Commandes OSM-Option avancée – suite Tag 3 H. POSITION (Position-H) Contrôle la position horizontale de l’image dans la zone d’affichage de l’ACL Appuyez sur « droite » ou « gauche » pour ajuster. V. POSITION (Position-V) Contrôle la position verticale de l’image dans la zone d’affichage de l’ACL. Appuyez sur « droite » ou « gauche » pour ajuster. (Entrée analogique seulement) (Entrée analogique seulement) H. SIZE (Hauteur [ou Largeur]) Augmente ou diminue la taille verticale ou horizontale.
Commandes OSM-Option avancée – suite Tag 5 suite DVI SELECTION (Sélection DVI) Cette fonction sélectionne le mode d’entrée DVI. Une fois que la sélection DVI est changée, vous devez redémarrer votre ordinateur. DIGITAL (NUMÉRIQUE) : L’entrée DVI numérique est disponible. ANALOG (ANALOGIQUE) : L’entrée DVI analogique est disponible. VIDEO DETECT (Détection Vidéo) Sélectionne la méthode de détection de vidéo lorsque plusieurs entrées de signal vidéo sont connectées. FIRST (PREM). : Si FIRST (PREM).
Commandes OSM-Option avancée – suite Tag 5 Tag 6 LED BRIGHTNESS (Intensité de Del) Ajuste l’intensité lumineuse du voyant à DEL de la touche d’alimentation située à l’avant du moniteur. LED COLOR (Couleur de DEL) La DEL frontale peut être bleue ou verte. SCREEN SAVER MOTION (Déplacement économiseur d’écran) Utilisez le SCREEN SAVER (économiseur d’écran) pour réduire le risque de persistance d’image.
Commandes OSM-Option avancée – suite Tag 6 suite Tag 7 OSM LOCKOUT Verrouillage OSM - suite 2: VERROUILLAGE OSM sans contrôle : Ce mode empêche l’accès à toutes les commandes OSM. Pour activer, appuyez simultanément sur les touches « SÉLECTION » et « DROITE ». Pour désactiver, appuyez simultanément sur les touches SÉLECTION et EN HAUT, dans le menu OSM. 3: VERROUILLAGE OSM avec contrôle de LUMINOSITÉ (uniquement) : Ce mode verrouille toutes les commandes d’OSM exceptées pour la LUMINOSITÉ.
Utilisation de la fonction de luminosité automatique La luminosité de l’écran ACL peut être augmentée ou diminuée selon la quantité de lumière ambiante de la pièce. Si la pièce est claire, le moniteur deviendra proportionnellement clair. Si la pièce est sombre, le moniteur deviendra proportionnellement sombre. Le but de ce dispositif est de fournir une vision plus confortable à l’œil dans différentes conditions d’éclairage.
Utilisation de la fonction de luminosité automatique - Suite. Quand la fonction « luminosité auto » est active, le niveau de luminosité de l’écran change automatique selon les conditions d’éclairage de la pièce (Figure 4). Niveau de LUMINOSITÉ réglé pour le moniteur en utilisation Quand le niveau de lumière ambiante est élevé. Niveau de LUMINOSITÉ réglé pour le moniteur en utilisation quand le niveau de lumière ambiante est bas. Gamme de LUMINOSITÉ.
Utilisation recommandée Consignes de sécurité et d’entretien POUR UNE QUALITÉ OPTIMALE, VEUILLEZ RESPECTER LES INTRUCTIONS SUIVANTES LORS DE LA CONFIGURATION ET DE LʼUTILISATION DU MONITEUR COULEUR ACL MULTISYNC® : • NʼOUVREZ PAS LE MONITEUR. Ce moniteur ne contient aucune pièce nécessitant lʼintervention de lʼutilisateur; lʼouverture et le retrait des panneaux du boîtier entraîne des risques dʼélectrocution et autres dangers. Confier tout travail dʼentretien à un technicien qualifié.
Utilisation recommandée – suite • • • • • • • • • • • • LE POSITIONNEMENT CORRECT ET LʼAJUSTEMENT DE LA POSITION DU MONITEUR CONTRIBUE À RÉDUIRE LA FATIQUE OCULAIRE ET LA TENSION DES ÉPAULE ET DU COU. POUR LE POSITIONNEMENT DU MONITEUR VERIFIEZ CE QUI SUIT : Pour une qualité optimale, laissez réchauffer le moniteur pendant 20 minutes. Ajustez la hauteur du moniteur de manière à ce que le haut de lʼécran soit placé à la hauteur des yeux.
Utilisation recommandée – suite Ergonomie Pour tirer le maximum des caractéristiques ergonomiques de ce produit, observer les directives ci-dessous : • Réglez la luminosité jusquʼà ce que la trame de fond disparaisse. • Ne réglez pas la commande Contraste au maximum. • Utilisez les commandes de format et de position préprogrammés, avec les signaux standards ; • Utilisez la configuration de couleur préréglée. • Utilisez les signaux non entrelacés avec fréquence de rafraîchissement vertical de 60 Hz.
Fiche technique Caractéristiques du moniteur Module LCD MultiSync® LCD1990FXp Diagonale : Surface utile : Résolution (nombre de pixels) : 19,0 po 19,0 po 1280 x 1024 Remarques : Matrice active; transistor à film fin (TFT) affichage à cristaux liquides (LCD); pas 0,294 mm; luminance blanche; 250cd/m² de XtraView+ technology ; taux de contraste caractéristique 1500:1. Signal d’entrée Vidéo : Sync : ANALOGIQUE 0,7 Vp-p 75 ohms Entrée numérique : DVI Sync.
Fonctions Technologie Ambix® : Technologie à double entrée permettant des entrées numérique et analogique à partir dʼun seul connecteur (DVI-I), ainsi que la prise en charge analogique supplémentaire dʼun connecteur traditionnel 15-pin mini D-SUB. Fournit la compatibilité traditionnelle avec la technologie MultiSync pour lʼanalogique ainsi que la compatibilité numérique basée sur TMDS (Transiting Minimized Differential Signaling) pour les entrées numériques.
Fonctions – suite. Système Intelligent Power Manager (IPM® ) : Fournit des méthodes dʼéconomie dʼénergie innovatrices permettant à votre moniteur de réduire la consommation dʼénergie lorsquʼil est en marche, mais non utilisé, économisant ainsi deux tiers des coûts dʼénergie, réduisant les radiations et abaissant les coûts relatifs à la climatisation de votre espace de travail.
Dépannage Aucune image • Le câble de signal doit être inséré entièrement dans la carte dʼaffichage/lʼordinateur. • La carte dʼaffichage doit être insérée entièrement dans sa fente. • Vérifier si le commutateur de veille est la position « MARCHE » . • Le commutateur dʼalimentation avant et le commutateur dʼalimentation de lʼordinateur doivent être en position de marche. • Vérifiez si le mode sélectionné par la carte dʼaffichage ou le système utilisé est supporté par le moniteur.
Références Service et assistance pour le moniteur NEC Service à la clientèle et assistance technique : Fax : (800) 632-4662 (800) 695-3044 Pièces et accessoires/adaptateur de câble Macintosh : (800) 632-4662 Information sur la garantie : www.necdisplay.com Service dʼassistance technique en ligne : www.necdisplay.
Garantie limitée Display Solutions of America, Inc. (ci-après « NEC DISPLAY SOLUTIONS ») garantit que ce produit est exempt de vice de fabrication et de main-dʼœuvre et, selon les conditions énoncées ci-dessous, accepte de réparer ou remplacer, à sa discrétion, toute pièce de lʼappareil qui sʼavérerait défectueuse et ce, pendant une période de trois (3) ans à partir de la date dʼachat initial. Les pièces de rechange sont garanties pendant quatre-vingt-dix (90) jours.
TCO’03 (C’est une traduction de portion Anglaise de TCO’03.) Félicitations! Lʼécran que vous venez dʼacheter porte lʼétiquette dʼaffichage TCOʼ03. Ceci signifie que votre écran est conçu, fabriqué et testé conformément à certaines des normes de qualité et dʼenvironnement les plus strictes dans le monde entier. Ceci contribue à un produit à performance élevée, conçu dans le respect de ce que souhaite lʼutilisateur, et qui minimise lʼimpact sur notre environnement naturel.
Informations du fabricant relatives au recylage et aux économies d’énergie NEC-DISPLAY SOLUTIONS est extrêmement résolu à protéger lʼenvironnement et considère le recyclage comme lʼune des principales priorités de lʼentreprise en essayant de minimiser les répercussions sur lʼenvironnement.
Déclaration du fabricant Nous certifions par la présente que le moniteur couleur MultiSync® LCD1990FXp(L196RY) est conforme à la directive 73/23/EEC du Conseil : – EN 60950-1 89/336/EEC du Conseil : – EN 55022 - EN 61 000-3-2 - EN 61 000-3-3 – EN 55024 et porte le sigle CE NEC Display Solutions, LTD.
NEC LCD Series AVIS DE PROPRIÉTÉ EXCLUSIVE ET DE DÉGAGEMENT DE RESPONSABILITÉ Lʼinformation contenue dans ce document, y compris tous les designs et matériels sʼy rapportant, sont la propriété de NEC Display Solutions of America, Inc., ou ses concédants. NEC Display Solutions of America, Inc.
ADVERTENCIA PARA EVITAR RIESGOS DE INCENDIO O DESCARGA, NO EXPONGA ESTA UNIDAD A LA LLUVIA O HUMEDAD. TAMPOCO USE EL TOMACORRIENTES POLARIZADO DE ESTA UNIDAD CON EL RECEPTÁCULO DE UN PROLONGADOR U OTRAS SALIDAS A NO SER QUE LAS PUNTAS SE PUEDAN INSERTAR COMPLETAMENTE. ABSTÉNGASE DE ABRIR EL GABINETE YA QUE HAY COMPONENTES DE ALTO VOLTAJE EN SU INTERIOR. CONSULTE AL PERSONAL DE MANTENIMIENTO CAPACITADO.
Contenidos La caja del monitor NEC MultiSync LCD* debe contener lo siguiente: • • • • • • • Monitor MultiSync LCD1990FXp™ con base inclinable, pivotante, giratoria y ajustable. Cable de alimentación Cable de señal de video (DVI-D a DVI-D cable) Cable de señal de video ((mini D-SUB de 15 contactos a mini D-SUB de 15 contactos) Manual del usuario Tapa de cable Tornillos (4) (para la instalación del monitor en un brazo flexible.
Inicio rápido Para conectar el monitor MultiSync® LCD a su sistema, siga estas instrucciones: 1. Apague su computadora. 2. Para utilizar con PC o MAC con salida digital DVI: Conecte el cable de señal DVI al conector de la tarjeta de visualización de su sistema (Figura A.1). Ajuste todos los tornillos. Para PC con salida análoga: Conecte el cable de señal mini D-SUB 15 clavijas a DVI-A al conector de la tarjeta de visualización de su sistema (Figura A.2).Apriete los tornillos.
Inicio rápido – continuación 30 Tilt Highest Stand Position DVI-I D-SUB (Salida CC para productos opcionales NEC como el accesorio Soundbar. No use este conector a menos que se le indique). Figure 4 Figure 5 Asegúrese de no tensar los cables para que las funciones Inclinar, Subir y Bajar del monitor funcionen correctamente. 6. Sujete firmemente todos los cables y coloque la cubierta para cables sobre el soporte (Figura 7). 7. Vuelva a deslizar la cubierta para cables a la posición correcta (Figura 8).
Inicio rápido – continuación Figura 7 Figura 6 OFF Position ON Position Interrputor Vacation Figura 8 Figua 9 Botón de encendido NOTA:El interruptor vacation es un interruptor de encendido/apagado. Si este interruptor está en posición de APAGADO, el monitor no puede prenderse usando el botón del frente. Cómo elevar y bajar la pantalla del monitor Se puede subir o bajar la pantalla del monitor mientras se esté en modo vertical u horizontal.
Inicio rápido – continuación Rotación de la pantalla Antes de girar la pantalla, súbala al máximo para evitar provocar daños accidentales y para evitar pellizcarse los dedos. Para subir la pantalla, Sujete con una mano la parte superior de la pantalla por el asa y con la otra sujete la parte inferior. Levántela hasta la posición más elevada (Figura RL.1).
Inicio rápido – continuación Cómo quitar el soporte del monitor para el montaje Se puede quitar el soporte para montar el monitor utilizando un método de montaje alternativo aprobado por VESA. 1. Desconecte todos los cables. 2. Sujete con una mano la parte superior de la pantalla por el asa y con la otra sujete la parte inferior.(consulte Cómo subir y bajar la pantalla del monitor en la página 73). 3. Coloque el monitor boca abajo sobre una superficie no abrasiva (Figura S.1). 4.
Inicio rápido – continuación Instalación de brazos flexibles Este monitor LCD está diseñado para utilizarse con un brazo flexible. Para montar el monitor a un brazo flexible: 1. Quite el soporte (consulte Cómo quitar el soporte del monitor para el motaje en la página 75). 2. Use los 4 tornillos que se suministran con el producto para conectar el brazo al monitor (Figura F.1). 100mm 100mm (Figura F.
Controles Los botones de control OSM (Administrador en pantalla), ubicados en la parte frontal del monitor, funcionan de la siguiente manera: Para acceder al menú OSM, presione cualesquiera de los botones siguientes del control: MENU, IZQUIERDA, DERECHA, ARRIBA/ABAJO. Para modificar la señal de entrada cuando el menú OSM esté cerrado, presione el botón SELECCIONAR.
Controles – continuación Controles de brillo/contraste BRILLO: ajusta la imagen completa y el brillo del fondo de la pantalla. CONTRASTE: ajusta el brillo de imagen en relación con el fondo. CONTRASTE AUTOM. (sólo para entradas análogas): Ajusta la imagen que aparece para las entradas de video no estándar. MODO ECO: Disminuye la cantidad de energía consumida al reducir el nivel de brillo. 1: Disminuye el brillo en un 25%. 2: Disminuye el brillo en un 50%.
Controles – continuación Control de imagen IZQ./DERECHA(para entrada análoga únicamente): Controla la posición hori zontal de la imagen en el área de visualización de la pantalla de LCD. ABAJO/ARRIBA(para entrada análoga únicamente): Controla la posición vertical de la imagen en el área de visu alización de la pantalla de LCD. ANCHURA (para entrada análoga únicamente): Aumenta o reduce el tamaño horizontal (o ALTURA).
Controles – continuación AccuColor® Control Systems Sistemas de control AccuColor: seis colores preestablecidos permiten seleccionar la configuración de color deseada (los valores predefinidos sRGB y ESTÁNDAR son estándar y no se pueden cambiar). R,G,B: permite aumentar o reducir el color rojo, verde o azul, dependiendo de la selección. El cambio de color aparecerá en la pantalla y la dirección (aumentar o reducir) se mostrará mediante barras.
Controles – continuación TIEMPO DESACTIV.: El monitor se apagará automáticamente después de un período determinado por el usuario. IPM (Administrador inteligente de energía): El administrador inteligente de energía permite que el monitor ingrese a un modo ahorro de energía luego de un tiempo de inactividad. El IPM tiene dos opciones de configuración. ESTÁNDAR: el monitor entra en el modo de ahorro de energía automáticamente cuando la señal de entrada se pierde.
Controles – continuación BLOQUEO OSM: Este control bloquea completamente el acceso a algunas o todas las funciones de control de OSM. Al intentar activar los controles OSM mientras se encuentra en el modo de Bloqueo, aparecerá una pantalla que indicará que los controles OSM están bloqueados. Hay 4 formas de utilizar la función BLOQUEO OSM: 1. BLOQUEO OSM con control de BRILLO y CONTRASTE: Este modo bloquea todas las funciones OSM excepto el BRILLO y el CONTRASTE.
Controles – continuación Información Proporciona información sobre la resolución actual de la visualización del monitor. Además, proporciona información técnica que incluye la temporización predefinida que se está utilizando, como también las frecuencias horizontales y verticales. ADVERTENCIAS OSM: Los menús Advertencias OSM avisan al usuario cuando hay problemas con la señal de entrada. Estas advertencias desaparecen cuando se presiona el botón Salir.
Controles OSM avanzados Además del Menú en pantalla (OSM) estándar, el menú de control OSM avanzado permite que el usuario tenga más control sobre las funciones OSM comunes como también acceso a las funciones que no están disponibles en el OSM estándar. Cómo utilizar el menú avanzado • Apague el monitor con el botón “ENCENDIDO”. • Encienda el monitor presionando simultáneamente los botones “ENCENDIDO” y “SELECCIONAR” durante al menos un segundo.
Controles OSM avanzados - continuación Entrada 3 H. POSITION (Posición H.) Configura la posición de imagen horizontal en el área de visualización del LCD. Presione “Izquierda” o “Derecha” para ajustar. V. POSITION (Posición V.) Configura la posición de imagen vertical en el área de visualización del LCD. Presione “Izquierda” o “Derecha” para ajustar. (para entrada análoga únicamente) (para entrada análoga únicamente) H. SIZE (Anchura) Aumenta o reduce el tamaño horizontal (o vertical).
Controles OSM avanzados - continuación Entrada 5 DVI SELECTION (Selección DVI) Esta función selecciona el modo entrada DVI. Si se modifica la selección de DVI, debe reiniciar la computadora. DIGITAL: La entrada digital de DVI está disponible. ANALOG (ANÁLOGICO): La entrada análoga de DVI está disponible. VIDEO DETECT (Detección de Video) Selecciona el método de detección de video cuando hay más de una entrada de video conectada.
Controles OSM avanzados - continuación Entrada 5 continuación Entrada 6 LED BRIGHTNESS (Brillo Del Led) Controla el brillo del LED de la parte frontal del monitor. LED COLOR (Color Del Led) El LED de la parte frontal puede ser azul o verde. SCREEN SAVER MOTION(Movimien to del protector de pantalla) Utilice el PROTECTOR DE PANTALLA (SCREEN SAVER) para reducir el riesgo de la persistencia de la imagen.
Controles OSM avanzados - continuación Entrada 6 continuación Entrada 7 OSM LOCKOUT (Bloqueo OSM) Continuación 2: BLOQUEO OSM sin control: Este modo impide el acceso a todas las funciones OSM. Para activarlo, presione simultáneamente los botones SELECCIONAR y “Derecha”. Para desactivarlo, presione simultáneamente los botones SELECCIONAR y “Derecha”, mientras se encuentre en el menú OSM. 3: BLOQUEO DE OSM sólo con control de BRILLO: Este modo bloquea todas las funciones OSM excepto el BRILLO.
Uso de la función Brillo automático El brillo de la pantalla LCD puede configurarse para que aumente o disminuya según la cantidad de luz ambiental de la habitación. Si la habitación es luminosa, el monitor ajusta el brillo debidamente. Si la habitación es oscura, el monitor se oscurece adecuadamente. El propósito de esta función es mejorar la calidad de imagen para la vista en diferentes condiciones de iluminación. La configuración predeterminada de Brillo automático se encuentra apagada.
Uso de la función Brillo automático - continuación Cuando se activa la función “Brillo automático”, el nivel de brillo de la pantalla cambia automáticamente de acuerdo con las condiciones de iluminación de la habitación(Figura 4). Ajuste del nivel de BRILLO para que el monitor use cuando el nivel de iluminación ambiente sea alto. Ajuste del nivel de BRILLO para que el monitor use cuando el nivel de iluminación ambiente sea bajo.
Uso recomendado Precauciones de seguridad y mantenimiento PARA UN RENDIMIENTO ÓPTIMO, OBSERVE LO SIGUIENTE CUANDO INSTALE Y UTILICE EL MONITOR A COLOR MULTISYNC® LCD • NO ABRA EL MONITOR. No hay piezas que el usuario pueda utilizar en el interior y al abrir o sacar tapas puede exponerse a peligrosas descargas eléctricas u otros riesgos. Consulte a personal de mantenimiento capacitado. • No derrame líquidos en el gabinete ni use su monitor cerca del agua.
Uso recomendado – continuación LA UBICACIÓN CORRECTA Y EL AJUSTE DEL MONITOR PUEDE REDUCIR LA FATIGA EN LOS OJOS, HOMBROS Y CUELLO. CUANDO INSTALE EL MONITOR, VERIFIQUE LO SIGUIENTE: • Para garantizar el óptimo rendimiento, deje el monitor en marcha durante 20 minutos para que se caliente. • Regule la altura del monitor de modo que la parte superior de la pantalla quede apenas por debajo de la altura de la vista. Sus ojos deben mirar apenas hacia abajo cuando visualice la mitad de la pantalla.
Uso recomendado – continuación Ergonomía Para lograr los máximos beneficios ergonómicos, le recomendamos lo siguiente: • Ajuste el brillo hasta que desaparezca la trama del fondo de la imagen. • No ajuste el control de contraste en la posición máxima. • Use los controles de tamaño y posición programados con las indicaciones estándares. • Use la configuración de color predeterminada. • Use las señales no entrelazadas con un índice de actualización de más de 60Hz.
Specifications Especificaciones del monitor LCD MultiSync® LCD1990FXp Módulo diagonal: Tamaño de la imagen visible: Resolución nativa (cuenta de píxeles): Señal de entrada Video: Sincronización: Colores de pantalla Rango de sincronización 19.0 pulgadas 19.0 pulgadas 1280x1024 Matriz activa; transistor de película delgada (TFT) pantalla de cristal líquido (LCD); puntos de 0,294 mm altura; luminiscencia blanca 250cd/m.
Características Tecnología Ambix® : tecnología de entrada dual que permite entradas analógicas y digitales fuera de un conector (DVI-I) así como compatibilidad analógica heredada fuera de un conector mini D-SUB tradicional de 15 contactos. Proporciona compatibilidad con la tecnología de multisincronismo tradicional para señales analógicas y compatibilidad digital basada en TMDS (Transiting Minimized Differential Signaling, es decir, Señalización diferencial minimizada transitoria) para entradas digitales.
Características – continuación Sistema IPM® (Administrador inteligente de energía): Proporciona métodos de ahorro de energía innovadores que permiten que el monitor consuma menos energía cuando está encendido pero no se está utilizando, lo que supone un ahorro de dos tercios de los costos de energía del monitor, y reduce las emisiones y baja los costos de aire acondicionado del lugar de trabajo.
Solución de problemas Sin imagen • El cable de señal debe estar conectado por completo a la tarjeta de visualización/computadora. • La tarjeta de visualización debe estar colocada por completo en la ranura. • Compruebe que el interruptor vacation se encuentre en la posición de ENCENDIDO. • El botón de encendido frontal y el botón de encendido de la computadora deben estar en la posición de ENCENDIDO.
Referencias Servicio de atención y asistencia al cliente de monitores NEC Servicio de atención al cliente y soporte técnico: (800) 632-4662 Fax: (800) 695-3044 Piezas y accesorios/Macintosh Adaptador de cable: (800) 632-4662 Información sobre la garantía www.necdisplay.com Soporte técnico en línea www.necdisplay.
Garantía limitada NEC Display Solutions of America, Inc. (de aquí en más “NEC DISPLAY SOLUTIONS”) garantiza que este Producto está libre de defectos de material y fabricación y que está sujeto a las condiciones aquí expuestas, acepta reparar o reemplazar (a exclusivo criterio de NEC DISPLAY SOLUTIONS) cualquiera de las piezas de la unidad adjunta que se prueben defectuosas durante un período de tres (3) años a partir de la fecha de la primera compra del consumidor.
TCO’03 (traducción de la normativa TCO’03 en inglés) ¡Felicitaciones! El monitor que acaba de adquirir lleva está certificado por TCOʼ03 Displays. Esta certificación indica que su monitor está diseñado, fabricado y probado de acuerdo con algunos de los controles de calidad y medioambientales más estrictos del mundo. Esto contribuye a lograr un producto de alto rendimiento, diseñado para el usuario y que respeta el medio ambiente.
Información del fabricante sobre reciclado y energía NEC DISPLAY SOLUTIONS está muy comprometido con la protección del medio ambiente y considera el reciclado como una de las máximas prioridades de la empresa para reducir los daños al medio ambiente. Nuestro objetivo es desarrollar productos respetuosos con el medio ambiente y poner nuestro máximo empeño en ayudar a definir y cumplir las últimas normativas de organismos independientes tales como ISO (Organización Internacional de Normalización).
Declaración del fabricante Por el presente certificamos que los monitores color MultiSync® LCD1990FXp (L196RY) cumplen con la Directiva municipal 73/23/EEC: – EN 60950-1 Directiva municipal 89/336/EEC: – EN 55022 – EN 61000-3-2 – EN 61000-3-3 – EN 55024 y tiene la marca NEC Display Solutions, Ltd.
Serie LCD de NEC NOTIFICACIÓN DE PROPIEDAD Y DESCARGO DE RESPONSABILIDAD La información divulgada en este documento, incluidos todos los diseños y materiales relacionados, es propiedad valiosa de NEC Display Solutions of America, Inc.
Declaration of the Manufacturer We hereby certify that the color monitor MultiSync® LCD1990FXp (L196RY) is in compliance with Council Directive 73/23/EEC: – EN 60950-1 Council Directive 89/336/EEC: – EN 55022 – EN 61000-3-2 – EN 61000-3-3 – EN 55024 and marked with NEC Display Solutions, Ltd.
NEC LCD Series PROPRIETARY NOTICE AND LIABILITY DISCLAIMER The information disclosed in this document, including all designs and related materials, is the valuable property of NEC Display Solutions of America, Inc. and/or its licensors, as appropriate, reserve all patent, copyright and other proprietary rights to this document, including all design, manufacturing, reproduction, use and sales rights thereto, except to the extent said rights are expressly granted to others.