NEC LCD Series MultiSync ® LCD2010X ™ Register your t product online a shi.com/ www.necmitsubi on productregistrati 2010X.
Index Warning .................................................................................. 1 Contents ................................................................................... 2 Quick Start ............................................................................ 3-7 Controls .............................................................................. 8-11 Recommended Use ............................................................. 12-13 Specifications .................................
WARNING TO PREVENT FIRE OR SHOCK HAZARDS, DO NOT EXPOSE THIS UNIT TO RAIN OR MOISTURE. ALSO, DO NOT USE THIS UNIT'S POLARIZED PLUG WITH AN EXTENSION CORD RECEPTACLE OR OTHER OUTLETS UNLESS THE PRONGS CAN BE FULLY INSERTED. REFRAIN FROM OPENING THE CABINET AS THERE ARE HIGH VOLTAGE COMPONENTS INSIDE. REFER SERVICING TO QUALIFIED SERVICE PERSONNEL. CAUTION CAUTION: TO REDUCE THE RISK OF ELECTRIC SHOCK, MAKE SURE POWER CORD IS UNPLUGGED FROM WALL SOCKET.
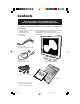
Contents You can register your product online at www.necmitsubishi.
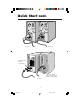
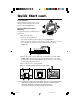
Quick Start To attach the MultiSync® LCD monitor to your system, follow these instructions: 1. Turn off the power to your computer. 2. For the PC with DVI digital output: Connect the DVI signal cable to the connector of the display card in your system (Figure A.1). Tighten all screws. For the PC with Analog output: Connect the 15-pin mini D-SUB to DVI signal cable to the connector of the display card in your system (Figure A.2).
Quick Start cont. Figure A.1 Figure A.2 Macintosh Cable Adapter (not included) Note: Some Macintosh systems do not require a Mactintosh cable adapter Figure B.1 4 2010X.
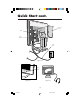
Quick Start cont. Connector Cover DVI Mini D-SUB Power Cord Figure C.1 Power Button Figure E.1 Figure D.1 5 2010X.
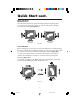
Controls Quick Start cont. Raise and Lower Monitor Screen The monitor may be raised or lowered in either Portrait or Landscape mode. To raise or lower screen, place hands on each side of the monitor and lift or lower to the desired height (Figure RL.1). Figure RL.1 Screen Rotation Before rotating, the screen must be raised to the highest level to avoid knocking the screen on the desk or pinching your fingers.
Quick Start cont. Tilt and Swivel Grasp both sides of the monitor screen with your hands and adjust the tilt and swivel as desired (Figure TS.1). Remove Monitor Stand for Mounting To prepare the monitor for alternate mounting purposes: 1. Disconnect all cables. Figure TS.1 2. Place hands on each side of the monitor and lift up to the highest position (Figure RL.1). 3. Place monitor face down on a non-abrasive surface. (Place the screen on a 2-inch platform so that the stand is parallel with the surface.
Controls OSM™ (On-Screen Manager) control buttons on the front of the monitor function as follows: To access OSM menu, press any of the control buttons ( , , , ) or the PROCEED button. To mute sound function, press the EXIT button. To rotate OSM between Landscape and Portrait modes, press the RESET button. To change DVI/D-SUB signal input, press the PROCEED button. NOTE: OSM menu must be closed in order to rotate. EXIT Main Menu Sub-Menu Exits the OSM controls. Exits to the OSM main menu.
Controls cont. AUTO ADJUST Automatically sets the Horizontal and Vertical Image Position within the display area of the LCD. Image Adjust Controls (Analog Input Only) H.SIZE Adjusts the horizontal size by increasing or decreasing this setting. FINE Improves focus, clarity and image stability by increasing or decreasing this setting. AUTO ADJUST Automatically adjusts H. SIZE and FINE settings. AccuColor® Control Systems Five color presets select the desired color setting.
Controls cont.ols LAST DETECT: The video input has to be switched to the “LAST DETECT” mode. When the monitor is displaying a signal from the current source and a new secondary source is supplied to the monitor, then the monitor will automatically switch to the new video source. When current video input signal is not present, then the monitor searches for a video signal from the other video input port.
Controls cont.ols Information DISPLAY MODE: Provides information about the current resolution display and technical data including the preset timing being used and the horizontal and vertical frequencies. MONITOR INFO: Indicates the model and serial numbers of your monitor. OSM™ Warning NO SIGNAL: This function gives a warning when there is no signal present. After power is turned on or when there is a change of input signal or video is inactive, the No Signal window will appear.
Recommended Use Safety Precautions and Maintenance FOR OPTIMUM PERFORMANCE, PLEASE NOTE THE FOLLOWING WHEN SETTING UP AND USING THE MULTISYNC® LCD COLOR MONITOR: • DO NOT OPEN THE MONITOR. There are no user serviceable parts inside and opening or removing covers may expose you to dangerous shock hazards or other risks. Refer all servicing to qualified service personnel. • Do not spill any liquids into the cabinet or use your monitor near water.
Recommended Use cont. CORRECT PLACEMENT AND ADJUSTMENT OF THE MONITOR CAN REDUCE EYE, SHOULDER AND NECK FATIGUE. CHECK THE FOLLOWING WHEN YOU POSITION THE MONITOR: • For optimum performance, allow 20 minutes for warm-up. • Adjust the monitor height so that the top of the screen is at or slightly below eye level. Your eyes should look slightly downward when viewing the middle of the screen. • Position your monitor no closer than 16 inches and no further away than 28 inches from your eyes.
Specifications Monitor Specifications MultiSync® LCD2010X™ Monitor LCD Module Diagonal: Viewable Image Size: Native Resolution (Pixel Count): Input Signal Video: Sync: 20.1 inch 20.1 inch Landscape: 1280 x 1024 Portrait: 1024 x 1280 Notes Active matrix; thin film transistor (TFT) liquid crystal display (LCD); 0.31 mm dot pitch; XtraView™ technology; 250cd/m2 white luminence; 250:1 contrast ratio, typical ANALOG 0.7 Vp-p/75 Ohms Digital Input: TMDS™ Separate sync. TTL Level Horizontal sync.
Features ambix™ Technology: Dual input technology allowing both analog and digital inputs off of one connector (DVI-I) as well as additional legacy analog support off of a traditional 15pin VGA connector. Provides traditional MultiSync® technology compatibility for analog as well as TMDS™-based (Transition Minimized Differential Signaling) digital compatibility for digital inputs. TMDS-based digital interfaces include DVI-D,DFP and P&D.
Features cont. IPM™ (Intelligent Power Manager) System: Provides innovative power-saving methods that allow the monitor to shift to a lower power consumption level when on but not in use, saving two-thirds of your monitor energy costs, reducing emissions and lowering the air conditioning costs of the workplace. Multiple Frequency Technology: Automatically adjusts monitor to the display card’s scanning frequency, thus displaying the resolution required.
Troubleshooting No picture • • • • The signal cable should be completely connected to the display card/computer. The display card should be completely seated in its slot. Power Button and computer power switch should be in the ON position. Check to make sure that a supported mode has been selected on the display card or system being used. (Please consult display card or system manual to change graphics mode.) • Check the monitor and your display card with respect to compatibility and recommended settings.
References • BBS (978) 742-8706 NEC-Mitsubishi Remote Bulletin Board System is an electronic service accessible with your system and a modem. Communication parameters are: 300/1200/2400/9600/14.4k/28.8k/33.6k bps, no parity, 8-data bits, 1 stop bit • Customer Service/ Technical Support Fax (800) 632-4662 (978) 742-7049 • Electronic Channels: NEC-Mitsubishi Remote Bulletin Board System Internet e-mail: tech-support@necmitsubishi.com Internet ftp site: ftp.necmitsubishi.com World Wide Web: http://www.
Limited Warranty NEC-Mitsubishi Electronics Display of America, Inc. (hereinafter “NEC-MITSUBISHI”) warrants this Product to be free from defects in material and workmanship and, subject to the conditions set forth below, agrees to repair or replace (at NEC-MITSUBISHI’s sole option) any part of the enclosed unit which proves defective for a period of three (3) years from the date of first consumer purchase. Spare parts are warranted for ninety (90) days.
TCO’95 LH-20S01-BK Congratulations! You have just purchased a TCO’95 approved and labeled product! Your choice has provided you with a product developed for professional use. Your purchase has also contributed to reducing the burden on the environment and also, to the further development of environmentally adapted electronics products.
TCO’95 cont. reproductive damage in fisheating birds and mammals, due to the bio-accumulative* processes. Flame retardants have been found in human blood and researchers fear that disturbances in foetus development may occur. TCO’95 demand requires that plastic components weighing more than 25 grams must not contain organically bound chlorine and bromine. Lead** Lead can be found in picture tubes, display screens, solders and capacitors.
TCO’99 LH-20S01 Congratulations! You have just purchased a TCO’99 approved and labeled product! Your choice has provided you with a product developed for professional use. Your purchase has also contributed to reducing the burden on the environment and also to the further development of environmentally adapted electronics products.
TCO’99 cont. TCO’99 demand requires that plastic components weighing more than 25 grams must not contain flame retardants with organically bound chlorine and bromine. Flame retardants are allowed in the printed circuit boards since no substitutes are available. Lead** Lead can be found in picture tubes, display screens, solders and capacitors. Lead damages the nervous system and in higher doses, causes lead poisoning.
Declaration of the Manufacturer We hereby certify that the color monitors MultiSync® LCD2010X™ (LH-20S01) MultiSync LCD2010X (LH-20S01-BK) are in compliance with Council Directive 73/23/EEC: – EN 60950 Council Directive 89/336/EEC: – EN 55022 – EN 55024 – EN 61000-3-2 – EN 61000-3-3 and marked with NEC-Mitsubishi Electric Visual Systems, Corp. 686-1, NISHIOI OI-MACHI, ASHIGARAKAMI-GUN KANAGAWA 258-8533, JAPAN 24 2010X.
AVERTISSEMENT AFIN D’ÉVITER TOUT RISQUE D’INCENDIE OU D’ÉLECTROCUTION, NE PAS EXPOSER CET APPAREIL À LA PLUIE OU À L’HUMIDITÉ. NE PAS UTILISER LA FICHE D’ALIMENTATION POLARISÉE AVEC UNE PRISE DE CORDON DE RALLONGE OU AUTRE PRISE SAUF SI LES BROCHES PEUVENT ÊTRE ENTIÈREMENT INTRODUITES. NE PAS OUVRIR LE BOÎTIER, LEQUEL CONTIENT DES COMPOSANTS À HAUTE TENSION. CONFIER TOUS TRAVAUX À DU PERSONNEL TECHNIQUE QUALIFIÉ.
Contenu Votre produit peut être enregistré sur Internet à l’adresse http://www.necmitsubishi.
Mise en marche rapide Pour raccorder le moniteur MultiSync® LCD au syst è me,suivez les directives ciaprès : 1. Mettez l’ordinateur hors tension. 2. Pour PC avec sortie numérique DVI : Branchez le câble d’interface DVI dans le connecteur de la carte d’affichage de votre système (Figure A.1) Serrez toutes les vis. Pour un PC avec sortie analogique : connecter le mini D-SUB à 15 broches vers le câble de signal DVI sur le connecteur de la carte d’affichage de votre système (Figure A.2).
Mise en marche rapide (suite) Figure A.1 Figure A.3 Adaptateur Macintosh (non fourni) Remarque : Certains systèmes Mactintosh ne nécessitent pas un adaptateur de câble Macintosh Figure B.1 28 2010X.
Mise en marche rapide (suite) Couvervle des connecteurs DVI Mini D-SUB Cordon d’alimentation Figure C.1 Bouton d’alimentation Figure E.1 Figure D.1 29 2010X.
Mise en marche rapide (suite) Utilisation d’un écouteur 1. Branchez le câble audio à l ’entrée “line in” à l’arriè re du moniteur et l’autre extrémité à la borne de “sortie audio ” de l’ordinateur.Remettez le cache-connecteur en place. 2. Connectez l’écouteur à la sortie “écouteur” à droite du moniteur (Figure F.1) Vous pouvez vous procurer un é couteur aupr è s de votre magasin de composants électroniques local.
Mise en marche rapide (suite) Incliner et pivoter Placez les mains de chaque côté du moniteur et réglez l’inclinaison et la position souhaitées (Figure TS.1). Enlever le support du moniteur pour le montage Pour préparer le moniteur à différents types de montage : Figure TS.1 1. Déconnectez tous les câbles. 2. Placez les mains de chaque côte de moniteur et soulevez jusqu à la position la plus élevée (Figure RL.1). 3.
Commandes Les boutons de réglage OSMMC situés sur l’avant du moniteur fournissent les fonctions suivantes : Pour accéder au menu OSM, appuyez sur une des touches de commande ( , , , ) ou sur la touche PROCEED. Pour rendre la fonction de sourdine silencieuse, appuyez sur la touche EXIT. À transformer DVI/D ou SUB signale de l’entrée, presser le CONTINUE bouton. Pour basculer entre les modes Landscape et Portrait, appuyez sur la touche RESET.
Commandes (suite) d’affichage du LCD. Réglage image SIMPLE Règle la dimension horizontale de l’image en augmentant ou en diminuant le format horizontal. FIN Améliore la mise au point, la netteté et la stabilité de l’image en augmentant ou en diminuant la valeur Fin. RÉGLAGE AUTO Ajuste automatiquement les réglages SIMPLE et FIN. Système de contrôle des couleurs AccuColor® Les cinq préréglages de couleurs sélectionnent la configuration de couleur désirée. Chaque préréglage est configuré à l’usine.
Commandes (suite) pas d’autres signaux vidéo tant que la source vidéo courante est active. LAST DETECT : L’entrée vidéo doit être réglée sur le mode “LAST DETECT ”. Si le moniteur affiche un signal de la source courante et qu ’une nouvelle source secondaire est activée, le moniteur se branche automatiquement sur cette nouvelle source vidéo. En l’absence de signal de l’entrée vidéo courante, le moniteur cherche un signal vidéo dans l’autre port d’entrée vidéo.
Commandes (suite) apparaît de 30 secondes après la non reconnassance du signal d’entrée en tant que signal 1280 x 1024. Information MODE D’AFFICHAGE : Fournit de l’information sur la résolution d’affichage et les données techniques courantes incluant le préréglage de la synchronisation utilisée et les fréquences horizontale et verticales. INFORMATION ÉCRAN : Le numéro du modèle et le numéro de série y sont indigués. Avertissement OSMMC PAS DE SIGNAL : Cette fonctionne vous avertit de l’absence de signal.
Usage recommandé Consignes de sécurité et d’entretien POUR UN FONCTIONNEMENT OPTIMAL, PRIÈRE DE NOTER CE QUI SUIT POUR LE RÉGLAGE ET L'UTILISATION DU MONITEUR COULEUR MULTISYNC® LCD : • NE PAS OUVRIR LE MONITEUR. Aucune pièce intérieure ne nécessite l'intervention de l'utilisateur, et l'ouverture ou la dépose des couvercles peut entraîner des risques de décharges électriques dangereuses ou d'autres risques. Confier tous travaux à du personnel technique qualifié.
Usage recommandé (suite) LA MODIFICATION DE LA POSITION ET DU RÉGLAGE DU MONITEUR PEUT RÉDUIRE LA FATIGUE DES YEUX, DES ÉPAULES ET DE LA NUQUE. OBSERVER LES DIRECTIVES CI-APRÈS LORS DU POSITIONNEMENT DU MONITEUR : • Pour une performance optimale, laissez le moniteur se réchauffer pendant 20 minutes. • Régler la hauteur du moniteur de sorte que le dessus de l'écran soit au niveau ou légèrement endessous du niveau des yeux.
Fiche technique Caractér. techn. du moniteur Module LCD Moniteur Remarques MultiSync® LCD2010XMC Diagonale : Surface utile : Résolution (nombre de pixels) : Vidéo : Sync : Signal d'entrée Entrée analogique : Couleurs d'affichage Horizontale : Verticale : Gamme de synchronisation Portrait : Zone d'affichage active Paysage : Horiz. : Vert. : Portrait : Horiz. : Vert. : ANALOGIQUE O,7 Vp-p/75 Ohms Synchro séparée niveau TTL. Positif/négatif sync. horizontale Positif/négatif sync. verticale Sync.
Fonctions Technologie ambixMC : À double entrée permettant des entrées analogique et numérique à partir du même connecteur (DVI-I) ainsi que le support de matériel analogique existant à partir d’un connecteur VGA à 15 broches conventionnel. Assure la compatibilité avec la technologie MultiSync® traditionnelle pour les entrées analogiques ainsi que la compatibilité numérique basée sur TMDSMC (Transition Minimized Differential Signaling) pour les entrées numériques.
Fonctions (suite) Commandes OSMMC Display Screen (Gestionnaire à l’écran) : Permet de régler facilement et rapidement tous les éléments de l’image de l’écran via les menus à l’écran simples à utiliser. Fonctions ErgoDesign® : Améliore l'ergonomie humaine pour améliorer l'environnement de travail, protéger la santé de l'utilisateur et épargner de l'argent.
Dépannage Pas d'image • Le câble vidéo doit être bien connecté à la carte d'affichage et à l’ordinateur. • La carte d'affichage doit être insérée à fond dans son logement. • Les interrupteurs d’alimentation du moniteur et de l’ordinateur doivent être sur la position MARCHE. • Vérifiez qu’un mode d’affichage autorisé a été sélectionné pour la carte d’affichage ou le système utilisé (veuillez consulter le manuel de votre carte d'affichage ou de votre système pour modifier le mode graphique).
Dépannage (suite) L'image n’a pas la bonne taille • Utilisez les boutons de Réglage image OSM pour augmenter ou diminuer le format horizontal. • Vérifiez qu’un mode d’affichage supporté a été sélectionné pour la carte d’affichage ou le système utilisé (veuillez consulter le manuel de votre carte d'affichage ou de votre système pour modifier le mode graphique). Pas de vidéo • Si pas be vidéo n’est présent sur l’écran, appuyez le couton d’alimentation marche et arrêt encore. 42 2010X.
Références • BBS (978) 742-8706 Le système de babillard électronique NEC-Mitsubishi Electronics Display of America, Inc. est un service électronique accessible avec votre système et un modem. Les paramètres de communication sont : 300/1200/2400/9600/ 1,4 k/28,8 k/33,6 k bps, pas de parité, 8 bits de données, 1 bit d'arrêt • Service à la clientèle/ Assistance technique (800) 632-4662 Télécopieur (978) 742-7049 • Canaux électroniques : Courrier électronique Internet (e-mail) : tech-support@necmitsubishi.
Garantie limitée NEC-Mitsubishi Electronics Display of America, Inc. (ci-après «NEC-MITSUBISHI ») garantit que ce produit est exempt de vice de fabrication et de main-d’oeuvre et, selon les conditions énoncées cidessous, accepte de réparer ou remplacer, à sa discrétion, toute pièce de l’appareil concerné qui s’avérerait défectueuse et ce, pendant une période de trois (3) ans à partir de la date d’achat initial. Les pièces de rechange sont garanties pendant quatre-vingt dix (90) jours.
TCO’95 LH-20S01-BK Félicitations! Vous avez acheté un produit qui répond à la directive TCO’95. En choisissant ce produit conçu pour une utilisation professionnelle, vous contribuez aussi à la réduction des effets nuisibles sur l’environnement et aussi au développement continu de produits électroniques respectueux de l’environnement.
TCO’95 (suite) de substances ignifuges. Ces dernières s’apparentent à un autre groupe de toxines environnementales, les PCB, qui sont suspectés de provoquer les mêmes effets néfastes, dont la modification de la reproduction chez les oiseaux piscivores et les mammifères, attribuable aux processus biocumulatifs*. La présence de retardateurs de flamme a été détectée dans le sang humain et les chercheurs craignent que le développement du fœtus pourrait être perturbé.
TCO’99 LH-20S01 Félicitations! Vous avez acheté un produit qui répond à la directive TCO’99. En choisissant ce produit conçu pour une utilisation professionnelle, vous contribuez aussi à la réduction des effets nuisibles sur l’environnement et aussi au développement continu de produits électroniques respectueux de l’environnement.
TCO’99 (suite) 25 grammes ne contiennent pas de retardateurs de flame contenant du chlore ou du brome organiquement liés. Les retardateurs de flame sont autorisés dans les cartes à circuits imprimés étant donné qu’aucun substitut n’est encore disponible. Plomb** Le plomb peut être présent dans les tubes cathodiques, les écrans, les soudures et les condensateurs. Le plomb s’attaque au système nerveux et, à doses élevées, entraîne l’intoxication par le plomb.
Déclaration du fabricant Nous certifions par la présente que les moniteurs MultiSync® LCD2010XMC (LH-20S01) MultiSync LCD2010X (LH-20S01-BK) est conformes à la directive 73/23/EEC du Conseil : – EN 60950 la directive 89/336/EEC du Conseil : – EN 55022 – EN 55024 – EN 61000-3-2 – EN 61000-3-3 et porte le sigle NEC-Mitsubishi Electric Visual Systems Corp. 686-1, NISHIOI OI-MACHI, ASHIGARAKAMI-GUN KANAGAWA 258-8533, JAPAN 49 2010X.
Série LCD NEC AVIS DE PROPRIÉTÉ EXCLUSIVE ET DE DÉGAGEMENT DE RESPONSABILITÉ Les informations contenues dans ce document, y compris tous les designs et matériel s'y rapportant, sont la propriété de NEC-Mitsubishi et/ou ses concédants.
WARNUNG UM BRÄNDE BZW. ELEKTRISCHE SCHLÄGE ZU VERMEIDEN, SETZEN SIE DIESES GERÄT WEDER REGEN NOCH SONSTIGER FEUCHTIGKEIT AUS. VERWENDEN SIE DEN GEPOLTEN STECKER DIESES GERÄTS NICHT MIT EINER VERLÄNGERUNGSSTECKDOSE ODER ANDEREN STECKDOSEN, WENN DIE POLE NICHT ZUR GÄNZE IN DIESE EINGEFÜHRT WERDEN KÖNNEN. ÖFFNEN SIE DAS GERÄT NICHT SELBST, DA ES UNTER HOHER SPANNUNG STEHENDE KOMPONENTEN ENTHÄLT. ÜBERLASSEN SIE WARTUNGSARBEITEN QUALIFIZIERTEN SERVICETECHNIKERN.
Lieferumfang Sie können lhr Gerät auch im Internet unter der Adresse http://www.necmitsubishi.com/productregistration Ihr neues MultiSync® LCD Monitor-Paket* von NEC-Mitsubishi Electronics Display of America, Inc.
Quick Start Um den MultiSync® LCD Monitor an Ihr System anzuschließen, führen Sie bitte folgende Instruktionen aus: 1. Den Computer ausschalten. 2. Für PC mit DVI-Digitalausgang: Den DVI des geeigneten Signalkabels an die Buchse der Displaykarte Ihres Systems anschließen (Abbildung A.1) Alle Schrauben festziehen. Für PC mit Analogausgang: Den 15-Stift Mini-D-SUB zum DVI-Signalkabel an die Buchse der Displaykarte in Ihrem System anschließen (Abbildung A.2).
Quick Start / Fortsetzung Abbildung A.1 Abbildung A.3 Macintosh Kabeladapter (nicht im Lieferumfang) Macintosh Modelle G3 oder G4 benötigen keinen Macintosh-Kabeladapter Abbildung B.1 54 2010X.
Quick Start / Fortsetzung DVI Anschlußdeckel Mini D-SUB Netzkabel Abbildung C.1 Netzschalter Abbildung F.1 Abbildung E.1 55 2010X.
Quick Start / Fortsetzung Kopfhörer verwenden 1. Das Audiokabel an “Line-in“ auf der Rückseite des Monitors und das andere Ende an die “Audio out“-Klemme des Computers anschließen. Danach die Abdeckung für den Anschluss wieder anbringen. 2. Kopfhörer können an den “Headphones“-Ausgang auf der rechten Monitorseite angeschlossen werden (Abbildung E.1). Kopfhörer sind in Elektrofachgeschäften am Ort erhältlich.
Quick Start / Fortsetzung Kippen und Schwenken Fassen Sie beide Seiten des Monitorbildschirms und kippen bzw. schwenken Sie den Bildschirm in die gewünschte Position (Abbildung TS.1). Abnehmen des Monitorfußes zu Montagezwecken Um den Monitor für alternative Montagemethoden vorzubereiten, gehen Sie vor wie folgt : 1. Schließen Sie sämtliche Kabel ab. Abbildung TS.1 2. Legen sie eine Hände auf jede seite des Monitors und heben Sie bis zur höchsten Position an (Abbildung RL.1). 3.
Bedienungselemente DVI/D-SUB: Erlaubt ein Wechseln zwischen den DVI-Analog-, DVI-Digital- und D-SUBSignaleingängen. Mit den vorne am Monitor befindlichen OSM™- (On-Screen Manager)-Tasten werden die folgenden Funktionen ausgeführt : Um auf das OSM-Menü zuzugreifen, drücken Sie eine beliebige Steuertaste ( , , , ) bzw. die PROCEED-Taste. Zu verändern DVI/D- oder SUB zeige Versorgung, bedrängen die VERAUFE Schaltfläche an. Um das OSM-Menü zwischen Längs- und Querformat umzustellen, drücken Sie die Taste RESET.
Bedienungselemente / Fortsetzung Positionsregler (nur Analogeingang) LINKS / RECHTS Steuert die horizontale Bildposition innerhalb des LCD-Anzeigebereichs. UNTEN / OBEN Steuert die vertikale Bildposition innerhalb des LCD-Anzeigebereichs. AUTOM. EINST Stellt die horizontale und die vertikale Bildposition innerhalb des LCDAnzeigebereichs automatisch ein. Bildanpassungsregler (nur Analogeingang) BILDPUNKTE Paßt die horizontale Bildgröß e durch Erhöhen oder Verringern der Einstellung an.
Bedienungselemente / Fortsetzung VIDEO DETECT: Zur Wahl des Verfahrens zur Erkennung des Videosignals, wenn zwei Rechner an den Monitor angeschlossen sind. NONE: Der Monitor sucht nur im eingeschalteten Zustand den anderen Videoeingang. FIRST DETECT: In dieser Stellung schaltet der Monitor automatisch nur dann auf den anderen Eingang um, wenn am ersten kein Signal mehr anliegt.
Bedienungselemente / Fortsetzung Information GRAFIK MODUS: Liefert Information über die derzeitige Auflösung auf dem Bildschirm sowie technische Daten einschließlich der benutzten Voreinstellzeit sowie der horizontalen und vertikalen Frequenzen. MONITORINFORMATION: Zeigt Modell-und Seriennummern des Monitors. OSM™ Warnung KEIN SIGNAL: Warnung,wenn kein Signal anliegt. Dieses Fenster erscheint, wenn nach dem Einschalten des Monitors oder dem Wechseln des Eingangssignals kein Videosignal anliegt.
Empfehlungen für die Verwendung Vorsichtsmaßnahmen und Wartung UM DIE OPTIMALE LEISTUNGSFÄHIGKEIT IHRES MULTISYNC LCD FARBMONITORS ZU GEWÄHRLEISTEN, SOLLTEN SIE BEI DER AUFSTELLUNG UND VERWENDUNG IHRES GERÄTES DIE FOLGENDEN PUNKTE BEACHTEN • ÖFFNEN SIE DEN MONITOR NICHT. Im Inneren des Gerätes befinden sich keine Teile, die vom Benutzer selbst gewartet werden können. Das Öffnen oder Entfernen der Abdeckungen könnte einen elektrischen Schock verursachen oder zu anderen gefährlichen Situationen führen.
Empfehlungen für die Verwendung / Fortsetzung EINE KORREKTE AUFSTELLUNG UND EINRICHTUNG DES MONITORS KANN BEIM ARBEITEN AM BILDSCHIRM AUGEN, NACKEN- UND SCHULTERMUSKULATUR ENTLASTEN. BEACHTEN SIE BEIM AUFSTELLEN DES MONITORS BITTE DIE FOLGENDEN PUNKTE: • Lassen Sie den Monitor 20 Minuten lang aufwärmen, um optimale Leistung sicherzustellen. • Passen Sie die Höhe des Monitors so an, daß der obere Bildschirmrand sich in oder geringfügig unter Ihrer Augenhöhe befindet.
Technische Daten Technische Daten Monitor Diagonal: Sichtbare Bildgröße: LCD Modul dem Monitor entsprechende Auflösung (Pixel-Count): Eingangssignal Video: Sync: Display-Farben Analoges Eingangssignal: Synchronisationsbereich Unterstützte Auflösungen 51 cm (20,1 Zoll) 51 cm (20,1 Zoll) Quer: 1280 x 1024 Hoch: 1024 x 1280 Aktive Matrix, Dünnfilmtransistor (TFT), Flüssigkristallanzeige (LCD), 0,31 mm, Punktabstand XtraView ™-Technologie, 250 cd/m2, weiße Leuchtdichte, Kontrastverhältnis 250:1, typisc
Funktionen ambix™ Technology: Erlaubt sowohl analoge als auch digitale Signale am gleichen Eingang (DVI-I) sowie einen zus ä tzlichen analogen 15pol VGA-Eingang. Bietet MultiSync-Technologie für analoge Eingangssignale sowie digitale TMDS- Eingangssignale (TMDS =Transition Minimized Differential Signal). Zu den digitalen TMDS-Schnittstellen gehören DVI-D, DFP und P&D.
Funktionen / Fortsetzung Plug-and-Play: Die Microsoft®-Lösung mit dem Betriebssystem Windows®95/98 erleichtert die Einrichtung und Installation, indem die Eigenschaften des Monitors (z.B. Bildschirmgröße und unterstützte Auflösungen) direkt vom Monitor an den Computer übermittelt werden, wodurch die Anzeige automatisch optimiert wird.
Fehlerbehebung Kein Bild • Das Signalkabel muß ordnungsgemäß an die Grafikkarte / den Computer angeschlossen sein. • Vergewissern Sie sich, daß die Grafikkarte vollständig eingeschoben ist. • Vergewissern Sie sich, daß der Einschaltknopf des Monitors und der Einschaltknopf des Computers auf ON stehen. • Vergewissern Sie sich, daß auf der Grafikkarte oder im verwendeten System ein unterstützter Modus ausgewählt wurde.
Verweise • BBS (978) 742-8706 Das Remote Bulletin Board System von NEC-Mitsubishi ist ein elektronischer Service, den Sie mit Hilfe Ihres Systems und eines Modems nutzen können. Die Kommunikationsparameter lauten: 300/1200/2400/9600/14,4k/28,8k/ 33.
Beschränkte Gewährleistung NEC-Mitsubishi Electronics Display of America, Inc.
TCO’95 LH-20S01-BK Herzliche Gratulation! Sie haben gerade eines der unter TCO’95 zugelassenen und zertifizierten Produkte erworben. Damit steht Ihnen ein Produkt zur Verfügung, das für die gewerbliche Anwendung entwickelt wurde. Ihr Kauf hat außerdem dazu beigetragen, die Umweltbelastung zu reduzieren und die weitere Entwicklung umweltgerechter Elektronikprodukte zu fördern.
TCO’95 / Fortsetzung bestehen. Diese sind verwandt mit einer weiteren Gruppe von Umweltgiften, den PCBs (polychlorierten Biphenylenen), die im Verdacht stehen, ähnlich schädlich zu sein und unter anderem aufgrund bioakkumulativer Prozesse* auch negative Auswirkungen auf die Vermehrung fischfressender Vögel und Säugetiere zu haben. Entflammungsverzögerer wurden auch im menschlichen Blut gefunden, und die Wissenschaftler fürchten, daß sie Störungen der fetalen Entwicklung zur Folge haben könnten.
TCO’99 LH-20S01 Herzliche Gratulation! Sie haben gerade eines der unter TCO’99 zugelassenen und zertifizierten Produkte erworben. Damit steht lhnen ein Produkt zur Verfügung, das für die gewerbliche Anwendung entwickelt wurde. Ihr Kauf hat außerdem dazu beigetragen, die Umweltbelastung zu reduzieren und die weitere Entwicklung umweltgerechter Elektronikprodukte zu fördern.
TCO’99 / Fortsetzung bioakkumulativer Prozesse* auch negative Auswirkungen auf die Vermehrung fischfressender Vögel und Säugetiere zu haben. Entflammungsverzögerer wurden auch im menschlichen Blut gefunden, und die Wissenschaftler fürchten, daß sie Störungen der fetalen Entwicklung zur Folge haben könnten. TCO’99 verlangt, daß Plastikkomponenten, die mehr als 25 Gramm wiegen, keine Entflammungsverzögerer mit organisch gebundenem Chlor oder Brom enthalten dürfen.
Erklärung des Herstellers Wir bestätigen hiermit, daß der Farbmonitoren MultiSync® LCD2010X™ (LH-20S01) MultiSync LCD2010X (LH-20S01-BK) den folgenden Richtlinien entspricht: Richtlinie des Rates 73/23/EEC: – EN 60950 Richtlinie des Rates 89/336/EEC: – EN 55022 – EN 55024 – EN 61000-3-2 – EN 61000-3-3 und folgende Kennzeichnung trägt NEC-Mitsubishi Electric Visual Systems, Corp. 686-1, NISHIOI OI-MACHI, ASHIGARAKAMI-GUN KANAGAWA 258-8533, JAPAN 74 2010X.
NEC LCD Series EIGENTUMSRECHTE UND HAFTUNGSAUSSCHLUSS Die in diesem Dokument veröffentlichten Informationen einschließlich sämtlicher Muster und verwandten Materialien sind Eigentum der Firma NEC-Mitsubishi und/oder ihrer Lizenzgeber. NEC-Mitsubishi bzw.
NEC LCD Series PROPRIETARY NOTICE AND LIABILITY DISCLAIMER The information disclosed in this document, including all designs and related materials, is the valuable property of NECMitsubishi and/or its licensors, as appropriate, reserve all patent, copyright and other proprietary rights to this document, including all design, manufacturing, reproduction, use and sales rights thereto, except to the extent said rights are expressly granted to others.