MultiSync MT840/MT1040 LCD Projector User’s Manual
IMPORTANT INFORMATION RF Interference Precautions Please read this manual carefully before using your NEC MultiSync MT840/MT1040 Projector and keep the manual handy for future reference. Your serial number is located under the name plate label on the left side of your MultiSync MT840/MT1040. Record it here: WARNING The Federal Communications Commission does not allow any modifications or changes to the unit EXCEPT those specified by NEC Technologies in this manual.
Important Safeguards These safety instructions are to ensure the long life of your projector and to prevent fire and shock. Please read them carefully and heed all warnings. Installation 1. For best results, use your projector in a darkened room. 2. Place the projector on a flat, level surface in a dry area away from dust and moisture. 3. Do not place your projector in direct sunlight, near heaters or heat radiating appliances. 4. Exposure to direct sunlight, smoke or steam can harm internal components. 5.
Lamp Replacement • To replace the lamp, follow all instructions provided on page E-33. • Be sure to replace the lamp when the Status light comes on. If you continue to use the lamp after 2000 hours of use, the lamp bulb may shatter, and pieces of glass may be scattered in the lamp case. Do not touch them as the pieces of glass may cause injury. If this happens, contact your NEC dealer for lamp replacement. • Allow a minimum of ONE minute to elapse after turning off the projector.
TABLE OF CONTENTS Setup ..................................................................... E-23 Orientation ........................................................ E-23 Background ...................................................... E-23 Signal Select ..................................................... E-23 Auto Start ......................................................... E-23 Power Panagement .......................................... E-23 Power Off Confirmation .................................
1. INTRODUCTION Introduction to the MultiSync MT840/MT1040 Projector • The supplied remote control can be used without a cable, and you can even use the remote control and mouse adapter to operate your PC or Macintosh mouse wirelessly from across the room with the built-in remote mouse receiver. • You can control the projector with a PC using the PC Control port. • The contemporary cabinet design is light, compact, easy to carry, and complements any office, boardroom or auditorium.
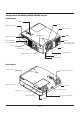
Getting to Know Your MultiSync MT840/MT1040 Projector Front Features Controls Zoom USB (Mouse) Terminal Remote Sensor P R TA E S O W TU S O N E NTE R /O FF CA S E LE C T NCEL S O U R C E M EN U USB A U TO A D JU S PC Card Access Slot T Remote Sensor Air-Filter Slot for Kensington MicroSaver Security System AC Input AC Cannot the supplied power cable’s three-pin plug here.
Top Features 1 2 SOURCE AUTO ADJUST 3 MENU 4 SELECT 6 E NT L 5 ER CA NC E 9 7 STATUS ON/OFF POWER 8 6 Cancel Button Press this button to exit “Menus”. Press this button to return the adjustments to the last condition while you are in the adjustment or setting menu. 1 Source Button Use this button to select a video source such as a PC, VCR, DVD player or PC Card Viewer (PC card installed).
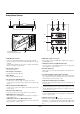
Terminal Panel Features 1 2 5 3 6 7 MOUSE PC CONTROL OUT REMOTE CONTROL INPUT USB 4 RGB INPUT 1 AUDIO RGB INPUT 2 S T LE ENTER E S JU D AUDIO 8 T C CA NCE L FF /O N O RD -CA PC 9 B US S-VIDEO Slot for Kensington MicroSaver Security System 13 10 1 USB (Mouse) Terminal Connect a commercially available mouse that supports USB. You can operate the menu or Viewer with the USB mouse via this terminal.
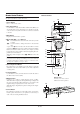
Remote Control Features Remote Control NOTE: If you are using a Macintosh computer, you can click either the right or left button to activate the mouse. 16 11 1 Source Button Press to select a video source. 16 2 Auto Adjust Button Use this button to adjust Position-H/V and Pixel Clock/Phase for an optimal picture. Some signals may not be displayed correctly, or in some cases it may take some time for a source to be switched to another. 3 Menu Button Displays the main menu for operation.
9 Picture Mute Button This button turns off the image and sound for a short period of time. Press again to restore the image and sound. 10 Help Button Provides information about operation and adjustment procedures or the set information for the current menu or adjustment during menu operation. This also displays information how to use the Help. 11 Power On And Off If power is applied, you can use this button to turn your projector on and off.
2. INSTALLATION This section describes how to set up your MultiSync MT840/MT1040 projector and how to connect video and audio sources. Setting up Your Projector 2. Connect the power cable, remove the lens cap and turn the projector on. (If no input signal is available, the projector will display a background image.) 3. Ensure that the projector is square to the screen. Your MultiSync MT840/MT1040 Projector is simple to set up and use. But before you get started, you must first: 1.
Distance Chart Screen Top Throwing Distance (S) Screen (inch) H V Screen center Q R D V Throwing Angle (U) P=2.89”(73.5mm) Projector foot Lens Center Screen Bottom MT840 Screen Size D Magnification K Throwing Distance S Throwing Angle U V Q R P Q+P Diagonal Width(H) Width(V) (inch) (inch) (inch) Wide (inch) (mm) Tele (inch) (mm) Wide (degree) Tele (degree) (inch) (mm) (inch) (mm) (inch) (mm) (inch) (mm) (inch) (mm) 30 24 18 23.1 42.2 1071.1 51.0 1296.3 10.4 8.6 18.0 457.2 7.7 196.2 1.3 32.
Ceiling Installation Screen top Projector Foot R P=2.89”(73.5mm) Throwing Angle (U) Q Lens Center V Screen center Screen Bottom Throwing Distance (S) WARNING • Installing your projector on the ceiling must be done by a qualified technician. Contact your NEC dealer for more information. * Do not attempt to install the projector yourself. • Only use your projector on a solid, level surface. If the projector falls to the ground, you can be injured and the projector severely damaged.
Wiring Diagram Supplied mouse adapter (For Macintosh) Supplied serial cable Macintosh or Compatibles (Desktop type or notebook type) Pin adapter for Macintosh (supplied) PC CONTROL MOUSE OUT REMOTE CONTROL INPUT AUDIO RGB INPUT 1 AUDIO RGB INPUT 2 Supplied mouse adapter (For IBM PS/2) IBM VGA or Compatibles (Desktop type or notebook type) DVD Player (with component output) S-VIDEO L /MONO R VIDEO Signal cable (supplied) To mini D-Sub 15-pin connector on the projector.
When using a Macintosh with the projector, set the DIP switches of the supplied pin adapter according to your resolution. After setting, restart your Macintosh. See the following pages for setting of the DIP switches. • When using with a Macintosh, SVGA(8002600 :MT840)/ XGA(10242768 : MT1040) is recommended if your Macintosh supports this mode. • When using with a Macintosh PowerBook, output may not be set to 8002600 unless “mirroring” is off on your PowerBook.
3.OPERATION This section describes how to select a computer or video source, how to adjust the picture, and how to customize the menu or projector settings. 2. Press the ▲▼ buttons on the full function remote control or the projector cabinet to highlight the menu for the item you want to adjust or set. General Controls 3. Press the © button or the “Enter” button on the projector cabinet or the “Left Click” button on the full function remote control to select a submenu or item.
MENU Tree Main Menu Mein Menu Source Select Adjustments Image Options Projector Options Sub Menu Items Adjustable Sources Source Select RGB 1 RGB 2 Video S-Video PC Card Viewer Brightness* Contrast* Color* Hue* Sharpness* R, V, C R, V, C V, C V, C V Auto Adjust** Position** Pixel Adjust** Resolution** R R R R, V, C Tools Help Adjustments Picture Volume R, V, C Image Color Temperature All Keystone All Factory Default Image Options Image Mode Video Mode Projector Options Menu Setup Tools Ca
Menu Elements Tab Title bar Close button Setup Page1 Page2 Page3 Page4 Signal Select Orientation Highlight Front Floor Solid triangle Background Blue RGB1 Auto RGB2 Auto Video Auto S-Video Auto OK Cancel Cancel Button OK Button Setup Page1 Page2 Page3 Page4 Check box Mouse Button Right Hand Radio button Auto Start Left Hand Sensitivity Fast Medium Slow Power Management Power Off Confirmation Keystone Save Clear Lamp Hour Mater Fan High Speed Mode OK Cancel Slide bar Brightness
Menu Descriptions & Functions Play/Stop: Plays back automatically or manually depending on the setting on PC Card Viewer Options of the menu. This allows you to stop Auto Play while you are playing back and to resume playing from the selected slide or folder when “Auto Play” is selected. This allows you to move on to the next slide when “Manual Play” is selected.
Auto Adjust: When “Auto Adjust” is set to “On”, the projector automatically determines the best resolution for the current RGB input signal to project an image using NEC’s Advanced AccuBlend Intelligent Pixel Blending Technology. The image can be automatically adjusted for geometry and stability; “Horizontal Position”, “Vertical Position” and “Pixel Adjust.” On: Automatically adjusts image “Horizontal Position”, “Vertical Position” and “Pixel Adjust.
Projector Options Video Mode Video Mode Gamma Projector Options Menu Noise Reduction Setup Color Matrix Enables you to set preferences and other operating options. Menu Menu Gamma: Language Gamma Normal Natural 1 English Natural 2 Projector Pointer Use the § or © buttons to choose “Normal” when in a lighted room and “Natural 1&2” when in a darkened room. “Natural 1” for better flesh tone; “Natural 2” for true reproduction of middle tones.
Setup [Page2] Enables you to set operating options. Press “OK” to save your changes for all the features of Page1, Page2, Page3 and Page4.
[Page 3] PC Card Viewer Options Start Mode Sets the starting condition when PC Viewer input is selected on the projector. Setup Page1 Page2 Page3 Page4 Show Folder List When PC Card input is selected on the projector, the folder lists will be displayed and allows you to select the presentation from the PC Card. S-Video Mode Select Remote Sensor Off Auto Play If this option is checked, any given slide will start to play automatically. You can also specify interval between 5 and 300 seconds.
The tool bar includes the following buttons: ChalkBoard (available only when using with USB mouse) Provides the tool bar for producing freehand drawings. Freeze Drag Pen: Capture Exit Drag: Drags to move the tool bar. (for USB mouse operation only) Erase: Left-click and drag to erase part of a drawing. Rightclick to display the eraser palette containing four eraser of different thickness from which you can select an eraser you prefer by left-clicking.
Using the PC Card Viewer function Inserting the PC Card • Hold the PC card horizontally and insert it slowly into card slot with its top facing up. • The eject button pops out once the PC card is fully inserted. Check that the PC card is fully inserted. NOTE: When using the supplied software (CD-ROM) The software is designed to use with a personal computer only. Do not play the software on CD player. Doing so could cause damage to speakers. NOTE: Do not try to force the PC card into the slot.
Installing the PC Card Viewer Software Starting Up the PC Card Viewer Software on your PC (PC Card Viewer Utility 1.0) Before Installing Perform the following before installing the PC Card Viewer software: • If Windows95 is already started, exit all applications. Installation may not be performed properly if any applications are running. Use the PC Card Viewer Utility 1.0 for creating viewer slides.
Operating the PC Card Viewer Function from the Projector (playback) This section describes the operation for showing slides of presentation documents created using the PC Card Viewer function with the projector. It is also possible to make slides directly from the images projected with the projector. Drag: Drags to move the tool bar. This is available for USB mouse operation only. Prev: Returns to the previous slide or folder. Or this lets you play slides back in reverse.
Auto Play Mode When the tool bar is not displayed: • If the “Auto Play” option is selected in “PC Card Viewer Options” of the menu, any given slide will start to play automatically. You can also specify Auto Play Interval between 5 and 300 seconds. Multi cursor (blue marks) Folder Folder Folder Folder Switching to Slides Directly from Other Input Modes Folder When the tool bar is not displayed, use the § or © button to advance to the next folder or return to the previous folder.
Capturing Images Displayed on the Projector Storing images displayed on the projector on the PC card Preparations: Insert the PC card into the card slot. Insert the PC card with the side with the insertion direction arrow on the top. * Press the eject button to eject the card. 1. Project the image you wish to store on the projector. 2. Select the “Capture” from the Tools menu. Tools Capture NOTE: • File size of the captured image varies depending on the resolution of an input signal.
Uninstalling the PC Card Viewer Software Deleting Captured Images Prev Play/Stop Select View Even if you do now know the PC Card Viewer software's file names or where they are stored, the PC Card Viewer software files can be easily removed from the system using the "Install/Uninstall Applications" control panel in Windows 95. (Normally there is no need to perform this operation.
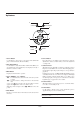
Terminology PC card This is the name of a card currently being standardized by the Japan Electronic Industry Association (JEIDA) and PCMCIA (Personal Computer Memory Card Interface Association) of the United States. TYPE (I, II and III) PCMCIA 2.1 PC cards are divided into three types according to their thickness: Type I (3.3 mm), Type II (5.0 mm) and Type III (10.5 mm). BMP A type of image format. The standard Windows Bit Map format used for MS-DOS/Windows-compatible computers.
4. MAINTENANCE E C EN U Replacing the Lamp O N /O FF S E LE C CAN C EL T S O U R M A U TO A D S T 4. Insert a new lamp housing until the lamp housing is plugged into the socket. JU This section describes the simple maintenance procedures you should follow to replace the lamp, clean the filter, and replace the batteries in the remote control.
Remote Control Battery Installation Cleaning or Replacing the Filters 1. Press firmly and slide the battery cover off. The air-filter sponge keeps the inside of the MultiSync MT840/ MT1040 Projector free from dust or dirt and should be cleaned after every 100 hours of operation (more often in dusty conditions). If the filter is dirty or clogged, your projector may overheat. CAUTION • Turn off the power and unplug the projector before replacing the filter.
5. TROUBLESHOOTING This section helps you resolve problems you may encounter while setting up or using the projector. Status Light Messages Condition Status OFF • Normal On continually • The projector lamp has exceeded 2000 hours of operation and should be replaced. Blinking very rapidly (On and off in a cycle of 1 sec.) • The lamp cover or filter cover is not fastened properly. Check and reattach it if necessary.
When using the PC Card Viewer function Condition Status No picture • • • • Part of a slide is not displayed • While an image with over 10242768 dots is projected, several lines of information will be lost. Use the supplied software change the image to 10242768 dots in size. Contents of PC Card are damaged • Areas of slides exceeding 10242768 (MT840: 8002600 dots) cannot be displayed. Use the PC Card Viewer software, etc., to change the image size to 10242768 dots (MT840: 8002600 dots).
6. SPECIFICATIONS This section provides technical information about the MultiSync MT840/MT1040 Projector’s performance. Model Number MT840 / MT840G / MT1040 / MT1040G Optical DMDTM 1.3” p-Si TFT avtive-matrix, 8002600 dots (MT840) / 10242768 dots (MT1040) Lens Manual zoom, manual focus F2.3 – 2.7 f=48.6 – 58.4 mm Lamp 180W NSH lamp Image Size 30 – 300 inches (762 – 7620 mm) diagonal Projection Distance 4.3 – 36.7 ft (1.3 - 11.2 m) Electrical Inputs Video (NTSC / PAL / PAL60 / SECAM / NTSC4.
Cabinet Dimensions 1.5 (0.06") 281 (11.06") POWER USB ON/OFF STATUS CA ER E NT NC E L SELECT MEN U AUTO ADJUST 364 (14.33") SOURCE 6.6 (0.26") 39.5 (1.56") 73.5 (2.89") 121 (4.76") Lens center AC IN 4 (0.
D-Sub Pin Assignments Mini D-Sub 15 Pin Connector 5 4 3 2 1 10 9 8 7 6 15 14 13 12 11 Pin No. Signal Level Video signal : 0.
Timing Chart Y/N Signal Resolution ( Dots ) Y Y Y Y Y Y Y Y Y Y Y Y Y Y Y Y Y Y Y Y Y Y Y Y Y #Y #Y #Y #Y #Y #Y #Y #Y ##Y ##Y ##Y ##Y ##Y ##Y ##Y ##Y ##Y ##Y ##Y ##Y ##Y NTSC PAL SECAM VESA MAC IBM VESA VESA IBM MAC MAC MAC VESA VESA IBM VESA IBM VESA IBM IBM VESA VESA VESA VESA VESA MAC VESA VESA VESA IBM MAC VESA VESA VESA MAC SUN SGI VESA SGI VESA MAC MAC HP SUN VESA VESA 640 768 768 640 640 640 640 640 640 640 640 640 640 640 640 640 720 720 720 720 800 800 800 800 800 832 1024 1024 1024 1024 1024
PC Control Codes Function Code Data POWER ON 02H 00H 00H 00H 00H 02H POWER OFF 02H 01H 00H 00H 00H 03H INPUT SELECT RGB 02H 03H 00H 00H 02H 01H 01H 09H INPUT SELECT VIDEO 02H 03H 00H 00H 02H 01H 06H 0EH INPUT SELECT S-VIDEO 02H 03H 00H 00H 02H 01H 0BH 13H INPUT SELECT PC CARD VIEWER 02H 03H 00H 00H 02H 01H 1FH 27H PICTURE MUTE ON 02H 10H 00H 00H 00H 12H PICTURE MUTE OFF 02H 11H 00H 00H 00H 13H SOUND MUTE ON 02H 12H 00H 00H 00H 14H SOUN
Cable Connection Communication Protocol Baud rate: 38400 bps Data length: 8 bits Parity: No parity Stop bit: One bit X on/off: None Full duplex Communications procedure: PC Control Connector (DIN-8P) 8 4 2 § To GND of PC © 6 7 5 To RxD of PC 3 1 To TxD of PC © NOTE: Pins 2, 3, 5, 6 and 8 are used inside the projector.