MultiSync XG85 MultiSync XG135LC Large Screen MultiSync Projection Monitor Operation Manual Model Number: XG-852/XG-1352 XG-852G/XG-1352G
For the customers in Germany CAUTION: To turn off main power, be sure to remove the plug from power outlet. The power outlet socket should be installed as near to the equipment as possible, and should be easily accessible. 3. GSGV Acoustic Noise Information Ordinance: The sound pressure level is less than 70 dB(A) according to ISO 3744 or ISO 7779.
123456 123456 123456 123456 123456 123456 INTRODUCTION. Before operating this projector, please read this manual carefully and completely. This manual will provide you with the basic instructions for operation of the projector. Installation, preliminary adjustments and procedures which require the opening of the projector and contact with electrical components should be performed by service personnel. For continued safe and reliable operation, use only cables supplied by the manufacturer for power.
INTRODUCTION Important Safeguards The following are important safety instructions designed to ensure the long life of your projector and to prevent fire and shock hazards. Be sure to read these safety instructions carefully and follow all warnings given below. Installation The projector must be installed by trained personnel. Place the projector on a flat, level surface and in a dry area free from dust and moisture.
123456 123456 123456 123456 123456 123456 123456 CONTENTS. PART NAMES AND FUNCTIONS ....................................................................6 Front Panel ..................................................................................................................... 7 Rear Panel ...................................................................................................................... 7 Remote Control Unit ........................................................................
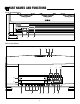
123456 123456 123456 123456 123456 123456 PART NAMES AND FUNCTIONS. Front Terminal Panel 1 2 3 Rear Control Panel A cover is provided to attach the rear control panel.
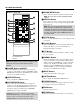
PART NAMES AND FUNCTIONS 0 POWER Button Turns the projector on or off when the projector is in the standby condition (Main Power switch must be on and the STANDBY and the RC READY indicator lit). Front Panel 1 Power Switch (Main power) To turn on the main power to the projector press the switch to the ON position (I). The STANDBY and the RC READY indicator will light.
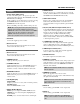
PART NAMES AND FUNCTIONS Remote control unit 4 SOUND MUTE Button Press to mute the sound. Press again to return the sound. NOTE: This works only with the ISS-6020/ISS-6020G Switcher. POWER 2 3 4 5 6 ON OFF OPERATE 1 ABC 2 DEF 3 GHI PICTURE MUTE 4 JKL 5 MNO 6 PQR SOUND MUTE 7 STU 8 VWX 9 YZ / 10 CAPTION DISPLAY ,. 5 DISPLAY Button Press to turn on or off the on-screen display. Pressing with CTL eliminates the on-screen display; pressing with CTL again restores it.
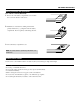
PART NAMES AND FUNCTIONS Battery installation and replacement User remote control (RC-6320) 1 Press down on the battery compartment cover and slide the cover in the direction of the arrow. 2 Install the two new batteries, making sure that their polarity matches the , . diagrams inside the battery compartment. Incorrect polarity could damage the unit. 3 Close the battery compartment cover. NOTE: The remote control is powered by two alkaline 1.5V AA batteries.
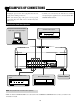
123456 123456 123456 123456 123456 123456 EXAMPLES OF CONNECTIONS. CAUTIONS ON CONNECTIONS: • Unplug the projector and other equipment from the AC supply before making connections. • Make sure that the plug of the power cord is properly connected to the power outlet. A loose connection may cause hum or noise. • Confirm your connection layout with the user’s manual accompanying the equipment to be connected with the ISS6020/ISS-6020G Switcher.
EXAMPLES OF CONNECTIONS When Used with One Switcher (ISS-6020/ISS-6020G) Up to 10 input signals can be accepted when the projector is connected to one Switcher. Using the projector with the Switcher allows easy adjustment and signal selection.
EXAMPLES OF CONNECTIONS When Used with Two or More Switchers (100 Inputs) Up to 100 inputs can be accepted using the Switcher. How to make connections: 1 Connect the REMOTE 1 terminal of the master Switcher to the REMOTE 1 of the projector using the optional control cable (15p-15p/CTL-6010). 2 Next connect the REMOTE 2 terminal of the master Switcher to the REMOTE 1 terminal of the first slave Switcher using the same optional control cable as mentioned above.
EXAMPLES OF CONNECTIONS Set the DIP switch (S8601) of the Switcher as follows: NOTE: Slave numbers 1 to 10 must correspond to the master’s slot numbers 1 to 10.
EXAMPLES OF CONNECTIONS REMOTE 1 Terminal 5 4 3 2 1 10 9 8 7 6 15 14 13 12 11 This terminal is used for either connecting the ISS-6020/ISS-6020G Switcher or a third party external control device. When the Switcher is used, connect it with the optional control cable (15-15 pin; 50 ft./16m; CTL-6010) to this terminal. When used with the Switcher. Pin No. FUNCTION 1, 2, 6 and 7 Sending and receiving data when the Switcher is used.
EXAMPLES OF CONNECTIONS When used in stand alone operation. Pin No.
123456 123456 123456 123456 123456 123456 BASIC OPERATION. Picture Projection Rear panel 3 6 INPUT SELECT POWER POWER ON OFF 1 ABC 2 DEF 3 GHI PICTURE MUTE 4 JKL 5 MNO 6 PQR SOUND MUTE 7 STU 8 VWX 9 YZ / 10 ,.
BASIC OPERATION Displaying the Menu and Adjustment Screens You can easily access your desired screen by selecting menus. Depending upon button selection, your desired screen will be displayed as shown below: OPERATE menu NOTE: Some function items will not be used depending on the input signal or peripheral equipment connected.
BASIC OPERATION Storing Projector Settings (Automatic Save Feature) You have two options to store projector settings in the memory: automatically and manually. • Storing time is four seconds. • The Automatic Save Feature mode has been set to DISABLE by factory. For information on setting, see “Automatic Save Feature” in the Set-Up manual included only with the XG-1352/XG-852 models, and if you own XG-1352G/XG-852G, contact your dealer.
BASIC OPERATION mWhen selecting “NEW” The current settings are registered as a new signal and are saved to an unassigned line starting at memory location No.51. A registered name is automatically given. The “NEW ENTRY?” menu will be displayed. NEW ENTRY? LIST No. ** NAME ******** YES NO Use the CURSOR or button to highlight “YES” or “NO” and press ENTER. Items to select • YES ------------- Registers settings as a new signal and saves the signal in an unassigned location starting at memory location No.51.
BASIC OPERATION Picture Adjustment To adjust the picture for each input, proceed as follows: NOTE: The color, sharpness, and tint controls are not selected in the “PICTURE” menu for RGB signal. The tint control is not selected in the “PICTURE” menu for SECAM/PAL signal. 1 Press the OPERATE button. • The “OPERATE” menu is displayed. 2 Use the CURSOR or button to highlight the “1/PICTURE” line and press ENTER to display the “PICTURE” menu.
BASIC OPERATION Position Adjustment Adjust the position(SHIFT), the size (IMAGE SIZE) and the screen area (BLANKING). Proceed as follows: 1 Press the OPERATE button. • The “OPERATE” menu is displayed. 2 Use the CURSOR or button to highlight the “2/POSITION” line and press ENTER to display the “POSITION” menu. You can also select the “POSITION” menu directly by pressing the INPUT “2” button.
BASIC OPERATION When selecting IMAGE SIZE: Use the CURSOR buttons to adjust the size of image. • Pressing or button increases or decreases the horizontal size. • Pressing or button increases or decreases the vertical size. POSITION – IMAGE SIZE – H V When selecting BLANKING: 1) Hold down the CTL button and press CURSOR buttons to choose the right, left, top, or bottom edge. • The marker on the selected side will turn to a solid color. 2) Adjust the blanking using the CURSOR buttons. Top and Right .......
BASIC OPERATION Sound Adjustment (only when used with the ISS-6020/ISS-6020G Switcher) Adjust the volume to your preference. Proceed as follows: 1 Press the OPERATE button. • The “OPERATE” menu is displayed. 2 Use the CURSOR or button to highlight the “3/SOUND” line and press ENTER to display the “SOUND” menu. You can also select the “SOUND” menu directly by pressing the INPUT “3” button. 3 Use the CURSOR or button to select a sound function and press ENTER.
BASIC OPERATION Input Selection You can switch from one input to any other input signal. Proceed as follows: 1 Press the OPERATE button. • The “OPERATE” menu is displayed. 2 Use the CURSOR or button to highlight the “4/INPUT SELECT” line and press ENTER to display the “INPUT SELECT” list. You can also select the “INPUT SELECT” list directly by pressing the INPUT “4” button. 3 Use the CURSOR or button to highlight the signal to be switched to and press ENTER to switch to the selected input signal.
BASIC OPERATION NOTE: • While you are viewing a source screen, you can also select the input signal directly by pressing the INPUT “1” through “10” button.
BASIC OPERATION Source Information This is for viewing the signal information and the current status of various settings. Proceed as follows: 1 Press the OPERATE button. • The “OPERATE” menu is displayed. 2 Use the CURSOR or button to highlight the “5/SOURCE INFO” line and press ENTER to display the “SOURCE INFORMATION” screen. You can also select the “SOURCE INFORMATION” screen directly by pressing the INPUT “5” button. 3 Press the CURSOR or button to select the page.
BASIC OPERATION Static Convergence Adjustment Adjust for the red and blue CRTs to place their pattern on top of the green test pattern (center only). NOTE: The static convergence adjustment should be performed for R and B CRT. Carry out the adjustment after displaying an active image for 20 minutes or more. Proceed as follows: 1 Press the OPERATE button. • The “OPERATE” menu is displayed.
BASIC OPERATION Closed Caption Mode Selection Several closed caption modes can be set for text to be superimposed on the projection screen. To select and set a mode, proceed as follows: 1 Press the OPERATE button. • The “OPERATE” menu is displayed. 2 Use the CURSOR or button to highlight the “7/CLOSED CAPTION” item and then press ENTER to display the “CLOSED CAPTION” menu. You can also select the “CLOSED CAPTION” menu directly by pressing the INPUT “7” button.
BASIC OPERATION Setting Timer Your projector can be programmed to turn on or off automatically at a specified time. The two timer functions are available: ON/OFF TIMER and SLEEP TIMER. NOTE: When the ON TIMER is set and the projector is in standby, the two digit indicator flashes “00” to indicate that the ON TIMER is active. Proceed as follows: • Before setting ON/OFF TIMER, make sure that the DATE, TIME PRESET feature is set.
BASIC OPERATION -ON/OFF TIMERPRG DAY ON 1 2 3 4 5 6 7 8 ACTIVE INACTIVE 3) Use the CURSOR or button to select “EDIT” or “CLEAR”, and then press ENTER. Items to select • EDIT --------- Enters the mode for changing setting time. • CLEAR ------ Deletes the current setting time. When making a new setting or selecting “EDIT”: Select “EDIT”, and press ENTER to display the “DAY” setting menu which allows you to set the day of the week for TIMER.
BASIC OPERATION • The time display format varies depending on the setting in “DATE TIME DISPLAY” of the “OPTION” menu. • The “OFF TIMER” setting screen is displayed. NOTE: When the ON TIMER is set alone, the timer is programmed to turn off after four hours. While this setting is effective, if any button on the remote control or the rear panel is pressed, or if any operation is made from the external control, the timer will extend the current setting time to add four more hours.
BASIC OPERATION ■ Setting SLEEP TIMER 1) Use the CURSOR or button to highlight the “2/ SLEEP TIMER” and press ENTER to display the “SLEEP TIMER” menu. You can also select the “SLEEP TIMER” menu directly by pressing the INPUT “2” or by holding down CTL and pressing POWER OFF on the remote control. -TIMER1/ ON/OFF TIMER 2/ SLEEP TIMER 2) Use the CURSOR or button to select the time between 30 minutes and 2 hours in 30 minutes.
BASIC OPERATION Mute This function mutes the picture, sound or on-screen display. To mute picture: • Press the PICTURE MUTE button. To restore the picture, press the PICTURE MUTE button again or the END button. You can also mute the picture by holding down CTL and pressing PICTURE MUTE. To mute sound: • Press the SOUND MUTE button. To restore the sound, press the SOUND MUTE button again or the END button. Note that this function works only with the ISS-6020/ISS-6020G.
Data Area for Output and Storage Adjustment data have different reference data areas depending on each operation. Adjustment Area All Gain : All adjustment data except Ref.Adjust data Ref. Adjust : Ref.Adjust data Adjustment data fall into two: REF. ADJUST menu adjustment and the other adjustment data (Operate and Adjust menu). Data area falls into five: Data Area INPUT LIST (00-99) DEFAULT DATA (1-6) Cancel Data Ref.Adjust Data Ref.
Searching Registered Signals When a source is switched with the remote control or a signal is input, the projector searches the registered signals and outputs its adjustment data as follows: By using the horizontal frequency the projector searches up to 100 signals previously stored in the INPUT LIST and up to six signals stored in the DEFAULT AREA for a matching or close data to output. * When a matching data is found in the INPUT LIST, the matching data will be displayed.
BASIC OPERATION Screen Format in Projecting a Picture NOTE: The example of the screen display is only when used with the ISS-6020/ISS-6020G. Date MON 01/16/96 12:00:00 M–01 S–01 XXXX Current time Input Source name NOTE: • See the Set-Up manual (not included with XG-1352G/XG-852G) or contact your dealer for changing the on-screen display mode. • If the main power is not supplied to the projector for three days or more, the built-in clock may be reset.
123456 123456 123456 123456 123456 123456 SPECIFICATIONS. rojection type ................. Refraction type Projector and screen are separated Projection system .......... 3 lens and 3 CRTs in-line Scanning frequency ....... (XG-1352/XG-1352G) H 15 to 135 kHz/V 40 to 160Hz (XG-852/XG-852G) H 15 to 85 kHz/V 40 to 160Hz Retrace time .................. H 6.0 µS (fH 15 to 30kHz) H 2.6 µS (fH 30 to 77kHz) H 2.0 µS (fH 77 to 120kHz) H 1.4 µS (fH 120 to 135kHz) V 270 µS Video bandwidth ............
NEC Corporation Printed in Japan 78409161