
User guide


25
Required Tools
A torx driver (T25) is necessary to install the blade enclosure on a rack.
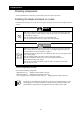
Installation Procedure
Complete the following steps to install the blade enclosure on a rack. See the instructions that come
with the rack as well.
Check
Before you install the blade enclosure on a rack, remove the doors at the front
and rear of the rack. For information on removing the rack doors, see the
instructions that come with the rack.
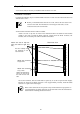
● Check where the blade enclosure will be installed.
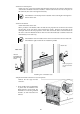
Attach core nuts or clip nuts as shown in the illustration below and attach the rail brackets
(L)/(R) to the rack to install the blade enclosure. Check where the blade enclosure, rail
brackets, and core nuts/clip nuts will be attached and installed.
Next to the rack holes, there are marks that are spaced by 1U (a unit to represent rack height).
Because the height of the blade enclosure is 10U (approximately 445mm), install the blade
enclosure in a space with a 10U height.
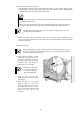
Check
Holes on the rack frame are not spaced evenly. Check that the four projections on
each rail bracket's end match with holes on the rack frame where the rail bracket is
attached before installing the blade enclosure.
Attach core nuts or clip nuts
here (four total on right and
left).
Attach the rail brack
et (R) here.
Attach the rail brack
et (L) here.
No core nuts/clip nuts
are attached on the
rear of the rack.
Attach rail brackets (R)
and (L) on the rear of
the rack like the front
side.
Blade enclosure is installed here.
Rack front view
0
1
2
3
4
5
6
7
9
10
(U)
8