
User guide


26
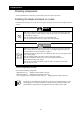
● Attach core nuts/clip nuts.
Attach core nuts or clip nuts inlcuded with the blade enclosure at the positions determined in
"Check where the blade enclosure is installed." Attach a total of four core nuts or clip nuts on
the rack front (two each on the right and left side).
Check
Check that the core nuts/clip nuts are attached on the same height on the right and
left side of the rack.
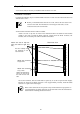
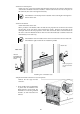
● Attach rail brackets.
Attach rail brackets to the rack.
When you attach a rail bracket, make sure that the four projections at its bent end are inserted
into the holes on the rear frame of the rack from the outside . Slide the rail according to the
rack depth and insert the four projections on the other end into the holes on the front frame of
the rack as well. The illustration below shows how the rail bracket (R) is attached. Attach the
rail bracket (L) in the same way.
Check
Check that the rails are installed on the same level at the front and rear of the rack.
Check that the right and left rails are installed in parallel.
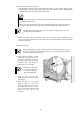
● Separate the blade enclosure into two components.
Remove the rear cage from the
enclosure.
1. If any modules such as CPU blades
or power units are installed on the
blade enclosure, remove them. For
information on removing installed
modules, see their instructions for
removal.
Insert 4
projections into
the rack frame
holes.
Insert 4 projections
into the rack frame
holes.
(1)
(3)
(2)
(1)
(2)
(3)
(3)
Rack front
Rack rear
Attaching the rail bracket (R)