
User guide


27
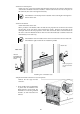
2. Use a torx driver (T25) to remove
the screws at the rear of the blade
enclosure (two each on the right
and left side for a total of four),
and then bend the hinges outward
so that the rear cage will not hit
them when it is removed.
3. Firmly hold the handles of the
blade enclosure, which are located
at its rear, on the right and left side
and slowly slide the enclosure out
approximately 10 cm. This step
should be done by two or more
people.
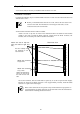
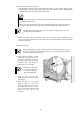
4. Firmly hold the handles of the rear
cage and the holding points at the
bottom (one each on the right and
left side) as shown in the right
illustration with two or more
people and pull out the rear cage
slowly until the tips of the stop
levers located at the side of the
rear cage are shown.
5. Keep pressing the two stop levers
on both the right and left sides and
hold the handles of the rear cage
and slowly pull out the rear cage
until the stop levers are fully
shown.
6. Firmly hold the handles of the rear
cage and the holding points at the
bottom with two or more people
and slowly remove the rear cage
from the enclosure.
Important
● When you carry the rear cage, hold the two handles at the rear of the enclosure (one each on both
the right and left side) and the holding points at the bottom (one each on the right and left side).
● When you remove the rear cage, make sure not to bump or bend the connectors and pins of the
rear cage that are located at the section connecting to the enclosure (midplane) against the
enclosure or rack frame. The midplane is the board to connect the CPU blades to switch modules
or pass-through cards inside the blade enclosure.
● Do not touch any connectors and pins of the rear cage.
Hint
The rear cage is heavy, especially the side of the section connecting to the enclosure
of the blade enclosure (midplane).When you hold the holding points at the bottom to
carry the rear cage, hold the midplane side as much as possible.
Stop lever
One each on
the right and
left side
Holding point
(One each on the right
and left side)