MultiSync LCD2060NX User’s Manual
TO PREVENT FIRE OR SHOCK HAZARDS, DO NOT EXPOSE THIS UNIT TO RAIN OR MOISTURE. ALSO, DO NOT USE THIS UNIT’S POLARIZED PLUG WITH AN EXTENSION CORD RECEPTACLE OR OTHER OUTLETS UNLESS THE PRONGS CAN BE FULLY INSERTED. REFRAIN FROM OPENING THE CABINET AS THERE ARE HIGH VOLTAGE COMPONENTS INSIDE. REFER SERVICING TO QUALIFIED SERVICE PERSONNEL. CAUTION RISK OF ELECTRIC SHOCK • DO NOT OPEN CAUTION: TO REDUCE THE RISK OF ELECTRIC SHOCK, DO NOT REMOVE COVER (OR BACK). NO USER SERVICEABLE PARTS INSIDE.
For the Customer to use in U.S.A. or Canada Canadian Department of Communications Compliance Statement DOC: This Class B digital apparatus meets all requirements of the Canadian Interference-Causing Equipment Regulations. Cet appareil numérique de la classe B respecte toutes les exigences du Règlement sur le matériel brouiller du Canada. C-UL: Bears the C-UL Mark and is in compliance with Canadian Safety Regulations according to CSA C22.2 No. 60950.
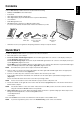
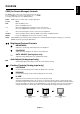
English Contents Your new NEC MultiSync LCD monitor box* should contain the following: • MultiSync LCD2060NX monitor with tilt base • Power Cord • Video Signal Cable (DVI-D to DVI-D cable) • Video Signal Cable (15-pin mini D-SUB male to 15-pin mini D-SUB male) • User’s Manual • Cable Management Cover • CD ROM (includes complete User’s Manual in PDF format). To see the User’s Manual, Acrobat Reader 4.0 must be installed on your PC.
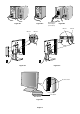
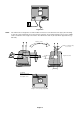
Figure A.1 Figure A.2 Macintosh Cable Adapter (not included) Figure B.1 INPUT1 INPUT1 INPUT2 Figure C.1 Figure C.2 Vacation Switch Power Button Figure D.
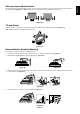
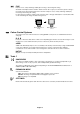
The monitor may be raised or lowered. To raise or lower screen, place hands on each side of the monitor and lift or lower to the desired height (Figure RL.1). Note: Handle with care when raising or lowering the monitor screen. Figure RL.1 Tilt and Swivel Grasp both sides of the monitor screen with your hands and adjust the tilt and swivel as desired (Figure TS.1). Note: Handle with care when tilting the monitor screen. Figure TS.
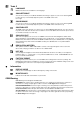
Figure S.5 NOTE: This LCD monitor is designed for use with a flexible arm. Please use the attached screws (4pcs) when mounting. To meet the safety requirements the monitor must be mounted to an arm which guaranties the necessary stability under consideration of the weight of the monitor. The LCD monitor shall only be used with an approved arm (e.g. GS mark). Replace screws Thickness of bracket (arm) 2.0 ~ 3.2 mm Tighten all screws 100 mm 100 mm 4 SCREWS (MAX depth: 8.
English Controls OSM (On-Screen-Manager) Controls The OSM controls on the front of the monitor function as follows: To access OSM press any of the control buttons (<, >, -, +, EXIT). To change signal input, press the SELECT button. NOTE: OSM must be closed in order to change signal input. Control Menu EXIT Exits the OSM controls. Exits to the OSM main menu. Moves the highlighted area left/right to select control menus. Moves the highlighted area up/down to select one of the controls.
FINE Improves focus, clarity and image stability by increasing or decreasing this setting. Should the “Auto Adjust function” and the “H.Size” function do not give you a satisfactory picture setting, a fine tuning can be performed using the “Fine” function. It improves focus, clearity and image stability by increasing or decreasing this setting. For this a Moiré test pattern could be used. If the Fine value is wrongly calibrated, the result would look like on the left drawing.
LANGUAGE OSM control menus are available in seven languages. OSM LEFT/RIGHT You can choose where you would like the OSM control image to appear on your screen. Selecting OSM Location allows you to manually adjust the position of the OSM control menu left or right. OSM DOWN/UP You can choose where you would like the OSM control image to appear on your screen. Selecting OSM Location allows you to manually adjust the position of the OSM control menu down or up.
Recommended use Safety Precautions and Maintenance FOR OPTIMUM PERFORMANCE, PLEASE NOTE THE FOLLOWING WHEN SETTING UP AND USING THE MULTISYNC LCD COLOUR MONITOR: • • • • • • • DO NOT OPEN THE MONITOR. There are no user serviceable parts inside and opening or removing covers may expose you to dangerous shock hazards or other risks. Refer all servicing to qualified service personnel. Do not spill any liquids into the cabinet or use your monitor near water.
• For optimum performance, allow 20 minutes for warm-up. • Adjust the monitor height so that the top of the screen is at or slightly below eye level. Your eyes should look slightly downward when viewing the middle of the screen. • Position your monitor no closer than 40 cm and no further away than 70 cm from your eyes. The optimal distance is 50 cm. • Rest your eyes periodically by focusing on an object at least 6 m away. Blink often.
Specifications Monitor Specifications MultiSync LCD2060NX Monitor LCD Module Diagonal: 51.0 cm/20.1 inches Viewable Image Size: 51.0 cm/20.1 inches Native Resolution (Pixel Count): 1600 x 1200 Input Signal Active matrix; thin film transistor (TFT) liquid crystal display (LCD); 0.255 mm dot pitch; 250cd/m2 white luminence, typical; 600:1 contrast ratio, typical. Video: ANALOG 0.7 Vp-p/75 Ohms Digital Input: DVI-D Sync: Separate sync.TTL Level Horizontal sync. Positive/Negative Vertical sync.
sRGB Colour Control: A new optimized colour management standard which allows for colour matching on computer displays and other peripherals. The sRGB, which is based on the calibrated colour space, allows for optimal colour representation and backward compatibility with other common colour standards. No Touch Auto Adjust (Analog input only): No Touch Auto Adjust automatically adjusts the monitor to optimal settings upon initial setup.
Troubleshooting No picture • The signal cable should be completely connected to the display card/computer. • The display card should be completely seated in its slot. • Check the Vacation Switch should be in the ON Position. Front power Switch and computer power switch should be in the ON position. • Check to make sure that a supported mode has been selected on the display card or system being used. (Please consult display card or system manual to change graphics mode.
English TCO’03 Congratulations! The display you have just purchased carries the TCO’03 Displays label. This means that your display is designed, manufactured and tested according to some of the strictest quality and environmental requirements in the world. This makes for a high performance product, designed with the user in focus that also minimizes the impact on our natural environment.
Manufacturer’s Recycling and Energy Information NEC-Mitsubishi Electric Visual Systems Corp. is strongly committed to environmental protection and sees recycling as one of the company’s top priorities in trying to minimize the burden placed on the environment.