5.1" LCD Color TV/ Monitor Contents Before operating the set, please read this manual carefully. Owner's Manual Model : NLT-15 Contents Warnings Supplied Accessories Controls Controller of panel Remote controller Installations Basic Operation Turning the TV On and off Programme selection Volume adjustment Q.
Warnings Warnings WARNING RISK OF ELECTRIC SHOCK DO NOT OPEN WARNING : To reduce the risk of electric shock do not remove cover (or back). No user serviceable parts inside. Refer servicing to qualified service personnel. The lightning flash with arrowhead symbol, within an equilateral triangle, is intended to alert the user to the presence of uninsulated “dangerous voltage” within the product’s enclosure that may be of sufficient magnitude to constitute a risk of electric shock to persons.
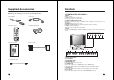
Supplied Accessories Controls L Make Sure the following accessories are provided with Product. <> 1. DC Adaptor 2. AC Cord 3. Remote control 4. Batteries (AAA type) POWER 1. MENU Displays a menu. 2. y PR x (Programme Up/Down) Selects a programme or a menu item. 3. POWER STANDBY INDICATOR Illuminates red when the TV is in standby mode. / Illumintes green when the TV is switched on. 4. POWER Switches TV set on or off. 5.
Controls Controls All the functions can be controlled with the remote controller handset. Some functions can also be adjusted with the buttons on the front panel of the set. 10. PRxy (Programme Up/Down) Remote controller 11. OK Before you use the remote controller, please install the batteries. 1. POWER Turns the TV on from standby or off to standby. 2. MUTE Turns the sound on or off. 3. NUMBER buttons Selects programme numbers 4.
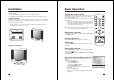
Installation Basic Operation Installation Options * You can install the TV on a wall or place it on a table-like surface. * To eliminate any risk of injury from the TV falling, it should be mounted securely. Turning the TV On and Off 1. Wall Installation Caution: Do not install the TV on a weak wall surface, like plaster etc. It is not needed any bracket or installation accessory with the exception of 2 nails or screws. Distance of holes of back panel is 305mm, a.
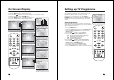
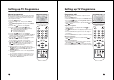
On Screen Display Setting up TV Programme 1. Press the MENU button to display main menu. 2. Press the PR xy button to select menus-Picture, Sound, Special, Setup. 3. Adjust each menu with the VOLÏq button. 4. Press the MENU button to return to preceding menu. Equalizer 5. Press the TV/AV button to finish adjusting menu. Flat Up to 100 TV Programmes can be stored in this set by programme numbers.
Setting up TV Programme Setting up TV Programme Manual programme Manual programme Programme edit Programme edit Manual programme lets you manually tune and arrange the Programme in whatever order you desire. Also you can assign a Programme name with five characters to each programme number. 1. Press the MENU button. 2. Select the Setup menu. Then press the VOLÏq button. 3. Select Manual programme. Then press the VOLÏq button. 4. Press the PRxy button to select System. 5.
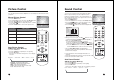
Picture Control Sound Control You can adjust picture Contrast, Brightness, Colour Sharpness and Tint to the levels you prefer. You can select your preferred sound setting; Flat, Music, Sound Movie or Speech and you can also adjust the sound Equalizer Balance frequency of equalizer, balance. If you switch AVL to on, the set automatically keeps on an equal volume level even AVL Surround if you change programmes. 1. Press the MENU button. 2. Select the Sound menu. Then press the VOLÏq button. 3.
Other functions Other functions TV, COMPONENT, VIDEO and S-VIDEO modes Special (You can’t set PC mode in this menu. Use the TV/AV button) Inputs can be set for COMPONENT, VIDEO or S-VIDEO mode. The COMPONENT, VIDEO or S-VIDEO mode is used when a video cassette recorder (VCR), or other equipment is connected to the set. Note : When a VCR is connected to the aerial socket the set is used in TV mode. See the Connection of external equipment section. 1. Press the MENU button. 2. Select the Special menu. 3.
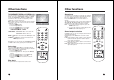
Teletext Teletext TEXT On/Off Press the TEXT/MIX button to switch to teletext. The initial page or last selected page appears on the screen. Two page numbers, TV Programme name, date and time are displayed on the screen headline. The first page number indicates your selection, while the second shows the current page displayed. 1. Press TEXT/MIX button once to set the TEXT mode. 2. Press TEXT/MIX button once more displays the teletext pages superimposed on the TV picture. 3.
External Equipment Connection External Equipment Connection When connecting to external equipment, please ensure you turn the main switch OFF to prevent any damage to the equipment. You can connect additional equipment, such as VCRs, camcorders etc. to your set. Examples are shown below. S-VIDEO INPUT If using an S-VIDEO source, the picture quality will be improved over a video source. 1. Connect the S-VIDEO output of a VCR to the S-VIDEO input on the TV. 2.
Connecting PC as monitor Connecting PC as monitor VGA/DTV INPUT Picture adjustment 1. Connect the VGA IN cable (D sub jack) from the monitor output socket of the PC to the PC/DTV input socket of the set. 2. Connect the Audio cable from the PC to the PC Audio IN of the set. 3. Press the TV/AV button to select PC mode. 4. Switch on the PC, and the PC screen appears on the set. The set can be operated as the PC monitor.
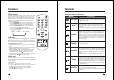
Product Spec. Model Troubleshooting NLT-15 Horizontal size 455 mm Thickness 210 mm Height Weight 6.3 kg Main body Power requirements Television system Television programnme Display Panel Power consumption 405 mm Speaker External input ports PAL/SECAM-B/G, I, D/K /NTSC-M No picture on screen and no sound from speakers. • Insert the AC power cord plug securely in AC power outlet. • Make sure the LCD TV is not in the standby mode (The POWER/Standby indicator is red.
NEC Australia Pty. Ltd.