
Operation Manual


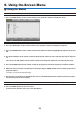


Table Of Contents
- Front cover
- Important Information
- Table of Contents
- 1. Introduction
- 2. Projecting an Image (Basic Operation)
- (1) Flow of Projecting an Image
- (2) Connecting Your Computer/Connecting the Power Cord
- (3) Turning on the Projector
- (4) Selecting a Source
- (5) Adjusting the Picture Size and Position
- (6) Correcting Keystone Distortion [KEYSTONE]
- (7) Optimizing Computer Signal Automatically
- (8) Turning Up or Down Volume
- (9) Turning off the Projector
- (10) When Moving the Projector
- 3. Convenient Features
- (1) Turning off the Image and Sound
- (2) Freezing a Picture
- (3) Magnifying a Picture
- (4) Changing Eco Mode/Checking Energy-Saving Effect
- (5) Using 4-Point Corner to Correct Keystone Distortion [CORNERSTONE]
- (6) Preventing the Unauthorized Use of the Projector [SECURITY]
- (7) Operating Your Computer’s Mouse Functions from the Projector’s Remote Control via the USB Cable (Remote Mouse Function)
- (8) Projecting Your Computer’s Screen Image from the Projector via the USB Cable (USB Display)
- (9) Controlling the Projector by Using an HTTP Browser
- (10) Projecting an Image from an Angle (Geometric Correction Tool in Image Express Utility Lite)
- 4. Using the Viewer
- 5. Using On-Screen Menu
- 6. Installation and Connections
- 7. Maintenance
- 8. Appendix
- (1) Troubleshooting
- (2) Specifications
- (3) Cabinet Dimensions
- (4) Pin Assignments of D-Sub COMPUTER Input Terminal
- (5) Compatible Input Signal List
- (6) PC Control Codes and Cable Connection
- (7) Using the Computer Cable (VGA) to Operate the Projector (Virtual Remote Tool)
- (8) Troubleshooting Check List
- (9) REGISTER YOUR PROJECTOR! (for residents in the United States, Canada, and Mexico)

53
5. Using On-Screen Menu
❶ Using the Menus
NOTE:Theon-screenmenumaynotbedisplayedcorrectlywhileinterlacedmotionvideoimageisprojected.
1. Press the MENU button on the remote control or the projector cabinet to display the menu.
NOTE:ThecommandssuchasENTER,EXIT,▲▼,◀▶inthebottomshowavailablebuttonsforyouroperation.
2. Press the ◀▶ buttons on the remote control or the projector cabinet to display the submenu.
3. Press the ENTER button on the remote control or the projector cabinet to highlight the top item or the rst
tab.
4. Use the ▲▼ buttons on the remote control or the projector cabinet to select the item you want to adjust or
set.
You can use the ◀▶ buttons on the remote control or the projector cabinet to select the tab you want.
5. Press the ENTER button on the remote control or the projector cabinet to display the submenu window.
6. Adjust the level or turn the selected item on or off by using the ▲▼◀▶ buttons on the remote control or the
projector cabinet.
Changesarestoreduntiladjustedagain.
7. Repeat steps 2 -6 to adjust an additional item, or press the EXIT button on the remote control or the projec-
tor cabinet to quit the menu display.
NOTE:Whenamenuormessageisdisplayed,severallinesofinformationmaybelost,dependingonthesignalorsettings.
8. Press the MENU button to close the menu.
To return to the previous menu, press the EXIT button.