
User guide


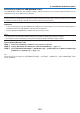

Table Of Contents
- Front cover
- Table of Contents
- Important Information
- 1. Introduction
- 2. Projecting an Image (Basic Operation)
- (1) Flow of Projecting an Image
- (2) Connecting Your Computer/Connecting the Power Cord
- (3) Turning on the Projector
- (4) Selecting a Source
- (5) Adjusting the Picture Size and Position
- (6) Correcting Keystone Distortion Manually
- (7) Optimizing Computer Signal Automatically
- (8) Turning Up or Down Volume
- (9) Turning off the Projector
- (10) After Use
- 3. Convenient Features
- (1) Turning off the Image and Sound
- (2) Freezing a Picture
- (3) Enlarging a Picture
- (4) Changing Eco Mode/Checking Energy-Saving Effect Using Eco Mode [ECO MODE]
- (5) Preventing the Unauthorized Use of the Projector [SECURITY]
- (6) Operating Your Computer’s Mouse Functions from the Projector’s Remote Control via the USB Cable (Remote Mouse Function)
- (7) Projecting Your Computer’s Screen Image from the Projector via the USB Cable (USB Display)
- (8) Controlling the Projector by Using an HTTP Browser
- (9) Projecting Your Computer’s Screen Image from the Projector via a Network [NETWORK PROJECTOR]
- (10) Using the Projector to Operate Your Computer via a Network [REMOTE DESKTOP]
- 4. Using the Viewer
- 5. Using On-Screen Menu
- 6. Installation and Connections
- 7. Maintenance
- 8. User Supportware
- (1) Installing Software Program
- (2) Using the Computer Cable (VGA) to Operate the Projector (Virtual Remote Tool)
- (3) Projecting Your Computer’s Screen Image from the Projector over a LAN (Image Express Utility Lite)
- (4) Projecting an Image from an Angle (Geometric Correction Tool in Image Express Utility Lite)
- (5) Projecting Images or Videos from the Projector over a LAN (Image Express Utility 2.0)
- (6) Using the Projector to Operate Your Computer over a LAN (Desktop Control Utility 1.0)
- (7) Controlling the Projector over a LAN (PC Control Utility Pro 4)
- (8) Converting PowerPoint files to Slides (Viewer PPT Converter 3.0)
- (9) Projecting Your Mac’s Screen Image from the Projector over a LAN (Image Express Utility 2 for Mac)
- 9. Appendix
141
6. Installation and Connections
PrepareaPhillipsscrewdriverbeforehand.
1. PressthePOWERbuttontoturnofftheprojectorandsetit
intostandbycondition,anddisconnectthepowercord.
2. RemovetheUSB(LAN)portcover.
Loosen the screw securing the port cover.
•Thescrewisnotremovable.
3. SlowlypullouttheUSBWirelessLANUnitintotheUSB(LAN)
port.
Keep the cap for later use.
4. PuttheUSB(LAN)portcoverbackintoplace.
Insert the catch of the USB (LAN) port cover into the groove of the
projector cabinet, and then tighten the screw to secure the port
cover.
ToinstalltheUSBWirelessLANUnit,disconnectthepowercordand
usetheaboveprocedure.
NOTE:
• ThegreenLEDontheUSBWirelessLANUnitashestoshowthatWireless
LANUnitisworking.IftheUSBWirelessLANUnitisincorrectlyattached,
theblueLEDwillnotash.
• DonotpressthebuttonontheUSBWirelessLANUnit.Thebuttonwillnot
workwiththismodel.
1
2
Removing and attaching the USB Wireless LAN Unit
NOTE:
• TheUSBWirelessLANUnitmustbeinsertedintotheUSBWirelessLANUnitportinthecorrectdirection.Itcannotbeinserted
inthereversedirection.IftheUSBWirelessLANUnitisinsertedinthereversedirectionwithexcessiveforceapplied,theUSB
portmaybreak.
• BeforetouchingtheUSBWirelessLANUnit,touchametallicobject(suchasadoorknoboraluminumwindowframe)todischarge
thestaticelectricityfromyourbody.
• AlwaysinsertorremovetheUSBWirelessLANunitwhenthemainpoweristurnedoff.Failuretodosomaycauseprojector
malfunctionordamagetotheUSBwirelessLANunit.Iftheprojectorwillnotworkcorrectly,turnofftheprojector,disconnect
thepowercord,andthenconnectitagain.
• DonotinsertotherUSBdevicesintotheUSBWirelessLANunitport.DonotinserttheUSBWirelessLANunitintotheUSB(PC)
port(TypeB).