
User's Manual


155
6. Installation and Connections
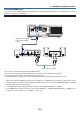
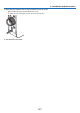
Projecting Portrait Images
Theprojectorcanbeusedonitsleftside(whenviewedfromthefront)toprojectportraitimages.
Caution on placing in portrait orientation
• Whenusingtheprojectoronitsleftside,donotblocktheintakevents.Doingsowillcausebuild-upheatinside
theprojector.
• Whenusingtheprojectoronitsleftside,attachastandsupportingtheprojector.
• Lockthelensshiftaftercompletinglensshiftadjustment.
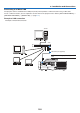
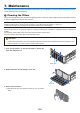
Specicationsofstandforprojectingportraitimages
Fordesigningastandforprojectingportraitimages,consultyourdealer.
1. Allow310x170mmofspacefortheintakevents.
2. Allow130mmorlongerforopeningtheltercover(intakevent).
3. Usethe4screwsonthebottomoftheprojector.
Locationof4screws:200x250mm
Screw:M4x8mm
• Designthestandsothatitwillnotcontacttherearfeetoftheprojector.
• Designthestandinsuchawaythatitwillnotfalldowneasily.