
User's Manual


English-32
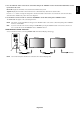
Preparation Before Use
Connect the monitor to a commercially available LAN cable before engaging in browser operations.
Operation with a browser that uses a proxy server may not be possible depending on the type of proxy server and the setting
method. Although the type of proxy server will be a factor, it is possible that items that have actually been set will not be
displayed depending on the effectiveness of the cache, and the contents set from the browser may not be reflected in
operation. It is recommended that a proxy server not be used unless it is unavailable.
Handling of the Address for Operation via a Browser
The host name can be used under the following cases:
If the host name corresponding to the IP address of the monitor has been registered to the domain name server (DNS) by the
network administrator, you can then access the network settings of the display via that registered host name using a
compatible browser.
If the host name corresponding to the IP address of the monitor has been configured in the “HOSTS” file of the computer
being used, you can then access the network settings of the display via that host name using a compatible browser.
Example 1: When the host name of the monitor has been set to “pd.nec.co.jp”, access is gained to the network setting by
specifying
http://pd.nec.co.jp/index.html
for the address or the entry column of the URL.
Example 2: When the IP address of the monitor is “192.168.73.1”, access is gained to the mail alert settings by specifying
http://192.168.73.1/index.html
for the address or the entry column of the URL.
Network Settings
http://<the Monitor’s IP address> /index.html
Enabling this option automatically assigns an IP address to the monitor from your DHCP server.
Disabling this option allows you to register the IP address or subnet mask number obtained from
your network administrator.
NOTE: Consult your network administrator for the IP address when [ENABLE] is selected for
[DHCP].
Set your IP address of the network connected to the monitor when [DISABLE] is selected for
[DHCP].
Set your subnet mask number of the network connected to the monitor when [DISABLE] is selected
for [DHCP].
Set your default gateway of the network connected to the monitor when [DISABLE] is selected for
[DHCP].
Set your primary DNS settings of the network connected to the monitor.
Set your secondary DNS settings of the network connected to the monitor.
Reflect your settings.
NOTE: Make sure to execute “the reboot” from the “reboot screen” or to turn the monitor off and
then back on to enable the changing, after clicking [Apply].
DHCP
IP v4 Address
Subnet Mask
Default Gateway
Primary DNS
Secondary DNS
Apply