
White Paper

NEC MultiSync
®
P & PA Series:
Usage in Medical Applications
www.necdisplay.com
About the MultiSync PA Series
NEC MultiSync P & PA Series professional displays include a number of industry-leading features that
make them ideal for a clinical review environment. Features includes a selectable factory preset DICOM
GSDF setting for medical imaging and image uniformity compensation for optimum image quality. The
built-in backlight sensor provides a feedback loop for brightness stability and consistency. Calibration is
accomplished using 14-bit lookup tables (LUTs) that give you incredibly precise control over grayscale and
color spaces.
The MultiSync P & PA Series is not shipped from the factory in the clinical review mode, however, through
the use of NEC’s MultiProler™ software, the display can easily be set up for clinical imaging.
About Picture Mode Presets
MultiSync PA Series displays have ve built-in Picture Mode presets that are available using the vertical hotkeys on the
bezel, giving one-button access to up to ve different display settings. The Picture Mode presets include customized color
gamut, gamma, brightness, black level and white point settings. Any of the default picture modes on a MultiSync P & PA
Series display can be easily customized using the free MultiProler tool.
Creating a DICOM Preset
The Digital Imaging and Communications in Medicine (DICOM) standard denes a Grayscale Denition Function (GSDF)
gamma curve optimized for diagnostic image viewing. The MultiSync PA Series includes a DICOM conguration preset that
can be easily set in MultiProler.
Before creating the preset, the uniformity should be adjusted to the desired level. The Digital Uniformity
Correction control adjusts the screen uniformity correction applied to the display in order to improve the
screen luminance and color uniformity. This compensation is done at the expense of some screen
brightness. A higher level of correction will give a more uniform screen, but the maximum brightness that
can be achieved will be lower. Start the MultiProler tool and choose the Settings panel from the icons
on the left. Using the slider, change the Digital Uniformity Correction to the desired level.
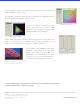
Next, select the Picture Mode panel. The Picture Mode
panel controls the settings for the various Picture Modes
that the monitor supports, as well as adjusting the
Brightness and Black Level. The monitor supports ve
different congurable Picture Modes that can be quickly
selected by clicking on the relevant buttons. Any picture mode can be customized by selecting the Picture
Mode preset button (the display may ash while adjusting to the new picture mode) and click the “Edit…”
button.
The Picture Mode Panel
Adjusting the
Digital Uniformity Correction