
User manual
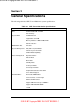

1-20 Introduction
To upgrade the memory in the notebook, follow these steps.
1.
Power off the computer and remove the AC adapter and battery pack.
2.
Remove the hinge covers, status bar cover, and the keyboard from the top of the
unit and locate the memory expansion sockets.
3.
Remove the extra DIMM module from its anti-static wrapping.
4.
Hold the memory module with its golden teeth connector pointed towards the
memory socket.
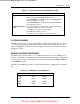
Note: The top socket is connector 0 and
should be used when installing only one module.
Incline the module at 60 degrees and gently attached it to the memory socket by
pushing it forward.
5.
Slowly push the module downwards until the locking tabs snap into the retaining
notches or holes at each corner of the module.
The bottom socket sits a little in front of the top socket for easier access. How-
ever, installation for both sockets is the same.
6.
Replace the keyboard, status bar cover, and hinge covers.
7.
Reconnect the AC adapter and insert the battery pack into the computer.
8.
Power on the notebook and notice the BIOS error message informing you that the
memory size stored in CMOS does not match the installed memory size. Press
F2
to run the SETUP program and save the CMOS settings anew. The computer
automatically adjusts the memory size.
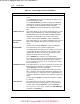
NOTE:
If the notebook has been configured for
save-to-disk, it may be necessary to run PHDisk
to re-partition the drive. The save-to-disk parti-
tion must be of a size sufficient to store the con-
tent of the whole memory size.
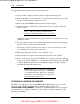
SYSTEM BIOS UPGRADE PROCEDURE
The NEC Versa 2500 Series supports the EPROM Flash BIOS that allows you to easily
update the system BIOS using the Flash Programming utility program called
“PHLASH.COM & PLATFORM.BIN”. Update the system BIOS whenever you are upgrad-
ing the LCD Panel or adding modifications to the computer’s hardware function. To up-
grade the System BIOS:
SOLD BY laptopia2005 DO NOT RESELL!!
SOLD BY laptopia2005 DO NOT RESELL!!