Speakers ............................................................................... PX-60SP3U English Instruction Manual Thank you for choosing to purchase NEC PX-60SP3U speakers. In order to ensure that you are able to make the fullest possible use of this product, please be sure to read this Instruction Manual before use. After reading, place this manual in a easily accessed location for future reference. This product is designed for use exclusively with the following plasma monitor.
Safety Precautions (A note on symbols used herein) Warning ÷ Never use the speakers to hold the plasma monitor when moving the plasma monitor, as doing so might cause the plasma monitor to fall and result in personal injury. When moving the plasma monitor, always be sure to hold the bottom of the main body of the plasma monitor.
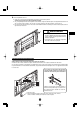
Attaching speakers to a plasma monitor 1 2 Remove the protective tape from the cushions and then attach the cushions to the sides of the speakers in the locations indicated in the diagram below. Attaching the attachment pieces to the locations shown in the drawing of the plasma monitor with screws (M5 × 12 mm) (8 locations). Check the marks on the attachment pieces (TL, TR, BL, BR) and the plasma monitor attachment locations.
5 Tighten the loosely inserted screws in 4 locations fully into place. ¶ Tighten the screws while pushing the speakers lightly against the plasma monitor. Check to be sure that all four screws have been screwed firmly into place. ¶ If there is a large gap between the plasma monitor and the speakers, adjust them after slightly loosening the screws that were tightened in step 2. After adjustment, re-tighten the screws.
Cleaning cabinets ¶ Wipe with a soft, dry cloth with a relatively flat pile. If soiling is particularly bad, wet the cloth in a mixture of neutral detergent thinned with water, wring the cloth dry, wipe, and then finish with a dry cloth. If using a chemically treated cleaning cloth, be sure to follow any and all instructions on its use. ¶ Wiping with a mixture containing benzene, paint thinner, or other volatile materials may result in warping or the peeling of the cabinet coating.
Enceintes .............................................................................. PX-60SP3U Mode d’emploi Merci d’avoir acheté les enceintes NEC PX-60SP3U. Pour être sûr(e) de faire une utilisation optimale de ce produit, lisez ce manuel dans son intégralité. Après avoir lu le manuel, rangez-le de façon à pouvoir le consulter à nouveau si le besoin s’en fait sentir.
Consignes de sécurité (explication des symboles utilisés dans le manuel) Avertissement ¶ Lorsque vous déplacez l’écran à plasma, ne le prenez jamais par les enceintes. L’écran pourrait tomber et blesser quelqu’un. Lorsque vous déplacez l’écran à plasma, tenez-le toujours par le dessous. Pour vous permettre d’utiliser le produit correctement et en toute sécurité, différents symboles sont utilisés pour signaler des points importants pour éviter tout dommage corporel ou matériel.
Monter les enceintes sur un écran à plasma Le système se compose d’une enceinte droite (R) et d’une enceinte gauche (L). Pour les monter, reportez-vous aux étiquettes (R/L) situées à l’arrière des enceintes. 1 2 Retirez les bandes de protection des coussinets puis fixez les coussinets sur le côté des enceintes comme indiqué sur le schéma ci-dessous. Posez les pièces de fixation sur l’écran à plasma à l’aide de vis (M5 x 12 mm) aux endroits indiqués sur le schéma (8 endroits).
5 Serrer complètement les 4 vis. ¶ Serrez les vis tout en poussant légèrement les enceintes contre l’écran à plasma. Vérifiez que les quatre vis ont été complètement vissées. ¶ S’il y a un grand espace entre l’écran à plasma et les enceintes, réglez ces dernières après avoir légèrement desserré les vis que vous avez vissées à l’étape 2. Une fois que vous avez ajusté la position des enceintes, resserrez les vis.
Nettoyer les boîtiers Veillez à débrancher la prise d’alimentation avant de nettoyer les boîtiers. ¶ Essuyez le boîtier avec un chiffon doux et sec à la texture relativement régulière. Si le boîtier est particulièrement sale, imprégnez le chiffon de détergent neutre allongé à l’eau, essorez-le bien, passez-le sur le boîtier et essuyez avec un chiffon sec. Si vous utilisez une lingette nettoyante traitée chimiquement, suivez toutes les instructions du fabricant sur son utilisation.
スピーカ ................................................................................. PX-60SP3U 取 扱 説 明 書 このたびはスピーカ PX-60SP3U をお買い上げいただき、ありがとうございました。 ご使用の前に、本機の機能を十分生かしてご利用いただくために、この「取扱説明書」を最後までお読みください。 お読みになったあとは、いつでも見られる所に大切に保存してください。 本機は NEC 製 60V 型プラズマディスプレイ(PX-60XM5J)専用です。 ―パッケージ内容のご確認― 万一、不足品や不良品などがございましたら、すみやかにお買い上げの販売店 までご連絡ください。 クッション(2本) 接続コード (2本) TL TR BL BR コードクランパ (2個) gl En for . ...... spe al nu Ma PX- se cha pur ake . itor rs. ma P3U 60S NEC the mon 表 ...... ..
安全上のご注意(絵表示について) 警告 この取扱説明書および製品への表示は、製品を安全に正し くお使いいただき、あなたや他の人々への危害や財産への 損害を未然に防止するために、いろいろな絵表示をしてい ます。その表示と意味は次のようになっています。内容を よく理解してから本文をお読みください。 ÷ スピーカを持ってプラズマディスプレイを移動 しないでください。プラズマディスプレイが落 下してけがの原因となります。プラズマディス プレイを動かすときは、プラズマディスプレイ 本体の下側を持って持ち上げてください。 ÷ 安全確保のため、ネジ類は確実に締めつけてく ださい。スピーカが落下してけがの原因となり ます。 警告 この表示を無視して、誤った取り扱いをすると、人が死亡 または重傷を負う可能性が想定される内容を示していま す。 注意 注意 この表示を無視して、誤った取り扱いをすると、人が傷害 を負う可能性が想定されるか、物的損害の発生が想定され る内容を示しています。 設置 ÷ ぐらついた台の上や傾いたところなど不安定な 場所に置かないでください。落ちたり、倒れた りしてけがの原因となることがありま
スピーカをプラズマディスプレイに取り付ける 注意 スピーカは右用(R)・左用(L)に分かれています。 使用方法 取り付けの際には、スピーカの背面に書かれている文字(R・ L)でご確認ください。 ÷ 接続コードの上に重いものをのせたり、コード がプラズマディスプレイの下敷きにならないよ うにしてください。コードに傷がついて火災・ 感電の原因となります。 1 クッションのはくり紙をはがして、スピーカの側面、下 図の位置に貼り付けます。 ÷ スピーカの開口部などから内部に金属類や燃え やすいものなど異物を差し込んだり、落とし込 んだりしないでください。火災・感電の原因と なります。特に小さなお子様のいるご家庭や場 所ではご注意ください。 ÷ スピーカを指定のプラズマディスプレイ以外に 接続して使用しないでください。故障・火災の 原因になることがあります。 お願い プラズマディスプレイ以外のディスプレイに近づけた場 合、設置の仕方によっては、画面に色ムラなど影響が生 じる場合があります。その際は、スピーカをディスプレ イから離してご使用ください。 2 日本語 クッション プラズマディスプレイ
3 4 上側の取付ピースにネジ(M5 × 12 mm)を仮留めし ます。(2 カ所) フックを引っかけます。 2 下部の取付ピースのネジ穴にスピーカ下部のフックの ご注意 穴を合わせてネジ(M5×12 mm)で仮留めします。 プラズマディスプレイを壁に設置する場合は、取付ピースをプ ラズマディスプレイに取り付けてから壁に設置してください。 プラズマディスプレイを壁に設置してからでは、取付ピースを ネジ留めできない場合があります。 5 1 仮留めしたネジ(M5 × 12 mm)にスピーカ上部の 仮留め状態の 4 カ所のネジを締めつけます。 スピーカを軽くプラズマディスプレイに押しつけながらネジを締めつけてください。 4 カ所のネジが確実に締めつけられていることを確認してください。 プラズマディスプレイとスピーカの間に隙間が大きく開く場合には、手順2で締めたネジを少し緩めて調整してください。 調整後は、再度ネジを締めてください。 プラズマディスプレイを壁に設置する場合は、一度スピーカユニットを取り外し、プラズマディスプレイを壁に取り付 けた後、再度スピーカユニットを取り付けることをお
コードを接続する 接続する際は接続機器の電源を切ってから行ってください。 付属の接続コードで、プラズマディスプレイの SPEAKER R/L 端子とスピーカの端子を接続します。 端子に接続したあとは、コードを軽く引いて、 コードの先端が端子へ確実に接続されていること 極性 + − がありますので、正しく挿入し てください。 を確かめてください。接続が不完全だと、 音がとぎれたり、雑音の出る原因 となります。 スピーカ端子のボタンを指で押したまま、 コードクランパ コードクランパの裏のはくり紙をはがし、お好みの位置に 取り付け、コードを束線してください。 キャビネットのお手入れ お手入れの前に必ず電源プラグをコンセントから抜いてください。 ● 毛羽立ちの少ない柔らかい乾いた布で拭いてください。 汚れのひどいときは、水で薄めた中性洗剤に浸した布をよく絞って拭き取り、乾いた布で仕上げてください。 化学ぞうきんを使用する場合は、その注意書に従ってください。 ● シンナーやベンジンなどの溶剤で拭いたりしますと、変質したり、塗料がはげることがあります。 ● スピーカネット部のほこりを取り除く場合は、掃除機のブラ
仕 様 型 式 : 2 ウェイ・3 スピーカシステム(バスレフ方式)/ 1 本 インピーダンス : 6 Ω 定 格 入 力 : 20 W (JEITA) 最 大 入 力 : 60 W (JEITA) 外 形 寸 法 : 90 mm (W)× 880 mm (H)× 96 mm (D) (取付金具を除く/ 1 本) 質 使 用 条 量 : 6.8 kg(2 本) 件 : 温度 0 ℃∼ 40 ℃ 湿度 20 %∼ 80 % 保 管 条 件 : 温度 湿度 10 %∼ 90 % − 10 ℃∼ 50 ℃ ●この仕様・意匠は予告なく変更することがあります。 NEC and the NEC logo are registered trademarks of NEC Corporation.