Assembly Instructions GRAND FIRE RING • 48" W x 12" H 48" Outside Dia. 31" Inside Dia. 12" WARNING: Failure to follow all steps of the installation instructions may result in property damage or bodily injury. Rockwood Retaining Walls, Inc. is not liable for any property damage or bodily injury caused by failure to follow the installation instructions or improper use of the product.
Grand Fire Ring Kits – Contents Item 4 x 12 x 8" Insert Description Fire Ring Block Steel Ring Adhesive 29 oz Tube Quantity 57 1 1 Please note: Use 19 fire ring blocks per course. Standard Steel Ring Optional Cooking Grate Insert Copyright notice, please read: The plans and instructions contained in this kit and the three-dimensional [Grand Fire Ring] design constructed from the use of this kit are protected under the U.S. Copyright Act.
Base Preparation: Base can be constructed of either poured slab or compacted gravel. See requirements below. Zoning and Permits: Before you plan your project, learn about the necessary zoning requirements and rules for excavating and building in your area. No matter how small your project, be sure you obtain the necessary permits before you start construction. Know What ’s Below: Whether you are planning to do it yourself or hire a professional, smart digging means calling 811 before each job.
Course 1 Be sure your properly prepared base is level. Begin building by laying your base course as shown. Using a stiff brush, remove all debris and dust from each block surface to be glued. IMPORTANT: Lay glue bead away from outside perimeter to prevent glue from squeezing out between courses Butt blocks tightly together. Use only 19 blocks per course. Course 2 Continue to build each course as shown. Use adhesive on each block. IMPORTANT: Use adhesive on first and second courses.
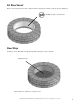
Fit Steel Insert Drop in steel ring and center. Use a rubber mallet to tap blocks towards center for proper alignment. Do NOT use glue on metal ring. Final Step Fill interior of Fire Ring with enough gravel/sand to bury first course of blocks. Sand/gravel mix. Allow 72 hrs. for adhesive to set before use. © 2012 Rockwood Retaining Walls, Inc. All Rights Reserved. Please see copyright notice on page 2.
Optional Cooking Grate Assembly Connect bracket (A) to ring as shown. Position grate (B) above bracket and secure with pin (C). Screw on handle and secure with nut (D). For anti-theft feature, secure pin with bolt (E). (C) (B) (D) (A) (E) ATTENTION: Season the Grill Surface Before Use The cooking grate should be seasoned before cooking food directly on the surface. Expose the grate to an open flame until the enamel finish is completely removed.
325 Alliance Place NE Rochester, MN 55906 Available at: toll free 888.288.4045 phone 507.529.2871 fax 507.529.2879 www.rockwoodwalls.com © 2012 Rockwood Retaining Walls, Inc. All Rights Reserved. Made worldwide under license from Rockwood Retaining Walls, Inc. US and international patents issued and pending. This information has been prepared for the benefit of customers interested in Rockwood Retaining Wall products. It was reviewed carefully prior to publication.