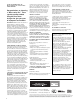
Necessories Assembly Instructions Compact Fireplace, Woodbox and Hearth 70.00 34.00 Leave these instructions with property owner. 32 .00 .00 32 6.25 40 .00 32 .00 40 .00 12 .
ROCKWOOD RETAINING WALLS, INC. NECESSORIES KITS FOR OUTDOOR LIVING LIMITED WARRANTY Congratulations on choosing a “Necessories Kit.” These superior-quality outdoor living kits have been designed to give you years of enjoyment and comfort. IMPORTANT NOTICE: Read this entire Rockwood Retaining Walls, Inc. (“Rockwood”) Limited Warranty and Limitation of Liability (“Limited Warranty”).
WARNING: Failure to follow all steps of the installation instructions may result in property damage or bodily injury. Rockwood Retaining Walls, Inc. is not liable for any property damage or bodily injury caused by failure to follow the installation instructions or improper use of the product.
Preparation: Base can be constructed of either poured slab or compacted gravel. Concrete Base Foundation: - 4" deep - 4" outside perimeter of base - Reinforce with 6" x 6" no.
Course 1 Be sure your properly prepared base is level. Begin building by laying your base course as shown. IMPORTANT: Lay glue bead away from outside perimeter to prevent glue from squeezing out between courses Using a stiff brush, remove all debris and dust from each block surface to be glued. S S M L M S First course for optional hearth. M M S FR ON S S L S T S First course for optional woodbox. Course 2 Continue to build each course as shown. Use adhesive on each block.
Course 3 L A L S S A S S S Course 4 IMPORTANT: All cut block surfaces should face interior of fireplace. S B S S L B S S 6 © 2007 - 2016 Rockwood Retaining Walls, Inc. All Rights Reserved. Please see copyright notice on page 2.
Course 5 M S M M S S S S Course 6 L (B) 4 x 4 x 4" Cut Block. S S S L (C) Cut blocks to accommodate angle iron. © 2007 - 2016 Rockwood Retaining Walls, Inc. All Rights Reserved. Please see copyright notice on page 2.
Course 7 B A S B A M Course 8 IMPORTANT: All cut block surfaces should face interior of fireplace. Glue 3" side of angle iron to cut blocks. Center left to right. 8 © 2007 - 2016 Rockwood Retaining Walls, Inc. All Rights Reserved. Please see copyright notice on page 2.
Course 9 A S NOTE: When building with woodbox, place block as shown to support top. Stand block vertically for no woodbox. A S S S S Course 10 B S B B © 2007 - 2016 Rockwood Retaining Walls, Inc. All Rights Reserved. Please see copyright notice on page 2.
Installing Firebrick Step #1, Bottom Install fire brick now. Meeco furnace cement and fireplace mortar (furnished) is a silicate product that when fire cured, sets rock hard - as strong as firebrick itself and withstands 2,000°F. Carefully follow use instructions on tube. Step #1: Start by applying a bead of firebrick mortar to the bottom of a brick. Begin at the bottom of the fireplace.
Course 11 Place and center Silver Creek Limestone Tops as shown. Lift to glue in place. PLEASE NOTE: As with any concrete product, the age of the products can cause variations in color. Lighter colored Silver Creek tops are older and have cured more than newer, darker tops. Don’t be alarmed. As tops age, their color will lighten and blend together. © 2007 - 2016 Rockwood Retaining Walls, Inc. All Rights Reserved. Please see copyright notice on page 2.
Course 12 Position and center course as shown. Lift each block to glue in place. S A S A S Course 13 A S 12 IMPORTANT: All cut block surfaces should face interior of fireplace. S B © 2007 - 2016 Rockwood Retaining Walls, Inc. All Rights Reserved. Please see copyright notice on page 2.
Course 14 A A S A S S S S Course 15 B S B A B S S S © 2007 - 2016 Rockwood Retaining Walls, Inc. All Rights Reserved. Please see copyright notice on page 2.
Course 16 S S B S S B S A S S Course 17 IMPORTANT: All cut block surfaces should face interior of fireplace. Place and center Silver Creek Limestone Tops as shown. Lift to glue in place. 14 © 2007 - 2016 Rockwood Retaining Walls, Inc. All Rights Reserved. Please see copyright notice on page 2.
Course 18 Allow glue to set on support blocks before placing spark suppressor cap. S S S S © 2007 - 2016 Rockwood Retaining Walls, Inc. All Rights Reserved. Please see copyright notice on page 2.
Final Steps Place and center Silver Creek Limestone Tops as shown. Lift to glue in place. PLEASE NOTE: As with any concrete product, the age of the products can cause variations in color. Lighter colored Silver Creek tops are older and have cured more than newer, darker tops. Don’t be alarmed. As tops age, their color will lighten and blend together. IMPORTANT: Allow 72 hrs. for adhesive to set before use. Note: All warranty claims must be made online at: www.outdoorlivingkits.com/warranty.