Assembly Instructions COMPACT FIREPLACE, WOOD BOX AND HEARTH • 72" W x 44" D x 70" H
Compact Fireplace Compact Hearth Compact Woodbox Copyright notice, please read: The plans and instructions contained in this kit and the three-dimensional [Compact Fireplace, Woodbox and Hearth] design constructed from the use of this kit are protected under the U.S. Copyright Act.
Compact Fireplace Kit – Contents Item Description 4 x 12 x 8" Large Lakeland Block (L) 4 x 8 x 8" Medium Lakeland Block (M) 4 x 4 x 8" Small Lakeland Block (S) 4 x 4 x 12" Lakeland Block cut (A) 4 x 4 x 4" Lakeland Block cut (B) 4 x 4 x 8" Lakeland Block cut (C) Firebrick Firebox Lining Firebrick Mortar Rutland, 10.3 oz. Tubes 18 x 44" Mantle - Middle 14 x 36" Mantle - Top 24 X 7" Mantle - Firebox 25 x 25" Top Spark Suppressor Top Angle Iron Support Adhesive 29 oz.
Base Preparation: Base can be constructed of either poured slab or compacted gravel. See requirements below. Zoning and Permits: Before you plan your project, learn about the necessary zoning requirements and rules for excavating and building in your area. No matter how small your project, be sure you obtain the necessary permits before you start construction. Know What ’s Below: Whether you are planning to do it yourself or hire a professional, smart digging means calling 811 before each job.
Course 1 Be sure your properly prepared base is level. Begin building by laying your base course as shown. IMPORTANT: Lay glue bead away from outside perimeter to prevent glue from squeezing out between courses Using a stiff brush, remove all debris and dust from each block surface to be glued. S S S First course for optional hearth. S S S FR ON T S S First course for optional wood box. Course 2 Continue to build each course as shown. Use adhesive on each block.
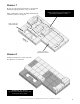
Course 3 (A) 4 x 4 x 12" Cut Block. S S S S Course 4 IMPORTANT: All cut block surfaces should face interior of fireplace. S S S S S S (B) 4 x 4 x 4" Cut Block. 6 © 2011 Rockwood Retaining Walls, Inc. All Rights Reserved. Please see copyright notice on page 2.
Course 5 M S M S S S S Course 6 (B) 4 x 4 x 4" Cut Block. S S (C) Cut blocks to accommodate reinforcing steel. © 2011 Rockwood Retaining Walls, Inc. All Rights Reserved. Please see copyright notice on page 2.
Course 7 (B) 4 x 4 x 4" Cut Block. S (A) 4 x 4 x 12" Cut Block. Course 8 IMPORTANT: All cut block surfaces should face interior of fireplace. Glue 3" side of angle iron to cut blocks. Center left to right. 8 © 2011 Rockwood Retaining Walls, Inc. All Rights Reserved. Please see copyright notice on page 2.
Course 9 (A) 4 x 4 x 12" Cut Block. S NOTE: When building with wood box, place block as shown to support top. Stand block vertically for no woodbox. S S S S Course 10 S (B) 4 x 4 x 4" Cut Block. © 2011 Rockwood Retaining Walls, Inc. All Rights Reserved. Please see copyright notice on page 2.
Installing Firebrick Install fire brick now. Step #1 Rutland fireplace mortar (furnished) is a silicate product that when fire cured, sets rock hard - as strong as firebrick itself and withstands 2,000°F. Passes ASTM E136 and E72. Step #1: Start by applying a bead of firebrick mortar to the bottom of a brick. Begin at the bottom of the fireplace. Place a full brick in the front left corner and end with a half brick on the right side.
Course 11 Place and center 18 x 44" Silver Creek Limestone Tops as shown. Lift to glue in place. © 2011 Rockwood Retaining Walls, Inc. All Rights Reserved. Please see copyright notice on page 2.
Course 12 Position course as shown. Lift each block to glue in place. S (A) 4 x 4 x 12" Cut Block. S S (A) 4 x 4 x 12" Cut Block Course 13 S IMPORTANT: All cut block surfaces should face interior of fireplace. S (B) 4 x 4 x 4" Cut Block. 12 © 2011 Rockwood Retaining Walls, Inc. All Rights Reserved. Please see copyright notice on page 2.
Course 14 (A) 4 x 4 x 12" Cut Block. S S S S Course 15 S (B) 4 x 4 x 4" Cut Block. S (A) 4 x 4 x 12" Cut Block. S S S © 2011 Rockwood Retaining Walls, Inc. All Rights Reserved. Please see copyright notice on page 2.
Course 16 (B) 4 x 4 x 4" Cut Block. S S S S S (A) 4 x 4 x 12" Cut Block. S S Course 17 IMPORTANT: All cut block surfaces should face interior of fireplace. Place caps. Lift to glue in place. 14 © 2011 Rockwood Retaining Walls, Inc. All Rights Reserved. Please see copyright notice on page 2.
Course 18 Allow glue to set on support blocks before placing spark suppressor cap. S S S S © 2011 Rockwood Retaining Walls, Inc. All Rights Reserved. Please see copyright notice on page 2.
Final Steps Place caps. Lift to glue in place. Secure fire box mantle in place with fire brick mortar. Do not use mortar to fill any gaps. Allow 72 hrs. for adhesive to set before use. 16 © 2011 Rockwood Retaining Walls, Inc. All Rights Reserved. Please see copyright notice on page 2.
Necessories Outdoor Living Kits Kit specifications, style and availability are subject to change without notice.
Assembly Instructions COMPACT FIREPLACE • 72" W x 44" D x 70" H 325 Alliance Place NE Rochester, MN 55906 Available at: toll free 888.288.4045 phone 507.529.2871 fax 507.529.2879 www.rockwoodwalls.com © 2010 Rockwood Retaining Walls, Inc. All Rights Reserved. Made worldwide under license from Rockwood Retaining Walls, Inc. US and international patents issued and pending. This information has been prepared for the benefit of customers interested in Rockwood Retaining Wall products.