Assembly Instructions COMPACT BAR • 48" W x 24" D x 38" H WITH 20 INCH OPENING CLOSED FRONT
Compact Bar Kit – Contents Item 4 x 12 x 8" 4 x 8 x 8" 4 x 4 x 8" Description Large Lakeland Block (L) Medium Lakeland Block (M) Small Lakeland Block (S) 24 x 48" Top Cut Block Assembly Table Top Back Splash Arch 1 5 Adhesive 29 oz. Tubes Super-Stik 3 LakelandTM blocks have the sophisticated look of an old brick wall so popular with homeowners today. This tumbled, three piece system offers designers the opportunity and freedom to combine functionality with style.
Base Preparation: Base can be constructed of either poured slab or compacted gravel. See requirements below. Zoning and Permits: Before you plan your project, learn about the necessary zoning requirements and rules for excavating and building in your area. No matter how small your project, be sure you obtain the necessary permits before you start construction. Know W hat ’s Below: Whether you are planning to do it yourself or hire a professional, smart digging means calling 811 before each job.
Course 1 (For open front) To build Compact Bar with closed front, see page 10. Be sure your properly prepared base is level. Begin building by laying your base course as shown. Using a stiff brush, remove all debris and dust from each block surface to be glued. IMPORTANT: Lay glue bead away from outside perimeter to prevent glue from squeezing out between courses S Course 2 (For open front) Continue to build each course as shown. Use adhesive on each block. S S 4 © 2010 Rockwood Retaining Walls, Inc.
Course 3 (For open front) S S IMPORTANT: Use Super-Stik adhesive on each course. Brush excessive dust from blocks to be glued. Course 4 (For open front) M © 2010 Rockwood Retaining Walls, Inc. All Rights Reserved. Please see copyright notice on page 2.
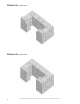
Course 5 (For open front) S S S S S S Course 6 (For open front) S S S S 6 © 2010 Rockwood Retaining Walls, Inc. All Rights Reserved. Please see copyright notice on page 2.
Course 7 (For open front) S S S Course 8 (For open front) S S © 2010 Rockwood Retaining Walls, Inc. All Rights Reserved. Please see copyright notice on page 2.
Course 9 (For open front) S S S Course 10 (For open front) Center left to right. Glue in place. S S S S S S 8 © 2010 Rockwood Retaining Walls, Inc. All Rights Reserved. Please see copyright notice on page 2.
Course 11 (For open front) Assemble back splash as shown. Glue in place. Back splash detail. Final Step (For open front) Place top and center. Lift to glue in place. Allow 72 hrs. for adhesive to set before use. © 2010 Rockwood Retaining Walls, Inc. All Rights Reserved. Please see copyright notice on page 2.
Course 1 (For closed front) Be sure your properly prepared base is level. Begin building by laying your base course as shown. Using a stiff brush, remove all debris and dust from each block surface to be glued. IMPORTANT: Lay glue bead away from outside perimeter to prevent glue from squeezing out between courses S Course 2 (For closed front) Continue to build each course as shown. Use adhesive on each block. S S 10 © 2010 Rockwood Retaining Walls, Inc. All Rights Reserved.
Course 3 (For closed front) S S S IMPORTANT: Use Super-Stik adhesive on each course. Brush excessive dust from blocks to be glued. Course 4 (For closed front) M M © 2010 Rockwood Retaining Walls, Inc. All Rights Reserved. Please see copyright notice on page 2.
Course 5 (For closed front) S S S S S S Course 6 (For closed front) S S S S 12 © 2010 Rockwood Retaining Walls, Inc. All Rights Reserved. Please see copyright notice on page 2.
Course 7 (For closed front) S S S S S Course 8 (For closed front) S M S © 2010 Rockwood Retaining Walls, Inc. All Rights Reserved. Please see copyright notice on page 2.
Course 9 (For closed front) S S S S S Course 10 (For closed front) S Center left to right. Glue in place. S S S S S 14 © 2010 Rockwood Retaining Walls, Inc. All Rights Reserved. Please see copyright notice on page 2.
Course 11 (For closed front) Assemble back splash as shown. Glue in place. Back splash detail. Final Step (For closed front) Place top and center. Lift to glue in place. Allow 72 hrs. for adhesive to set before use. © 2010 Rockwood Retaining Walls, Inc. All Rights Reserved. Please see copyright notice on page 2.
Necessories Outdoor Living Kits Kit specifications, style and availability are subject to change without notice.
Assembly Instructions COMPACT BAR • 48" W x 24" D x 38" H WITH 20 INCH OPENING CLOSED FRONT 325 Alliance Place NE Rochester, MN 55906 Available at: toll free 888.288.4045 phone 507.529.2871 fax 507.529.2879 www.rockwoodwalls.com © 2010 Rockwood Retaining Walls, Inc. All Rights Reserved. Made worldwide under license from Rockwood Retaining Walls, Inc. US and international patents issued and pending.