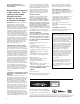
Necessories Assembly Instructions Compact Bar Leave these instructions with property owner. 48 .00 .00 48 .0 0 .00 24 47.50 47.50 24 44 .00 24 .00 44 .0 0 Builds either with a 20" opening or closed front. .
ROCKWOOD RETAINING WALLS, INC. NECESSORIES KITS FOR OUTDOOR LIVING LIMITED WARRANTY Congratulations on choosing a “Necessories Kit.” These superior-quality outdoor living kits have been designed to give you years of enjoyment and comfort. IMPORTANT NOTICE: Read this entire Rockwood Retaining Walls, Inc. (“Rockwood”) Limited Warranty and Limitation of Liability (“Limited Warranty”).
WARNING: Failure to follow all steps of the installation instructions may result in property damage or bodily injury. Rockwood Retaining Walls, Inc. is not liable for any property damage or bodily injury caused by failure to follow the installation instructions or improper use of the product. Compact Bar Kit Contents: Item Large Block Medium Block Small Block Cap - Top Cut Blocks Adhesive Description 4" H x 8" W x 12" D (L) 4" H x 8" W x 8" D (M) 4" H x 8" W x 4" D (S) 24" W x 48" D Backsplash Arch 29 oz.
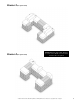
Course 1 (For open front) To build Compact Bar with closed front, see page 10. Be sure your properly prepared base is level. Begin building by laying your base course as shown. Using a stiff brush, remove all debris and dust from each block surface to be glued. IMPORTANT: Lay glue bead away from outside perimeter to prevent glue from squeezing out between courses S Course 2 (For open front) Continue to build each course as shown. Use adhesive on each block.
Course 3 (For open front) L S L S IMPORTANT: Use Super-Stik adhesive on each course. Brush excessive dust from blocks to be glued. Course 4 (For open front) M © 2007 - 2016 Rockwood Retaining Walls, Inc. All Rights Reserved. Please see copyright notice on page 2.
Course 5 (For open front) S S S S S S Course 6 (For open front) S S S 6 S © 2007 - 2016 Rockwood Retaining Walls, Inc. All Rights Reserved. Please see copyright notice on page 2.
Course 7 (For open front) S S S Course 8 (For open front) L S S S © 2007 - 2016 Rockwood Retaining Walls, Inc. All Rights Reserved. Please see copyright notice on page 2.
Course 9 (For open front) S S S S Course 10 (For open front) Center left to right. Glue in place. S S S S S S 8 © 2007 - 2016 Rockwood Retaining Walls, Inc. All Rights Reserved. Please see copyright notice on page 2.
Course 11 (For open front) Assemble back splash as shown. Glue in place. Back splash detail. Final Step (For open front) Place top and center. Lift to glue in place. IMPORTANT: Allow 72 hrs. for adhesive to set before use. Note: All warranty claims must be made online at: www.outdoorlivingkits.com/warranty.htm Claims submissions must include the following information: 1. Claimant’s name, address, and phone number and the installation address (if different). 2.
Course 1 (For closed front) Be sure your properly prepared base is level. Begin building by laying your base course as shown. Using a stiff brush, remove all debris and dust from each block surface to be glued. IMPORTANT: Lay glue bead away from outside perimeter to prevent glue from squeezing out between courses S Course 2 (For closed front) Continue to build each course as shown. Use adhesive on each block. S L S 10 © 2007 - 2016 Rockwood Retaining Walls, Inc. All Rights Reserved.
Course 3 (For closed front) L S L S S IMPORTANT: Use Super-Stik adhesive on each course. Brush excessive dust from blocks to be glued. Course 4 (For closed front) M M © 2007 - 2016 Rockwood Retaining Walls, Inc. All Rights Reserved. Please see copyright notice on page 2.
Course 5 (For closed front) S S S S S S Course 6 (For closed front) S S S L S 12 © 2007 - 2016 Rockwood Retaining Walls, Inc. All Rights Reserved. Please see copyright notice on page 2.
Course 7 (For closed front) S S S S S Course 8 (For closed front) L S M S © 2007 - 2016 Rockwood Retaining Walls, Inc. All Rights Reserved. Please see copyright notice on page 2.
Course 9 (For closed front) S S S S S Course 10 (For closed front) S Center left to right. Glue in place. S S S S S 14 © 2007 - 2016 Rockwood Retaining Walls, Inc. All Rights Reserved. Please see copyright notice on page 2.
Course 11 (For closed front) Assemble back splash as shown. Glue in place. Back splash detail. Final Step (For closed front) Place top and center. Lift to glue in place. IMPORTANT: Allow 72 hrs. for adhesive to set before use. Note: All warranty claims must be made online at: www.outdoorlivingkits.com/warranty.htm Claims submissions must include the following information: 1. Claimant’s name, address, and phone number and the installation address (if different). 2.