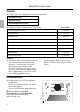
de Gebrauchsanweisung en Instructions for use fr Mode d’emploi nl Gebruiksaanwijzing it Istruzioni per l’uso es Instrucciones para el uso el Οδηγίες χρήσεως de en fr nl it 0 0 es el
de Seite 02 – 29 nl pagina 072 – 092 en fr page 30 – 50 it es pagina 093 – 113 page 51 – 71 el Σελίδα 135 – 155 página 114 – 134 Inhaltsverzeichnis Seite Seite Worauf Sie achten müssen ❑ Hinweise zur Entsorgung 3 ❑ Vor dem Anschluss des neuen Gerätes 3 ❑ Sicherheitshinweise 4 Tipps und Tricks 22 Auftauen und Garen 23 Das ist Ihr neuer Herd ❑ Gerätebeschreibung ❑ Zubehör ❑ Einschubhöhen 5 6 6 Vor dem ersten Benutzen ❑ Einstellen der Tageszeit ❑ Vorreinigung ❑ Ausheizen 7 7 7 Reinigen
Worauf Sie achten müssen Hinweise zur Entsorgung ❑ Altgeräte sind kein wertloser Abfall. Durch umweltgerechte Entsorgung können wertvolle Rohstoffe wiedergewonnen werden. Bevor Sie das Altgerät entsorgen, machen Sie es unbrauchbar. ❑ Ihr neues Gerät wurde auf dem Weg zu Ihnen durch die Verpackung geschützt. Alle eingesetzten Materialien sind umweltverträglich und wieder verwertbar. Bitte helfen Sie mit und entsorgen Sie die Verpackung umweltgerecht.
Worauf Sie achten müssen Sicherheitshinweise Vor dem Anschluß des neuen ❑ Benutzen Sie das Gerät nur für das Zubereiten von Speisen. ❑ Die Oberflächen von Heiz- und Kochgeräten werden bei Betrieb heiß. Die Backofeninnenflächen und die Heizelemente werden sehr heiß. Halten Sie Kinder grundsätzlich fern. ❑ Bleiben Sie in der Nähe, wenn Sie Speisen mit Fett oder Öl bereiten. Bei Überhitzung kann es sich entzünden. ❑ Reinigen Sie den Backofen regelmäßig.
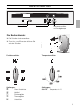
Das ist Ihr neuer Herd Elektronikuhr Funktionswähler Temperaturwähler mit Anzeigelampe Die Bedienblende: ❑ Die Schalter sind versenkbar. ❑ Zum Aus- und Einrasten drücken Sie auf den Schalter.
Das ist Ihr neuer Herd Zubehör ❑ Ihr Backofen ist mit folgendem Zubehör ausgestattet: 1 Backblech Email 1 Back-/Bratrost 1 Universalpfanne mit Rost ❑ Weiteres Zubehör erhalten Sie im Fachhandel: Universalpfanne mit Rost Z 1230 X2 Auflaufpfanne Z 1270 X2 Backblech Alu Z 1330 X0 Backblech Email Z 1340 X2 Back-/Bratrost gekröpft Z 1430 X0 Back-/Bratrost engmaschig Z 1440 X0 Bratenblech (nur in Universalpfanne einsetzbar) Z 1510 X2 Brotbackstein Z 1910 X0 Nachrüstsatz-Clou Z 1750 X0 Hinweis: ❑
Vor dem ersten Benutzen Tageszeit ❑ Bevor Sie das Gerät zum ersten Mal benutzen, müssen Sie an der Elektronikuhr die aktuelle Uhrzeit einstellen. ❑ Nach dem elektrischen Anschluss des Gerätes oder nach einem Stromausfall blinkt die Anzeige {:{{. Einstellen: Drücken Sie die Taste + und stellen Sie am Drehknopf die aktuelle Tageszeit ein (Beispiel | Å:{{ Uhr). Hinweis: Die Tageszeit kann nur eingestellt werden, wenn keine Automatikfunktion eingestellt ist (Löschen siehe Elektronikuhr). Vorreinigung: 1.
Elektronikuhr Funktionsanzeige Kurzzeitwecker Drehknopf Betriebszeit-Dauer Betriebszeit-Ende Tageszeit ❑ Sie können die Elektronikuhr mit einer Hand bedienen. Dazu müssen Sie nach einem Tastendruck die Zeit am Drehknopf einstellen. Einstellungen sind möglich, solange die Anzeige blinkt (~4 Sekunden). ❑ Einstellen der Tageszeit: siehe Abschnitt „Vor dem ersten Benutzen”. Kurzzeitwecker: 1. Drücken Sie die Taste t und stellen die Dauer ein (Beispiel: Å Minuten).
Elektronikuhr Zeitschaltautomatik ❑ Sie können den Backofen über die Elektronikuhr ein- bzw. ausschalten. Automatisches Ausschalten: ❑ Das Backen oder Braten beginnt sofort. 1. Wählen Sie das Heizsystem und die Backofentemperatur. 2. Drücken Sie die Taste g und stellen Sie die Betriebszeit-Dauer am Drehknopf ein (Beispiel: | Stunde und ~{ Minuten). Nach dem Einstellen wird nach ca. 4 Sekunden die aktuelle Uhrzeit angezeigt. Die Anzeige , über der g Taste signalisiert den Automatikbetrieb. 3.
Elektronikuhr Automatisches Ein- und Ausschalten: ❑ Das Backen oder Braten beginnt für die eingestellte Dauer zu einem von Ihnen gewählten späteren Zeitpunkt. 1. Wählen Sie das Heizsystem und die Backofentemperatur. 2. Drücken Sie die Taste g und stellen Sie die Betriebszeit-Dauer am Drehknopf ein (Beispiel: | Stunde und ~{ Minuten). 3. Drücken Sie die Taste h und stellen Sie das Betriebszeit-Ende am Drehknopf ein (Beispiel |}:~{ Uhr). Nach dem Einstellen wird nach ca.
Elektronikuhr Sonderfunktionen Ausblendung der Anzeige: 1. Drücken Sie 4 Sekunden lang die Taste +. Nach dieser Zeitspanne wird die Anzeige dunkel, die Tageszeit läuft im Hintergrund weiter. 2. Zum Einschalten der Anzeige drücken Sie kurz auf die Taste +. Nachtabdunkelung der Anzeige: ❑ Zwischen 22.00 Uhr und 6.00 Uhr wird die Anzeige automatisch abgedunkelt. Hinweise: ❑ Für Zeitschaltautomatik eignen sich solche Gerichte am besten, die wenig Aufmerksamkeit erfordern.
Backofen-Funktionen Ober-/Unterhitze ————————— e (Konventionelles Heizsystem) Durch oben und unten im Backofen angeordnete Heizkörper wird die Wärme auf das Back- oder Bratgut übertragen. Backen und Braten ist nur auf einer Einschubhöhe möglich.
Backofen ein- und ausschalten Bevor Sie Ihren Backofen einschalten entscheiden Sie, welches Heizsystem Sie benutzen möchten. Einschalten: 1. Stellen Sie den Funktionswähler auf das gewählte System ein. 2. Stellen Sie den Temperaturwähler auf die erforderliche Temperatur ein. (Temperaturangaben siehe Back-/Brattabellen). ❑ Die eingestellte Temperatur wird automatisch geregelt. ❑ Die Anzeigelampe leuchtet beim Einschalten des Backofens und bei jedem Nachheizen.
Backen Backen in Backformen ❑ Stellen Sie die Backformen immer auf die Mitte des Rostes. ❑ Wir empfehlen dunkle Backformen aus Metall. Backen in Weißblechformen: Einschubhöhe 3 ‰ Heißluft t Ober/Unterhitze Einschubhöhe 1 Ober-/Unterhitze: e ❑ Wird der Kuchen unten zu dunkel: Überprüfen Sie die Einschubhöhe. Verkürzen Sie die Backzeit und wählen Sie eventuell eine niedrigere Temperatur. ❑ Wird der Kuchen unten zu hell: Überprüfen Sie die Einschubhöhe.
Backen ❑ Die Angaben in der Tabelle sind Richtwerte, gültig für emaillierte Backbleche und dunkle Backformen. Die Werte können je nach Art und Menge des Teiges und je nach Backform variieren. ❑ Hinweise in der Tabelle zum Vorheizen beachten. ❑ Wir empfehlen beim ersten Versuch, die niedrigere der angegebenen Temperaturen einzustellen. Grundsätzlich ergibt die niedrigere Temperatur eine gleichmäßigere Bräunung.
Backen Heißluft Gebäckart Hefeteig Blechkuchen mit Belag (z. B. Apfelstreusel) 1 Blech 2 Bleche Hefekranz und -zopf (500 g Mehl) Kuchen niedere Form Kuchen hohe Form Kleingebäck Baisers Blätterteig (vorheizen) 1 Blech 2 Bleche Brandteig (vorheizen) 1 Blech 2 Bleche Spritzgebäck 1 Blech 2 Bleche 3 Bleche Rührteig (Small Cakes) 1 Blech 2 Bleche Pikantes Auflauf aus rohen Zutaten (z. B.
Braten Hinweise: ❑ Legen Sie den Rost in die Universalpfanne ein und schieben Sie gemeinsam in dieselbe Einschubhöhe ein. ❑ Fleisch kann besonders wirtschaftlich bei einem Gewicht von über 750 g im Backofen gebraten werden. ❑ Braten im offenen Geschirr: Spülen Sie die Universalpfanne bzw. das Bratgeschirr mit Wasser aus und legen Sie das Fleisch ein. ❑ Geben Sie für fettes Fleisch und Geflügel je nach Größe und Art des Bratens 1/8 bis 1/4 Liter Wasser in die Universalpfanne.
Braten ❑ Die Angaben in der Tabelle sind Richtwerte. Die Werte können je nach Art und Menge und je nach dem Bratgeschirr variieren. Allgemein: Große, hohe Braten, Gans, Pute, Ente = Lange Bratdauer, niedrige Temperatur Mittelgroße, niedrige Braten = Mittlere Bratdauer, mittlere Temperatur Kleine, flache Braten = Kurze Bratdauer, hohe Temperatur Bratdauer je cm Fleischhöhe ohne Knochen ca. 13 – 15 Min. Bratdauer je cm Fleischhöhe mit Knochen ca. 15 – 18 Min.
Rundum-Grillen Grillen mit Heißluft v ❑ Die Grillzeiten für das Rundum-Grillen sind Richtwerte. Die Werte können je nach Art und Menge des Grillgutes variieren. ❑ Ein Wenden des Grillgutes ist nicht erforderlich. ❑ Hinweise auf Vorheizen beachten. Grillgut Schweinesteak Schweinehaxen Rindersteak Hacksteak Hähnchen Temperatureinstellung 180 – 190° C (vorheizen) 170° C (mit Bratenblech bis 190° C) 190° C (vorheizen) 180 – 190° C 170 – 180° C Einschubhöhe 3 3 3 3 3 Grillzeit 115 – 120 Min. 100 – 130 Min.
Grillen ! Beim Grillen ist Vorsicht geboten. Kinder grundsätzlich fernhalten. Hinweise: ❑ Grillen Sie bei geschlossener Backofentür. ❑ Die Grilltemperaturen sind regelbar. ❑ Verwenden Sie immer den Rost und die Universalpfanne. ❑ Legen Sie das Grillgut immer auf die Mitte des Rostes. ❑ Schaltet sich der Grillheizkörper automatisch aus, wurde der Überhitzungsschutz wirksam. Der Grillheizkörper schaltet sich nach kurzer Zeit wieder ein. ❑ Legen Sie den Rost in die Universalpfanne ein.
Grillen Flächengrillen Z Für flache kleinere Gerichte. ❑ Verwenden Sie immer den Rost und die Universalpfanne. ❑ Wenden Sie das Grillgut nach ca. zwei Drittel der Zeit. ❑ Streichen Sie den Rost und das Grillgut nach Belieben leicht mit Öl ein. Tabelle für Flächengrillen Z ❑ Die Angaben in den Tabellen sind Richtwerte. Die Werte können je nach Art und Menge des Grillgutes variieren und gelten für das Einschieben in den kalten Backofen. Grillgut Temperatureinstellung EinRostGrillzeit schub- lage 1.
Tipps und Tricks Zum Backen: ❑ Der Blechkuchen ist unten zu hell. oder die Universalpfanne aus dem Backofen. Nehmen Sie nicht benötigte Backbleche oder die Universalpfanne aus dem Backofen. ❑ Der Formkuchen ist unten zu hell. Schieben Sie Backformen nicht auf dem Backblech sondern auf dem Rost ein. ❑ Kuchen oder Gebäck sind unten zu dunkel. Schieben Sie Kuchen oder Gebäck höher ein. ❑ Der Kuchen ist zu trocken. Stellen Sie die Backofentemperatur etwas höher ein. Wählen Sie die Backzeit etwas kürzer.
Auftauen und Garen Auftauen und Garen mit Heißluft: v Wichtige Hinweise: ❑ Verwenden Sie zum Auftauen und Garen von Gefrier- oder Tiefkühlprodukten nur Heißluft. ❑ Beachten Sie bei allen tiefgekühlten Lebensmitteln grundsätzlich die Angaben des Herstellers. ❑ Aufgetaute Gefrier- oder Tiefkühlprodukte (vor allem Fleisch) benötigen generell kürzere Garzeiten als frische Produkte, weil das Frosten eine Art Vorgaren bewirkt.
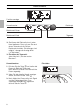
Sterilisieren von Obst und Gemüse Sterilisieren mit Heißluft v Im Backofen können bis zu sechs Einweckgläser mit 1/2, 1 oder 11/2 Liter Inhalt gleichzeitig sterilisiert werden. Hinweise: ❑ Obst und Gemüse müssen frisch und in einwandfreiem Zustand sein. ❑ Beim Vorbereiten und Verschließen ist Sauberkeit oberstes Gebot. ❑ Verwenden Sie nur Einweckgläser, die einwandfrei sauber und unbeschädigt sind. ❑ Verwenden Sie nur Gummiringe, die hitzebeständig sind.
Sterilisieren von Obst und Gemüse Einsetzen der Gläser: ❑ Schieben Sie die Universalpfanne in Einschubhöhe 1 ein. ❑ Stellen Sie die Einweckgläser im Dreieck auf (siehe Abb.), dabei ca. 5 cm Abstand zur Backofenrückwand halten. ❑ Stellen Sie die Einweckgläser so in die Universalpfanne, dass sie sich nicht berühren. ❑ Gießen Sie 1/2 l heißes Wasser (ca. 80° C) in die Universalpfanne.
Reinigen und Pflegen Wichtige Hinweise: ❑ Verwenden Sie zum Reinigen keine Scheuermittel, keine scharfen Mittel und keine kratzenden Gegenstände. ❑ Kratzen Sie eingebrannte Speisenrückstände nicht ab, sondern weichen Sie diese mit einem feuchten Tuch und Spülmittel auf. ❑ Verwenden Sie Spezialreiniger (z. B. Sprays) nicht für Aluminium- und Kunststoffteile. Edelstahlfront: ❑ Bei Verwendung von handelsüblichen Edelstahlreinigern kann die Bedruckung angegriffen werden.
Reinigen und Pflegen Backofen Hinweis: Zur bequemeren Reinigung im Anschluß an die automatische Reinigungshilfe bietet Ihnen das Gerät folgende Möglichkeiten. Backofentür Aushängen: 1. Öffnen Sie die Backofentür ganz. 2. Klappen Sie die Sperrhebel links und rechts ganz auf. 3. Stellen Sie die Backofentür hoch (schräg) und nehmen Sie diese nach vorne ab. Einhängen: 1. Setzen Sie beide Scharniere in die Halterungen links und rechts ein und schwenken Sie die Backofentür nach unten. 2.
Störungen und Reparaturen Bei Störungen oder Reparaturen, die Sie nicht selbst beheben können, ist der Kundendienst für Sie da. Anschriften siehe Kundendienststellenverzeichnis. Achtung: Es kostet Ihr Geld, wenn Sie wegen eines Bedienfehlers den Kundendienst rufen. Bei Kundendienstfällen bitte angeben: E-Nr. FD Sie finden diese Angaben auf dem Geräteschild. Das Geräteschild finden Sie hinter der Backofentür, links unten am seitlichen Rand des Backofens.
Was ist wenn? Nicht immer ist der Ruf nach dem Kundendienst erforderlich. In manchen Fällen können Sie selbst Abhilfe schaffen. In der nachfolgenden Tabelle finden Sie einige Tipps. Grundsätzlicher Hinweis: Arbeiten an der Geräte Elektrik dürfen nur von einem Fachmann ausgeführt werden. Vor Beginn solcher Arbeiten muss das Gerät unbedingt stromlos gemacht werden: Durch Betätigen des Sicherungsautomaten, oder durch Herausdrehen der Sicherungen im Sicherungskasten Ihrer Wohnung.
Table of Contents Page Important Information ❑ Notes on disposal ❑ Before connecting your new appliance ...
Important Information Notes on disposal ❑ Old appliances still have some residual value. An environment-friendly method of disposal will ensure that valuable raw materials can be recovered and used again. Before you dispose of your old appliance, make sure that it has been rendered inoperable. ❑ Your new appliance was protected by suitable packaging while it was on its way to you. All materials used for this purpose are environment-friendly and suitable for recycling.
Important Information Appliance safety considerations ❑ The appliance should only be used for the preparation of food. ❑ The surfaces of heating and cooking appliances get hot during operation. The interior oven walls and the heating elements get extremely hot. Always keep children away from the appliance. ❑ Never leave the appliance unattended when cooking with fat or oil. They can catch fire if overheated. ❑ Clean the oven regularly. Fatty or oily remants could ignite when the oven is switched on.
Introducing: Your new Cooker Electronic clock Function selector Temperatur selector with control lamp The control panel: ❑ The switches are retractable. ❑ To engage and disengage, depress the switch, making sure that it is in OFF position.
Introducing: Your new Cooker Accessories ❑ Your appliance is supplied with: 1 Baking tray, enamelled 1 Wire shelf 1 Universal pan with grid ❑ The following accessories can be obtained from a specialist dealer: Order no.
Before Using Your Appliance for the First Time Time of day ❑ Before you use your appliance for the first time, it is necessary to set the current time on the electronic timer. ❑ After connecting to the mains, or after a power failure, the display {:{{ will blink. Setting the time: Press the + button and set the current time with the rotary knob (e.g. | Å:{{). Note: The time cannot be set if an automatic function is active (see Electronic clock for cancelling automatic function). Preliminary cleaning: 1.
Electronic clock Function indicator Minute timer Rotary knob ON time OFF time Time ❑ The electronic clock can be operated with one hand; after pressing the button, set the time with the rotary knob. Adjustments can be made for as long as the display flashes (4 seconds). ❑ Setting the time: See section ”Before using your appliance for the first time”. Minute timer: 1. Press the t button and set the cooking time (e.g. Å minutes). When the timer switches on, the remaining time is displayed. 2.
Electronic clock Automatic timer ❑ You can switch the oven on and off via the electronic clock. Automatic switch off: ❑ If you wish to bake or roast food immediately, it is only necessary to set the ON time. 1. Select the heating system and the oven temperature. 2. Press the g button and set the ON time with the rotary knob (e.g. | hour and ~{ minutes). When the ON time has been set, the current time is displayed. The , displayed above the g button indicates automatic mode. 3. When the time has elapsed (e.
Electronic clock Automatic switch on and switch off: ❑ If the food is to be baked or roasted later on, both the ON time and OFF time must be set. 1. Select the heating system and the oven temperature. When the settings have been made, the current time is displayed. 2. Press the g button and set the ON time with the rotary knob (e.g. | hour and ~{ minutes). 3. Press the h button and set the OFF time with the rotary knob. The , displayed above the h button indicates automatic mode (e.g. |}:~{). 4.
Electronic clock Special functions Masking out the display: 1. Press the + button for 4 seconds. The display then goes blank and the time continues running in the background. 2. To switch on the display, briefly press the + button. Dimming the display: ❑ Between 22.00 and 6.00 the display is automatically dimmed. Note: ❑ The automatic timer is best used with dishes which require little attention. ❑ The minute timer and OFF time can be pre-programmed up to a max. 24 hours.
Description of Oven Features Top and bottom heat ——————— e (Conventional heating system) The food being baked or roasted is exposed to heat radiation from heating elements located at the top and bottom of the oven cavity. Baking and roasting is possible on one slide-in level only.
Switching the Oven ON and OFF Before switching on your oven, you should decide which heating system you wish to use. Switching the oven ON: 1. Use the function selector to determine the desired system. 2. Set the temperature control knob to the desired temperature. ❑ The selected temperature will be controlled automatically. ❑ The oven temperature control lamp illuminates when the oven is first switched on, and extinguishes when the required temperature has been reached.
Baking Using baking tins ❑ Always place baking tins in the centre of the baking grill. ❑ We recommend dark metallic baking tins. Using tinplate baking tins: Shelf position 3 ‰ Hot air t Top/bottom heat Shelf position 1 Top/bottom heat: e ❑ If the cake bottom gets too dark: Check the slide-in level. Shorten the baking time, and possibly use a lower baking temperature. ❑ If the cake bottom stays too light: Check the slide-in level.
Roasting Roasting with hot-air circulation v or with top/bottom heat e Notes: ❑ Place the grill into the universal baking pan and slide them together into the same slide-in level. ❑ Meat can be roasted in the oven in a particularly economical fashion if the weight of the cut exceeds 750 grams. ❑ Roasting in an uncovered pot: Rinse the universal baking pan and/or the roaster with water, and place the meat into it.
Grilling ! Exercise CAUTION when grilling. Always keep children at a safe distance. Notes on grilling: ❑ Always close the oven door when grilling. ❑ The grilling temperatures are variable. ❑ Always use the grill and the universal pan. ❑ Always place food to be grilled in the centre of the wire grill. ❑ If the grilling radiator (heating element) switches OFF automatically, the overheating protection was activated. The radiator will be reactivated after a short period of time.
Cooking Tips and Helpful Hints For baking: ❑ The bottom of a cake baked on a baking sheet stays too light. Remove from the oven all baking sheets or universal baking pan currently not in use. ❑ The bottom of a cake baked in a tin stays too light. Use a grill and not a baking sheet to support the cake tin during baking. ❑ The bottom of cake or cookies gets too dark. Set cake or cookies into a higher set of slide-in rails. ❑ The cake gets too dry.
Defrosting and Cooking Defrosting and cooking using the hot-air system v Important heating system information: ❑ For defrosting and cooking of frozen or deep-frozen foods, use only the hot-air heating system. ❑ With all deep-frozen foods, follow the food processing company‘s instructions on the package. ❑ As a rule, defrosted frozen or deepfrozen foods (especially meats) require less cooking time than fresh products, since freezing has a pre-cooking effect.
Cleaning and Care Important cleaning basics: ❑ For cleaning, do not use abrasives, no corrosive cleaners, and no sharp objects. ❑ Do not scratch off burnt-in food residues, but soak them off with a moist cloth and dishwashing detergent. ❑ Special cleaners, such as oven cleaning spray, must not be used on aluminium or plastic parts. Stainless steel front: ❑ When using commercially available stainless steel cleaning agents, the lettering may become damaged. ❑ Do not use scouring sponges.
Cleaning and Care Manual cleaning steps: Note: To make the manual cleaning steps following the automatic oven cleaning function more convenient, the appliance features the following options: Removing the oven door: 1. Fully open the oven door. 2. Move the catch levers on the right and left-hand sides to the fully open position. 3. Placing the door at an upward angle toward you, grasp the door with both hands and lift it out of the hinges toward you. Hanging the oven door: 1.
Service and Repair Information In the event of problems or repairs that you cannot solve or perform yourself, our customer service will be happy to help. Check the customer service directory for a customer service facility in your area. Caution: Calling the customer service because of an operator error can be very costly! In the event of a customer service request, please have the following information handy: E-Number FD You can find this information on the appliance‘s nameplate.
Trouble-shooting Guide Calling the customer service is not always really necessary. In some cases, you can remedy the situation yourself. The following table may contain some helpful tips. Important general safety guidelines: Service or repair work on the electronic components may only be performed by a qualified expert. Without exception, prior to starting such repairs, the appliance must be disconnected from the mains.
Sommaire Page Consignes à respecter ❑ Conseils pour la mise au rebut ❑ Avant de brancher l'appareil neuf ❑ Consignes de sécurité 52 52 53 Votre nouveau four ❑ Description de l'appareil ❑ Accessoires ❑ Niveaux d’enfournement 54 55 55 Avant la première utilisation ❑ Réglage de l'heure ❑ Premier nettoyage ❑ Premier chauffage Horloge électronique ❑ Minuterie ❑ Minuterie automatique ❑ Fonctions en option ❑ Remarques 56 56 56 Page Nettoyage et entretien ❑ Remarques importantes ❑ L'émail et le verre ❑ Façade
Consignes à respecter Conseils pour la mise au rebut ❑ Les appareils usagés ne sont pas des déchets sans valeur. Une mise au rebut respectueuse de l'environnement permet de récupérer de précieuses matières premières. Avant de vous débarrasser de l'ancien appareil, rendez-le inutilisable. ❑ Un emballage a protégé votre appareil pendant son transport jusqu'à votre domicile. Tous les matériaux qui le composent sont compatibles avec l'environnement et recyclables.
Consignes à respecter Consignes de sécurité Vor dem Anschluß des neuen ❑ N'utilisez l'appareil que pour préparer les repas. ❑ Les surfaces des appareils de chauffage et de cuisson chauffent pendant le fonctionnement. Les surfaces intérieures du four et les serpentins deviennent très chauds. Eloignez systématiquement les enfants. ❑ Ne vous éloignez pas de l'appareil pendant la cuisson de graisse ou d'huile. Si la graisse et l'huile surchauffent, ils risquent de s'enflammer.
Votre nouveau four Horloge électronique Sélecteur de fonction Sélecteur de température avec témoin lumineux Le bandeau de commande: ❑ Les manettes sont escamotables. ❑ Pour faire sortir et escamoter une manette, appuyez dessus. Elle doit se trouver dans les deux cas en position éteinte.
Votre nouveau four Accessoires ❑ Fournitures de série: 1 Plaque à pâtisserie en émail 1 Grille à pâtisserie/de rôtissage 1 Lèchefrite avec grille ❑ Vous trouverez d'autres accessoires dans le commerce spécialisé: N° de réf.
Avant la première utilisation Heure du jour ❑ Avant d'utiliser l'appareil pour la première fois, régler le minuteur électronique sur l'heure actuelle. ❑ {:{{ clignotent à l'afficheur une fois réalisé le branchement électrique de l'appareil ou après une panne de courant. Réglage: Appuyez sur la touche + puis réglez l'heure actuelle à l'aide du bouton rotatif (exemple: | Å:{{ heures).
Horloge électronique Affichage de la fonction Minuterie Bouton rotatif Durée de la période de service Fin de la période de service Heure actuelle ❑ Vous pouvez actionner l'horloge électronique avec une main. Pour cela, après avoir appuyé sur la touche, réglez l'heure à l'aide du bouton rotatif. Vous pouvez procéder au réglage tant que l'affichage clignote (4 secondes). ❑ Réglage de l'heure actuelle: Voir la section intitulée "Avant la première utilisation". Minuterie: 1.
Horloge électronique Minuterie automatique ❑ Vous pouvez allumer et éteindre le four par le biais de l'horloge électronique. Coupure automatique: ❑ Si la cuisson ou le rôtissage doit commencer immédiatement, réglez uniquement la durée de la période de service. 1. Choisissez le mode de cuisson et la température du four. 2. Appuyez sur la touche g puis réglez la durée de la période de service à l'aide du bouton rotatif (exemple: | heure et ~{ minutes).
Horloge électronique Enclenchement et coupure automatiques: ❑ Si la cuisson ou le rôtissage doit être différé, vous devez régler la durée et la fin de la période de service. 1. Choisissez le mode de cuisson et la température du four. Après avoir effectué le réglage, l'heure actuelle s'affiche. 2. Appuyez sur la touche g puis réglez la durée de la période de service avec le bouton rotatif (exemple: | heure et ~{ minutes). 3.
Horloge électronique Fonctions en option Masquage de l'affichage: 1. Appuyez pendant 4 secondes sur la touche +. Une fois cette durée écoulée, l'affichage s'assombrit. L'heure actuelle continue de fonctionner. 2. Pour enclencher l'affichage, appuyez un bref instant sur la touche +. Remarques: ❑ Les plats les mieux appropriés à la minuterie automatique sont ceux qui exigent peu d'attention. ❑ La minuterie et la fin de la période de service peuvent être programmées au maximum 24 heures à l'avance.
Fonctions du four Chaleur de voûte/de sole ————— e (Système de chauffage conventionnel) Les serpentins chauffant montés sur la sole et sous la voûte du four transmettent la chaleur par rayonnement aux gâteaux et rôtis. La cuisson et le rôtissage ne sont possibles qu'à un niveau d'enfournement à la fois. Avantages: – Cuisson de gâteaux à garniture humide, des pizzas et des quiches – Cuisson de pain.
Allumer et éteindre le four Choisissez le mode de cuisson avant d’allumer votre four. Allumer 1. Tourner le sélecteur de fonction de façon à ce qu’il corresponde au mode choisi 2. Régler le sélecteur de température sur la température requise. ❑ La température est alors réglée automatiquement. ❑ Le témoin lumineux s’allume dès que le four est allumé et pour chaque nouveau réglage de température. Eteindre: ❑ Pour éteindre le four, tourner les sélecteurs de température et de fonctions sur 0.
Cuisson de gâteaux Cuisson dans des moules ❑ Posez toujours les moules en milieu de four. ❑ Nous vous recommandons d'utiliser des moules sombres en métal. Cuisson dans des moules en fer blanc: Niveau 3 ‰ Air pulsé t Chaleur de voûte/de sole: Niveau 1 Chaleur de voûte/de sole: e ❑ Le fond du gâteau a trop bruni: Vérifier la hauteur d'enfournement. Réduisez la durée de cuisson et sélectionnez si nécessaire une température plus faible. ❑ Le fond du gâteau est trop clair: Vérifier la hauteur d'enfournement.
Rôtissage Rôtissage à la chaleur tournante v ou à la chaleur de voûte/de sole e Remarques: ❑ Posez la grille dans la plaque universelle et enfournez à la même hauteur. ❑ Lorsque la pièce de viande pèse plus de 750 grammes, sa cuisson au four est très économique. ❑ Rôtissage en récipient ouvert: Rincez la plaque universelle ou l'ustensile de rôtissage avec de l'eau puis posez la viande dedans.
Grillades ! Prudence lors des grillades. Eloignez systématiquement les enfants. Remarques: ❑ Les grillades se déroulent porte du four fermée. ❑ Les températures de grillade sont réglables. ❑ Enfournez toujours ensemble la grille et la plaque universelle. ❑ Posez toujours les aliments à griller au milieu de la grille. ❑ Le serpentin de grillade s'éteint automatiquement sur ordre du thermostat anti-surchauffe. Il se rallumera peu de temps après.
Conseils et astuces Pour cuire les gâteaux: ❑ Le fond du gâteau moulé est trop clair. Retirer du four les plaques à pâtisserie qui ne servent pas ou la plaque universelle. ❑ Le fond du gâteau cuit au moule est trop clair. Ne pas poser le moule sur la plaque à pâtisserie mais sur la grille. ❑ Le fond du gâteau ou du biscuit a trop bruni. Enfourner le gâteau ou le biscuit à un niveau plus élevé. ❑ Le gâteau est trop sec.
Décongélation et mijotage Décongélation et mijotage à la chaleur tournante v Remarques importantes ❑ N'utiliser que la chaleur tournante pour décongeler et faire cuire les produits congelés et surgelés. ❑ Toujours respecter les indications portées par les fabricants de produits surgelés sur leurs emballages.
Nettoyage et entretien Remarques importantes: ❑ Pour nettoyer le four, ne pas employer de produit récurants, d'ustensiles à arêtes vives ni de tampons abrasifs. ❑ Ne pas gratter les résidus d'aliments. Les ramollir avec un essuie-tout humide et un peu de liquide pour la vaisselle. ❑ Ne pas utiliser de détergent spécial (par ex. aérosols et assimilés) sur les pièces en aluminium et en plastique.
Nettoyage et entretien Le four: Remarque:pour nettoyer confortablement après avoir utilisé le dispositif de nettoyage automatique, l'appareil vous offre les possibilités ci-après. Retirer la porte du four: Décrochage: 1. Ouvrir la porte du four en grand. 2. Remonter complètement les taquets de verrouillage situés respectivement à droite et à gauche du four. 3. Commencer de refermer la porte du four jusqu'à ce qu'elle soit de biais puis la tirer vers vous. Accrochage: 1.
Pannes et réparations Le service après-vente (S.A.V.) est là pour vous aider en cas de panne ou si des réparations s'imposent que vous ne pouvez effectuer vous-même. Adresse de votre agence du S.A.V. la plus proche: voir le répertoire des agences. Attention: l'intervention du S.A.V. n'est pas un service gratuit. Songez-y si vous l'appelez à la suite d'une erreur de manipulation. En cas de besoin du S.A.V., veuillez indiquer les n° de réf. E et FD.
Que faire en cas de panne? Vous n'aurez pas toujours besoin d'appeler le service après-vente. Dans de nombreux cas, vous pourrez vous dépanner vous-même. Le tableau ci-dessous contient quelques astuces et conseils pour y parvenir. Remarque fondamentale: Les travaux sur les circuits électroniques de l'appareil ne pourront être confiés qu'à un spécialiste.
Inhoudsopgave Pagina Pagina Waar u op moet letten ❑ Aanwijzingen voor de afvoer ❑ Vóór het aansluiten van het nieuwe apparaat ❑ Veiligheidsvoorschriften Grillen 86 73 Tips en trucs 87 73 74 Ontdooien en gaar maken 88 Dit is uw nieuwe fornuis ❑ Beschrijving van het apparaat ❑ Toebehoren ❑ Inschuifhoogten 75 76 76 Vóór het eerste gebruik ❑ Instellen van de tijd van de dag ❑ Reiniging vóór gebruik ❑ Eerste keer verhitten 77 77 77 Elektronische klok ❑ Kookwekker ❑ Automatische tijdschakeling ❑ Sp
Waar u op moet letten Aanwijzingen voor de afvoer ❑ Oude apparaten zijn geen waardeloos afval. Dankzij een milieuvriendelijke afvoer kunnen waardevolle materialen worden hergebruikt. Maak uw oude apparaat onbruikbaar voor u het afvoert. ❑ Uw nieuwe apparaat wordt beschermd door de verpakking wanneer het naar u wordt vervoerd. Alle gebruikte materialen zijn milieuvriendelijk en kunnen worden hergebruikt. Lever uw bijdrage door de verpakking milieuvriendelijk af te voeren.
Waar u op moet letten Veiligheidsvoorschriften ❑ Gebruik het apparaat uitsluitend voor het bereiden van gerechten. ❑ Het oppervlak van verwarmings- en kookapparatuur wordt tijdens het gebruik heet. De binnenzijden van de oven en de verwarmingselementen worden zeer heet. Kinderen altijd uit de buurt van de oven houden. ❑ Blijf in de buurt wanneer u gerechten met vet of olie bereidt. Bij oververhitting kan het vet of de olie gaan branden. ❑ Reinig de oven regelmatig.
Dit is uw nieuwe oven Elektronische klok Functiekeuzeknop Temperatuurkeuzeknop met controlelampje Het bedieningspaneel: ❑ De schakelaars zijn verzinkbaar in het paneel. ❑ Druk op de schakelaar om deze te laten verzinken en weer naar buiten te laten komen. De schakelaar moet daarvoor in de uit-stand staan.
Dit is uw nieuwe oven Toebehoren ❑ Standaard worden meegeleverd: 1 Email bakplaat 1 bak- en braadrooster 1 braadslede met rooster ❑ Overig toebehoren is verkrijgbaar in de vakhandel: Bestelnr.
Vóór het eerste gebruik Tijdsinstelling ❑ Voordat u het apparaat voor het eerst gebruikt, dient u met de elektronische tijdschakelaar de actuele tijd in te stellen. ❑ Nadat het apparaat aan de elektrische stroom is aangesloten of nadat de stroom is uitgevallen, knipperen in het display de cijfers {:{{. Instellen: Druk op knop + en stel met de draaiknop de actuele tijd in (voorbeeld: | Å:{{ uur). N.B.
Elektronische klok Functieaanduiding Kookwekker Draaiknop, Gebruiksduur Einde gebruiksduur Tijd van de dag ❑ U kunt de elektronische klok met één hand bedienen. Nadat u op een knop hebt gedrukt, stelt u de tijd in met behulp van de draaiknop. Instellen is mogelijk zolang de indicatie knippert (4 seconden). ❑ Instellen van de tijd van de dag: zie de paragraaf "Voor het eerste gebruik". Kookwekker: 1. Druk op de knop t en stel de tijdsduur in (in het voorbeeld: Å minuten).
Elektronische klok Automatische tijdschakeling ❑ U kunt de oven in- en uitschakelen via de elektronische klok. Automatisch uitschakelen: ❑ Als u direct wilt beginnen met bakken of braden, hoeft u alleen de gebruiksduur in te stellen. 1. Kies het verwarmingssysteem en de oventemperatuur. 2. Druk op de knop g en stel de gebruiksduur in met behulp van de draaiknop (voorbeeld: | uur en ~{ minuten). Na het instellen wordt de actuele tijd weergegeven.
Elektronische klok Automatisch in- en uitschakelen: ❑ Als het bakken of braden op een later tijdstip moet beginnen, dient u de gebruiksduur en het einde van de gebruiksduur in te stellen. 1. Kies het verwarmingssysteem en de oventemperatuur. Na het instellen wordt de actuele tijd weergegeven. 2. Druk op de knop g en stel de gebruiksduur in met behulp van de draaiknop (voorbeeld: | uur en ~{ minuten). 3. Druk op de knop h en stel het einde van de gebruiksduur in met behulp van de draaiknop.
Elektronische klok Speciale functies Uitschakelen van het display: 1. Druk 4 seconden op de knop +. Hierna wordt het display donker. De tijd loopt door op de achtergrond. 2. Voor het inschakelen van het display drukt u kort op de knop +. Nachtverduistering van het display: ❑ Tussen 22.00 en 6.00 uur wordt het display automatisch donker gemaakt. Aanwijzingen: ❑ Het meest geschikt voor de automatische tijdschakeling zijn gerechten die weinig aandacht nodig hebben.
Ovenfuncties Boven- en onderwarmte ————— e (Conventioneel verwarmingssysteem) Door middel van boven en onder in de oven aangebrachte verwarmingselementen wordt de warmte op het te bakken of braden gerecht overgedragen. Er kan slechts op één inschuifhoogte worden gebakken of gebraden. Voordelen: – bakken van gebak met vochtig beslag, pizza en quiche – bakken van brood.
Oven in- en uitschakelen Voordat u uw oven inschakelt, kiest u het verwarmingssysteem dat u wilt gebruiken. Inschakelen: 1. Stel de functiekeuzeknop in op het gekozen systeem. 2. Stel de temperatuurkeuzeknop in op de gewenste temperatuur. ❑ De ingestelde temperatuur wordt automatisch geregeld. ❑ Het controlelampje gaat branden wanneer de oven wordt ingeschakeld en bij het naverwarmen.
Bakken Bakken in een bakvorm ❑ Plaats de bakvorm altijd op het midden van het rooster. ❑ Wij bevelen donkere bakvormen van metaal aan. Bakken in blankmetalen bakvormen: inschuifhoogte 3 ‰ hete lucht t boven-/onderwarmte inschuifhoogte 1 Boven- en onderwarmte: e ❑ Indien het gebak aan de onderkant te donker wordt: Controleer de inschuifhoogte. Maak de baktijd korter en kies eventueel een lagere temperatuur. ❑ Indien het gebak aan de onderkant te licht wordt: Controleer de inschuifhoogte.
Braden Braden met hete lucht v of met boven- en onderwarmte e Aanwijzingen: ❑ Leg het rooster in de braadslede en schuif ze samen op de dezelfde inschuifhoogte in de oven. ❑ Vlees kan zeer voordelig bij een gewicht van meer dan 750 g in de oven worden gebraden. ❑ Braden in een open schaal: Spoel een glazen schaal of de braadslede met water uit en leg het vlees er in. ❑ Voeg voor vet vlees en gevogelte afhankelijk van de grootte van het vlees en het soort vlees 1/8 à 1/4 liter water toe.
Grillen Bij het grillen is voorzichtigheid geboden. ❑ Leg het te grillen gerecht altijd op het midden van het rooster. Kinderen altijd uit de buurt houden. ❑ Indien het grill-verwarmingselement Aanwijzingen: automatisch wordt uitgeschakeld, is de ❑ Met gesloten ovendeur grillen. oververhittingsbeveiliging geactiveerd. Het verwarmingselement wordt auto❑ De grilltemperaturen kunnen worden matisch na korte tijd weer ingeschakeld. ingesteld.
Tips en trucs Voor bakken: ❑ Gebak van de bakplaat is aan de onderkant te licht. Neem niet benodigde bakblikken en de braadslede uit de oven. ❑ Gebak uit een vorm is aan de onderkant te licht. Plaats de bakvorm niet op het bakblik, maar op het rooster. ❑ Taart of gebak is aan de onderkant te donker. Plaats het gebak hoger in de oven. ❑ Het gebak is te droog. Stel de oventemperatuur iets hoger in en kies een kortere baktijd.
Ontdooien en gaar maken Ontdooien en gaar maken met hete lucht: v Belangrijke aanwijzingen: ❑ Gebruik voor het ontdooien en gaar maken van diepvriesproducten uitsluitend hete lucht. ❑ Neem altijd de gegevens op de verpakking van de diepvriesproducten in acht. ❑ Voor ontdooide diepvriesproducten (vooral vlees) gelden in het algemeen kortere bereidingstijden dan voor verse producten, omdat het invriezen een effect heeft dat te vergelijken is met gaar worden.
Reinigen en onderhouden Belangrijke aanwijzingen: ❑ Gebruik voor het reinigen geen schuurmiddelen of scherpe middelen en evenmin krassende voorwerpen. ❑ Krab ingebrande resten van gerechten niet weg, maar week ze met een vochtige doek en afwasmiddel los. ❑ Gebruik speciale reinigingsmiddelen zoals sprays niet voor aluminium of kunststof onderdelen. Edelstalen voorkant: ❑ Indien gewone edelstaalreinigingsmiddelen worden gebruikt, kan de opdruk worden beschadigd. ❑ Gebruik geen krassende sponsjes.
Reinigen en onderhouden Oven: Aanwijzing: om de oven na afloop van de automatische reiniging gemakkelijk verder te kunnen reinigen, biedt het apparaat u de volgende mogelijkheden. Ovendeur demonteren Verwijderen: 1. Open de ovendeur helemaal. 2. Klap de sluithendels links en rechts helemaal open. 3. Zet de ovendeur schuin omhoog en verwijder de deur naar voren toe. Aanbrengen: 1. Plaats beide scharnieren in de houders links en rechts en draai de ovendeur naar beneden. 2.
Storingen en reparaties Bij storingen en reparaties die u niet zelf kunt oplossen, is de klantenservice u graag van dienst. Zie voor adressen het overzicht van klantenservice-werkplaatsen. Let op: het kost u geld, wanneer u vanwege een bedieningsfout de klantenservice inschakelt. Indien u contact opneemt met de klantenservice, vermeld dan: E-nr. FD U vindt deze gegevens op het typeplaatje . Het typeplaatje vindt u achter de ovendeur, links onder op de zijrand van de oven.
Wat doet u, wanneer er iets niet werkt? Vaak hoeft u de klantenservice niet in te schakelen. In veel gevallen kunt u zelf het probleem oplossen. In de volgende tabel vindt u enkele tips. Belangrijke aanwijzing: Werkzaamheden aan de elektronica van het apparaat mogen uitsluitend door een vakman worden uitgevoerd.
Indice Pagina Raccomandazioni ❑ Avvertenze per lo smaltimento ❑ Prima dell'allacciamento del nuovo apparecchio ❑ Avvertenze di sicurezza 94 95 Ecco il Vostro nuovo forno ❑ Descrizione dell'apparecchio ❑ Accessori ❑ Livelli d'inserimento 96 97 97 Precede il primo impiego ❑ Regolazione dell'ora attuale ❑ Pulizia preliminare ❑ Primo riscaldamento 98 98 98 Orologio elettronico ❑ Avvisatore contaminuti ❑ Timer automatico ❑ Funzioni speciali ❑ Avvertenze 94 Pagina Pulizia e manutenzione ❑ Avvertenze impor
Raccomandazioni Avvertenze per lo smaltimento ❑ Gli apparecchi dismessi non sono rifiuti senza valore. Attraverso lo smaltimento ecologico possono essere recuperati materiali pregiati. Rendere inservibile l'apparecchio dismesso prima di rottamarlo. ❑ L'imballaggio ha protetto il Vostro nuovo apparecchio nel trasporto fino a Voi. Tutti i materiali utilizzati sono compatibili con l'ambiente e riciclabili. Siete pregati di collaborare, smaltendo l'imballaggio in modo ecologicamente corretto.
Raccomandazioni Avvertenze di sicurezza Vor dem Anschluß des neuen ❑ Usate l'apparecchio solo per cuocere pietanze. ❑ Le superfici degli apparecchi da riscaldamento e per la cottura di cibi durante il funzionamento si riscaldano. Le superfici interne del forno e gli elementi riscaldanti si surriscaldano. Per principio tenere lontano i bambini. ❑ Non Vi allontanate quando preparate pietanze con olio o grasso. In caso di surriscaldamento possono infiammarsi. ❑ Pulire regolarmente il forno.
Ecco il Vostro nuovo forno Orologio elettronico Selettore delle funzioni Selettore della temperatura con lampada spia Pannello di comando: ❑ I selettori sono rientranti. ❑ Premete sul selettore per farlo uscire o rientrare. A tal fine esso deve essere disinerito.
Ecco il Vostro nuovo forno Accessori ❑ Fornitura di serie: 1 Teglia da forno smaltata 1 Griglia per dolci/arrosti 1 Leccarda ❑ Troverete altri accessori presso i rivenditori specializzati. Cod.
Precede il primo impiego Ora attuale ❑ Prima di usare l'apparecchio la prima volta è necessario regolare l'ora attuale nell'orologio elettronico con timer. ❑ Dopo l'allacciamento elettrico dell' apparecchio, oppure dopo un interruzione della corrente, il display lampeggia indicando {:{{. Regolazione: Premete il tasto + e regolate con la manopola l'ora attuale (esempio: ore | Å:{{).
Orologio elettronico Indicatore di funzionamento Avvisatore contaminuti Manopola Durata di funzionamento Fine tempo di funzionamento Ora ❑ Potete impostare l'orologio elettronico con una sola mano. A tal fine, dopo avere premuto un tasto, regolate l'ora con la manopola. Le regolazioni sono possibili finché l'indicazione lampeggia (-4 secondi). ❑ Regolazione dell'ora attuale: Vedi capitolo "Precede il primo impiego". Avvisatore contaminuti: 1.
Orologio elettronico Timer automatico ❑ Tramite l'orologio elettronico potete inserire e disinserire il forno. Spegnimento automatico: ❑ Se la cottura o l'arrosto al forno deve iniziare subito è necessaria solo la regolazione della durata di funzionamento. 1. Selezionate il sistema di riscaldamento e la temperatura del forno. 2. Premete il tasto g e con la manopola regolate la durata di funzionamento (esempio: | ora e ~{ minuti). Eseguita l'impostazione viene visualizzata di nuovo l'ora attuale.
Orologio elettronico Accensione e spegnimento automatici: ❑ Se la cottura o l'arrosto al forno deve iniziare in un momento successivo, è necessaria la regolazione. 1. Selezionate il sistema di riscaldamento e la temperatura del forno. Conclusa la regolazione viene visualizzata l'ora attuale. 2. Premete il tasto g regolate con la manopola la durata di funzionamento (esempio: | ora e ~{ minuti). 3. Premete il tasto h e regolate con la manopola la fine del tempo di funzionamento.
Orologio elettronico Funzioni speciali Oscurare il display: 1. Premere per 4 secondi il tasto +. Ora il display si oscura e l'ora continua a scorrere in sottofondo. 2. Per inserire di nuovo il display, premere brevemente il tasto +. Avvertenze: ❑ Per il timer automatico le pietanze più idonee sono quelle che richiedono poca attenzione. ❑ L'avvisatore contaminuti e la fine del tempo di funzionamento possono essere programmate preventivamente con un anticipo massimo di 24 ore.
Funzioni del forno Riscaldamento superiore/inferiore — e (sistema di riscaldamento convenzionale) Mediante elementi riscaldanti situati nella parte superiore e inferiore del forno, il calore viene trasmesso alla pietanza da cuocere o arrostire. Cottura e arrosto sono possibili su un solo livello d'inserimento.
Accendere e spegnere il forno Prima di accendere il forno, decidete quale sistema di riscaldamento volete usare. Accendere: 1. Disponete il selettore delle funzioni sul sistema scelto. 2. Con il selettore della temperatura, impostate la temperatura richiesta. ❑ La temperatura impostata viene regolata automaticamente. ❑ La lampada spia s'illumina all'accensione del forno e ad ogni postriscaldamento. Spegnere: ❑ Per spegnere, girate il selettore della temperatura e il selettore delle funzioni su 0.
Cottura al forno Cuocere negli stampi ❑ Poggiate gli stampi sempre sul centro della griglia. ❑ Consigliamo stampi in metallo scuri. Cuocere in stampi di lamiera stagnata: ‰ Aria calda altezza d’inserimento 3 t Riscaldamento superiore/inferiore altezza d’inserimento 1 Riscaldamento superiore/inferiore: e ❑ Se il dolce nella parte inferiore diventa troppo oscuro: controllate l'altezza d'inserimento. Abbreviate il tempo di cottura e selezionate eventualmente una temperatura più bassa.
Arrosti al forno Arrostire con aria calda v oppure con riscaldamento superiore/inferiore e Avvertenze: ❑ Mettete la griglia nella leccarda e inseriteli insieme sullo stesso livello. ❑ Il pezzo di carne con un peso superiore a 750 g può essere arrostito molto economicamente nel forno. ❑ Arrosto in contenitore aperto: Sciacquate con acqua la leccarda o il contenitore per arrosto e mettete in esso la carne.
Cottura al grill ! Fare attenzione quando si usa il grill. Tenere sempre lontano i bambini. Avvertenze: ❑ Cuocete al grill con la porta del forno chiusa. ❑ Le temperature del grill si possono regolare. ❑ Introducete sempre insieme griglia e leccarda. ❑ Mettete la pietanza da cuocere al grill sempre al centro della griglia. ❑ Se l'elemento riscaldante del grill si spegne automaticamente, è intervenuta la protezione di surriscaldamento. L'elemento riscaldante del grill si riaccende subito dopo.
Consigli e astuzie Per infornare: ❑ Il dolce su teglia da forno sotto è troppo chiaro. Togliete dal forno le teglie e la leccarda non utilizzate. ❑ Il dolce in stampo sotto è troppo chiaro. Introducete lo stampo non su teglia da forno, ma sulla griglia. ❑ Il dolce o i biscotti sotto diventano troppo scuri. Introducete il dolce o i biscotti a un livello superiore. ❑ Il dolce si secca troppo. Aumentate un poco la temperatura del forno. Selezionate un tempo di cottura un poco più breve.
Scongelare e cuocere Scongelare e cuocere con il sistema ad aria calda: v Avvertenze importanti: ❑ Per scongelare e completare la cottura di prodotti congelati e surgelati, usate solo il sistema ad aria calda. ❑ Per tutti gli alimenti surgelati, osservate in linea di massima le indicazioni del produttore.
Pulizia e manutenzione Avvertenze importanti: ❑ Per la pulizia non adoperate mai sostanze abrasive, prodotti corrosivi e oggetti che graffiano. ❑ Non raschiate residui di cibo bruciati, ma ammorbiditeli con un panno umido e detergente. ❑ Per le parti in alluminio e in plastica non usate detergenti speciali (p. es. spray e simili). Frontale in acciaio inox: ❑ I detergenti commerciali per pulire l'acciaio inox possono aggredire la decorazione stampata. ❑ Non usate pagliette che graffiano.
Pulizia e manutenzione Forno: Avvertenza: oltre al sistema ausiliario automatico di pulizia, per una pulizia più comoda l'apparecchio Vi offre le possibilità seguenti: Smontare la porta del forno: Sganciare: 1. Aprite completamente la porta del forno. 2. Ribaltate completamente in fuori le leve di arresto a sinistra e a destra. 3. Sollevate la porta (posizione obliqua) ed estraetela tirando in avanti. Agganciare: 1.
Guasti e riparazioni In caso di guasti o di riparazioni, che non siete in grado di effettuare Voi stessi, il servizio assistenza clienti è a Vostra disposizione. Trovate gli indirizzi nell'elenco dei centri di assistenza. Attenzione: non spendete inutilmente il vostro denaro, chiamando il servizio assistenza per un Vostro errore nell'uso. In caso di ricorso al servizio assistenza siete pregati di indicare: E-Nr. FD Trovate questi dati sulla targhetta d'identificazione dell'apparecchio.
Che fare in questi casi? Non sempre è necessario telefonare al servizio assistenza clienti. In molti casi potete rimediare Voi stessi. Nella tabella seguente trovate alcuni suggerimenti. Avvertenza fondamentale: I lavori ai componenti elettronici dell'apparecchio devono essere eseguiti solo da un tecnico.
Indice Página Puntos a tener en cuenta ❑ Protección del medio ambiente 115 ❑ Antes de conectar el aparato nuevo 115 ❑ Advertencias y consejos de seguridad 116 Su nuevo horno ❑ Descripción del aparato ❑ Accesorios ❑ Diferentes alturas o pisos de colocación Antes de la primera utilización ❑ Puesta en hora del reloj electrónico incorporado ❑ Limpieza previa ❑ Calentamiento inicial (en vacío) del horno y las placas de cocción 117 118 118 119 119 119 Reloj electrónico ❑ Reloj temporizador para cortos períodos
Puntos a tener en cuenta Protección del medio ambiente ❑ Los aparatos usados incorporan materiales valiosos que se pueden recuperar, entregando el aparato a dicho efecto en un centro oficial de recogida o recuperación de materiales reciclables. Antes de deshacerse de su aparato usado deberá inutilizarlo. ❑ Su nuevo aparato está protegido durante el transporte hasta su hogar por un embalaje protector.
Puntos a tener en cuenta Advertencias y consejos de seguridad Advertencias y consejos de seguridad ❑ Utilice el aparato sólo para la preparación de alimentos. ❑ Las superficies de los dispositivos de calentamiento y de los recipientes de cocción pueden calentarse fuertemente durante su servicio. Lo mismo ocurre con las superficies interiores de los hornos y los elementos de calefacción. Mantenga siempre alejados los niños de la cocina.
Su nueva cocina Reloj electrónico Selector de funciones Selector de temperatura con piloto de aviso Panel de mandos: ❑ Los mandos pueden encastrarse en el cuerpo de la cocina. ❑ Para enclavarlos o desenclavarlos deberán ser presionados. Los mandos deberán encontrarse para ello en posición de desconexión.
Su nuevo horno Accesorios ❑ El equipo de serie del aparato incluye: 1 Bandeja pastelera, esmaltada 1 rejilla para hornear o asar 1 Bandeja universal con rejilla ❑ Más accesorios opcionales los podrá adquirir Vd. en el comercio especializado.
Antes de la primera utilización Puesta en hora del reloj temporizador ❑ Antes de la puesta en marcha inicial de la cocina, hay que programar la hora exacta en el temporizador electrónico. ❑ Tras conectar el aparato a la red eléctrica o después de haberse producido un corte de corriente eléctrica, destella en la indicación visual la cifra {:{{. Puesta en hora del reloj temporizador: Pulsar la tecla + y ajustar la hora actual a través del mando giratorio. (En nuestro ejemplo: Las | Å:{{ horas).
Reloj electrónico Pantella de visualización Temporizador para cortos períodos Mando giratorio Duración del ciclo de funcionamiento Fin (hora de desconexión) de la función programada Hora actual ❑ El reloj electrónico se puede accionar con una sola mano. Para ello tiene Vd. que ajustar el tiempo deseado con el mando giratorio. Los ajustes se pueden efectuar mientras destelle la pantalla de visualización (aprox. 4 segundos).
Reloj electrónico Función «Temporizador automático» ❑ El horno se puede conectar y desconectar a través del reloj electrónico. Desconexión automática: ❑ Para comenzar inmediatamente con el horneado, asado o cocción, sólo hay que ajustar en el temporizador automático la duración del tiempo de funcionamiento. 1. Seleccionar la modalidad de calentamiento y la temperatura deseada. 2. Pulsar la tecla g y ajustar la duración del tiempo de funcionamiento. (En nuestro ejemplo: | hora, ~{ minutos).
Reloj electrónico Conexión y desconexión automática: ❑ En caso desear programar por adelantado el comienzo del horneado, asado o la cocción, hay que ajustar la duración del ciclo de funcionamiento y la hora de desconexión del aparato. 1. Seleccionar la modalidad de calentamiento y la temperatura deseada. Una vez concluido el ajuste, aparece la indicación horaria normal. 2. Pulsar la tecla g y ajustar la duración del tiempo de funcionamiento. (En nuestro ejemplo: | hora y ~{ minutos). 3.
Reloj electrónico Funciones especiales Desactivar la pantalla de visualización: 1. Pulsar durante 4 segundos la tecla +. Al cabo de este período, la pantalla de visualización se oscurece, mostrando sólo la hora actual con intensidad reducida. 2. Para activar la pantalla de visualización, pulsar brevemente la tecla +. Oscurecimiento nocturno de la pantalla de visualización: ❑ Entre las 22.00 y las 6.00 horas, la pantalla de visualización reduce automáticamente la intensidad de su iluminación.
Funciones del horno Calor superior e inferior ————— e (Sistema convencional de calentamiento del horno) Los cuerpos radiadores de calefacción incorporados en la parte superior y inferior del horno generan el calor y lo transmiten a los alimentos por proceso de radiación. Horneado y asado sólo es posible en un piso.
Conexión y desconexión del horno Antes de conectar el horno deberá haber decidido Vd. qué sistema de calefacción desea emplear Conexión del horno: 1. Colocar el mando selector de funciones en la posición correspondiente al sistema de calefacción elegido. 2. Ajustar la temperatura deseada a través del mando selector de la temperatura. ❑ La temperatura seleccionada es regulada automáticamente.
Horneado Hornear en moldes ❑ Colocar los moldes siempre sobre la parrilla, fijándose que ocupen el centro del horno. ❑ Aconsejamos utilizar moldes oscuros de metal, dado que absorben mejor el calor. Hornear en Moldes de hojalata: Nivel 3 ‰ Aire caliente t Calor superior e inferior Nivel 1 Calor superior e inferior: e ❑ El pastel está muy tostado por abajo: Verificar la altura de la parrilla. Reducir el tiempo de horneado; ajustar una temperatura más baja.
Asado Asar con aire caliente forzado v o con calor superior e inferior e Advertencias: ❑ Colocar la parrilla en la bandeja universal recogedora de grasa. Introducirla conjuntamente con ésta en el mismo piso (altura). ❑ Los trozos de carne a partir de un peso de 750 gramos se pueden asar de modo particularmente económico en el horno. ❑ Asar en recipientes abiertos: Enjuagar la bandeja universal o los utensilios de asado que se vayan a utilizar con agua. Colocar la carne sobre los mismos.
Asado al grill ! Prestar atención al asar al grill. Mantener alejados los niños de la cocina durante las operaciones. Atención: ❑ Asar al grill con la puerta cerrada. ❑ Las temperaturas del asado al grill pueden regularse. ❑ Introducir siempre conjuntamente la bandeja universal y la parrilla. ❑ Colocar siempre la carne en el centro del parrilla. ❑ Si el cuerpo de calefacción del grill se desconectara, ello es debido a la activación del circuito protector contra sobrecalentamiento.
Advertencias y conejos prácticos Para el horneado: ❑ El pastel colocado sobre la bandeja no está suficientemente cocido por abajo Retirar las bandejas de horneado o universales que no vayan a usarse, del horno. ❑ El pastel de molde está demasiado claro por abajo. No colocar el molde sobre la bandeja de horneado, sino sobre la parrilla. ❑ El pastel o las pastas están demasiado tostadas por abajo. Colocar el pastel o las pastas en un piso más elevado. ❑ El pastel está demasiado seco.
Descongelar y preparar al horno Descongelar y preparar al horno con la modalidad «Aire caliente forzado v» Advertencias importantes: ❑ Descongelar y preparar al horno alimentos congelados, utilizar sólo la opción de aire caliente circulante. ❑ Observar las instrucciones e informaciones de los fabricantes consignadas en las envolturas de los alimentos congelados.
Limpieza y cuidados Advertencias importantes: ❑ No utilizar agentes frotadores ni abrasivos, así como tampoco objetos rascadores para limpiar la cocina. ❑ No eliminar los restos de alimentos quemados con objetos rascadores, sino ablandarlos con un paño húmedo y agente lavavajillas. ❑ No utilizar limpiadores especiales (p.e. sprays) para limpiar elementos o partes de aluminio o plástico.
Limpieza y cuidados Horno: Advertencia: Para una limpieza fácil del horno después de la activación de la función de limpieza automática, el aparato dispone de las siguientes opciones: Desmontaje de la puerta del horno Desenganchar la puerta: 1. Abrir la puerta completamente. 2. Abatir los bloqueos de cierre a izquierda y derecha de la puerta. 3. Colocar la puerta en posición inclinada y extraerla hacia adelante de su sujeción. Enganchar la puerta: 1.
Localización y subsanamiento de averías En caso de perturbaciones o de averías que Vd. misma no pudiera subsanar, deberá avisar al Servicio Técnico Postventa. Las señas figuran en la correspondiente guía. Atención: No olvide que Vd. gasta su dinero si avisa al Servicio Postventa sólo por haber cometido un error de manejo. Al avisar al Servicio Técnico Postventa, deberá indicar: Nº E FD Estos datos e indicaciones figuran en la placa de características del aparato.
¿Qué hacer en caso de que algo no funcione? No siempre hay que llamar al Servicio Postventa. En muchos casos, Vd. misma, señora, o alguien de su familia, puede subsanar la avería. La siguiente tabla le facilita algunos consejos prácticos. Advertencia importante: Los trabajos que fuera necesario realizar en los sistemas electrónicos sólo deberán ser ejecutados por técnicos especialistas del ramo.
Περιεχ µενα Σελίδα Tι πρέπει να προσέχετε ❑ Υποδείξεις απ συρσης ❑ Πριν απ τη σύνδεση της καινούργιας συσκευής ❑ Yποδείξεις ασφαλείας 136 137 Aυτή είναι η καινούργια σας κουζίνα ❑ Περιγραφή της συσκευής ❑ Eξαρτήµατα ❑ Ύψη σχάρας/ταψιών 138 139 139 136 Πρίν τη χρήση για πρώτη φορά ❑ Pύθµιση της ώρας ❑ Προκαταρκτικ ς καθαρισµ ς ❑ Θέρµανση για πρώτη φορά Ηλεκτρονικ ρολ ι ❑ Υπενθυµιστής χρ νου ❑ Αυτ µατη θέση σε και εκτ ς λειτουργίας ❑ Ειδικές λειτουργίες ❑ Υποδείξεις Σελίδα Kαθαρισµ ς και περιποίηση ❑
Tι πρέπει να προσέχετε Υποδείξεις απ συρσης ❑ Οι παλιές συσκευές δεν αποτελούν άχρηστα απορρίµµατα. Με την απ συρσή τους σύµφωνα µε τους κανονισµούς για την προστασία του περιβάλλοντος µπορούν να επαναποκτηθούν πολύτιµες πρώτες ύλες. Προτού αποσύρετε την παλιά σας συσκευή, πρέπει να την αχρηστέψετε. ❑ Η συσκευασία προστατεύει την καινούργια σας συσκευή κατά τη µεταφορά µέχρι το σπίτι σας. ;λα τα χρησιµοποιούµενα υλικά συσκευασίας είναι αβλαβή για το περιβάλλον και µπορούν να ξαναχρησιµοποιηθούν.
Tι πρέπει να προσέχετε Yποδείξεις ασφαλείας ❑ Xρησιµοποιείτε τη συσκευή µ νο για µαγείρεµα. ❑ Oι επιφάνειες συσκευών θέρµανσης και µαγειρικής ζεσταίνονται ταν λειτουργούν. Oι εσωτερικές επιφάνειες του φούρνου και τα θερµαντικά στοιχεία ζεσταίνονται πολύ. Γι αυτ κρατάτε τα παιδιά οπωσδήποτε µακριά απ αυτές. ❑ Mείνετε κοντά, ταν ετοιµάζεται φαγητά µε λίπος ή λάδι. ;ταν αυτά υπερθερµανθούν, µπορεί να πάρουν φωτιά. ❑ Καθαρίζετε τον φούρνο τακτικά.
Aυτή είναι η καινούργια σας κουζίνα Ηλεκτρονικ ρολ ι ∆ιακ πτης επιλογής λειτουργίας ∆ιακ πτης επιλογής θερµοκρασίας µε ενδεικτική λυχνία Ο πρ σοψη χειρισµού: ❑ Οι διακ πτες είναι χωνευτοί. ❑ Για να µπουν µέσα ή να βγουν έξω, πατάτε στον διακ πτη. Ο διακ πτης µως πρέπει να βρίσκεται στη θέση εκτ ς λειτουργίας.
Aυτή είναι η καινούργια σας κουζίνα Eξοπλισµ ς ❑ Ως εξαρτήµατα, συνοδεύοντα κάθε µοντέλο, περιέχονται 1 Εµαγιέ λαµαρίνα 1 σχάρα ψησίµατος 1 Ταψί γενικής χρήσης µε σχάρα ❑ Περαιτέρω εξαρτήµατα µπορείτε να προµηθευτείτε απ τα ειδικά καταστήµατα: Αριθµ ς παραγγελίας Ταψί γενικής χρήσης µε σχάρα Z 1230 X2 Ταψί για σουφλέ, ο γκρατέν Z 1270 X2 Αλουµινένια λαµαρίνα Z 1330 X0 Εµαγιέ λαµαρίνα Z 1340 X2 Σχάρα ψησίµατος, γωνιασµένη Z 1430 X0 Σχάρα ψησίµατος µε πυκν πλέγµα Z 1440 X0 Λαµαρίνα ψησίµατος
Πρίν τη χρήση για πρώτη φορά Ώρα ❑ Προτού να χρησιµοποιήσετε τη συσκευή για πρώτη φορά θα πρέπει να ρυθµίσετε την ώρα στον ηλεκτρονικ χρονοδιακ πτη. ❑ Mετά απ την ηλεκτρική σύνδεση ή µετά απ διακοπή ρεύµατος αναβοσβύνει η ένδειξη 0.00. Ρύθµιση: Πατήστε το πλήκτρο + και ρυθµίστε στον περιστρεφ µενο διακ πτη την επίκαιρη ώρα της ηµέρας (π.χ. | Å:{{ µ.µ.). Υπ δειξη: Η ώρα µπορεί να ρυθµιστεί µ νον, ταν δεν έχει ρυθµιστεί καµία αυτ µατη λειτουργία (για το σβήσιµο, βλ. στο ηλεκτρονικ ρολ ι).
Ηλεκτρονικ ρολ ι Ένδειξη λειτουργίας Περιστρεφ µενος διακ πτης Υπενθυµιστής χρ νου ∆ιάρκεια λειτουργίας Λήξη λειτουργίας Ώρα ❑ Μπορείτε να χειριστείτε το ηλεκτρονικ ρολ ι µε το ένα χέρι. Γι' αυτ πρέπει µετά το πάτηµα του πλήκτρου να ρυθµίσετε τον χρ νο µε τον περιστρεφ µενο διακ πτη. Οι ρυθµίσεις είναι δυνατές, σο αναβοσβήνει η ένδειξη (~ 4 δευτερ λεπτα). ❑ Ρύθµιση ώρας: Βλ. στο κεφάλαιο "Πριν την πρώτη χρήση". Υπενθυµιστής χρ νου: Ρύθµιση: 1.
Ηλεκτρονικ ρολ ι Αυτ µατη θέση σε και εκτ ς λειτουργίας ❑ Μπορείτε να θέτετε τον φούρνο του ηλεκτρονικού ρολογιού σε και εκτ ς λειτουργίας. Αυτ µατη θέση εκτ ς λειτουργίας: ❑ Αν το ψήσιµο κρέατος ή γλυκισµάτων πρ κειται ν' αρχίσει αµέσως, χρειάζεται να ρυθµίσετε µ νο τη διάρκεια. 1. Επιλέξτε το είδος ψησίµατος και τη θερµοκρασία του φούρνου. 2. Πατήστε το πλήκτρο g και ρυθµίστε τη διάρκεια µε τον περιστρεφ µενο διακ πτη (παράδειγµα: | ώρα και ~{ λεπτά). Μετά τη ρύθµιση εµφανίζεται η επίκαιρη ώρα.
Ηλεκτρονικ ρολ ι Αυτ µατη θέση σε και εκτ ς λειτουργίας: Ρύθµιση διάρκειας λειτουργίας: ❑ Αν το ψήσιµο κρέατος ή γλυκισµάτων πρ κειται ν' αρχίσει σε ένα µετέπειτα χρονικ σηµείο, χρειάζεται να ρυθµίσετε τη διάρκεια και τη λήξη της λειτουργίας. 1. Επιλέξτε το είδος ψησίµατος και τη θερµοκρασία του φούρνου. Μετά τη ρύθµιση δείχνεται η επίκαιρη ώρα. 2. Πατήστε το πλήκτρο g και ρυθµίστε τη διάρκεια λειτουργίας µε τον περιστρεφ µενο διακ πτη (παράδειγµα: | ώρα και ~{ λεπτά). 3.
Ηλεκτρονικ ρολ ι Ειδικές λειτουργίες Απενεργοποίηση της ένδειξης: Νυχτεριν σκοτείνιασµα της ένδειξης: 1. Πατήστε επί 4 δευτερ λεπτα το πλήκτρο +. Μετά απ αυτ το χρονικ διάστηµα η ένδειξη σκοτεινιάζει και η ώρα συνεχίζει να τρέχει χωρίς να φαίνεται. ❑ Μεταξύ 22.00 και 6.00 η ώρα η ένδειξη 2. Για την ενεργοποίηση της ένδειξης πατήστε για λίγο το πλήκτρο +. Υποδείξεις: ❑ Για τη λειτουργία αυτ µατης θέσης σε και εκτ ς λειτουργίας είναι κατάλληλα φαγητά, τα οποία απαιτούν λίγη προσοχή.
Λειτουργίες Φούρνου e Θέρµανση πάνω/κάτω ———————— (Συµβατικ σύστηµα θέρµανσης) H θερµ τητα µεταδίδεται στο φαγητ που ψήνεται µε τη βοήθεια θερµαντικών στοιχείων που είναι διατεταγµένα πάνω και κάτω µέσα στο φούρνο. Tο ψήσιµο µπορεί να γίνει µ νο σε µία θέση ύψους. Πλεονεκτήµατα: – Ψήσιµο γλυκών µε υγρή επίστρωση, πίτσας, κις κλπ. – Ψήσιµο ψωµιού. Θερµ ς αέρας ——————————— v Mε το σύστηµα θέρµανσης που βρίσκεται στο πίσω τοίχωµα του φούρνου ανακυκλώνεται ο θερµ ς αέρας µέσα στο φούρνο.
Θέση του φούρνου σε και εκτ ς λειτουργίας Πριν θέσετε τον φούρνο σας σε λειτουργία, αποφασίστε ποι σύστηµα θέρµανσης θέλετε να χρησιµοποιείσετε. Θέση σε λειτουργία: 1. Ρυθµίστε τον διακ πτη επιλογής λειτουργίας στο σύστηµα που επιλέξατε. 2. Ρυθµίστε τον διακ πτη επιλογής θερµοκρασίας στην απαιτούµενη θερµοκρασία. ❑ Η θερµοκρασία που επιλέξατε ρυθµίζετε αυτ µατα. ❑ Η κ κκινη λυχνία ενδεικτική λυχνία ανάβει, ταν τεθεί ο φούρνος σε λειτουργία και σε κάθε κατ πιν θέρµανση.
Ψήσιµο αρτοσκευασµάτων Ψήσιµο σε φ ρµες ❑ Πάντοτε να βάζετε τη φ ρµα στο κέντρο της σχάρας. ❑ Συνιστούµε σκούρες φ ρµες ψησίµατος απ µέταλλο. Ψήσιµο αρτοσκευασµάτων σε φ ρµες απ λευκοσίδηρο: ‰ Θερµ ς αέρας t ΠάνωΚάτω αντιστάσεις Θέση 3 Θέση 1 Θέρµανση πάνω/κάτω: e ❑ Aν το γλυκ γίνεται κάτω πιο σκούρο: Eλέγξτε το ύψος ψησίµατος. Mειώστε το χρ νο ψησίµατος και ενδεχοµένως επιλέξτε µια χαµηλ τερη θερµοκρασία. ❑ Aν το γλυκ γίνεται κάτω πιο ανοιχτ χρωµο: Eλέγξτε το ύψος ψησίµατος.
Ψήσιµο Ψήσιµο µε αέρα v ή µε θέρµανση πάνω/κάτω e Yποδείξεις: ❑ Eγκαταστήστε τη σχάρα στο ταψί γενικής χρήσης και βάλτε τα και τα δύο στην ίδια θέση ύψους στο φούρνο. ❑ Kρέας µε βάρος πάνω απ 750 γραµµάρια µπορεί να ψηθεί ιδιαίτερα οικονοµικά στο φούρνο. ❑ Ψήσιµο σε ανοικτ σκεύος: Ξεπλύνετε το ταψί γενικής χρήσης ή το µαγειρικ σκεύος µε νερ και βάλτε σ' αυτ το κρέας.
Γκριλ ! H λειτουργία του γκριλ απαιτεί προσοχή. Kρατήστε πάντοτε µακριά τα παιδιά. Yποδείξεις: ❑ Ψήνετε στο γκριλ µε κλειστή την π ρτα του φούρνου. ❑ Oι θερµοκρασίες του γκριλ είναι ρυθµιζ µενες. ❑ Πάντοτε να βάζετε τη σχάρα και το ταψί γενικής χρήσης µαζί στο φούρνο. ❑ Πάντοτε να βάζετε το ψητ στο κέντρο της σχάρας. ❑ Oταν το θερµαντικ σώµα του γκριλ σβήνει αυτ µατα, τ τε έχει ενεργοποιηθεί η ασφάλεια υπερθέρµανσης. Tο θερµαντικ σώµα του γκριλ ανάβει και πάλι µετά απ σύντοµο χρονικ διάστηµα.
Yποδείξεις και Tεχνάσµατα Για αρτοσκευάσµατα: ❑ Tο γλυκ ταψιού έχει πολύ ανοιχτ χρώµα στο κάτω µέρος του. ❑ Tο γλυκ φ ρµας έχει πολύ ανοιχτ χρώµα στο κάτω µέρος του. ❑ Το γλυκ ή τα κουλουράκια είναι στο κάτω µέρος πολύ σκούρα. Bγάλτε τα ταψιά που δεν χρησιµοποιείτε απ το φούρνο. Mη βάζετε τις φ ρµες στο φούρνο πάνω σε ταψί αλλά πάνω στη σχάρα. Bάλτε το γλυκ ή τα κουλουράκια πι ψηλά. ❑ Tο γλυκ είναι πολύ στεγν . Eπιλέξτε µια λίγο πι ψηλή θερµοκρασία φούρνου.
Aπ ψυξη και άχνισµα Aπ ψυξη και άχνισµα µε αέρα: v Σηµαντικές υποδείξεις: ❑ Για την απ ψυξη και το άχνισµα κατεψυγµένων προϊ ντων χρησιµοποείτε πάντοτε µ νο θερµ αέρα. ❑ Nα προσέχετε πάντοτε τα στοιχεία του παρασκευαστή σε λα τα κατεψυγµένα προϊ ντα. ❑ Aποψυγµένα προϊ ντα κατάψυξης (κυρίως κρέας) γενικά χρειάζονται συντοµ τερους χρ νους αχνίσµατος απ τι τα φρέσκα προϊ ντα, επειδή η κατάψυξη λειτουργεί ως ένα είδος προβρασµού.
Kαθαρισµ ς και περιποίηση Σηµαντικές υποδείξεις: ❑ Mη χρησιµοποιείτε για καθαρισµ απορρυπαντικά σε σκ νη, ισχυρά καθαριστικά και αιχµηρά αντικείµενα που χαράζουν. ❑ Nα µην ξύνετε καµµένα κατάλοιπα φαγητών, αλλά να τα µαλακώνετε µε ένα υγρ πανί και απορρυπαντικ πιάτων. ❑ Nα µη χρησιµοποιείτε ειδικά καθαριστικά (π.χ. σπρέυ) για µέρη απ αλουµίνιο και πλαστικ . Πρ σοψη απ ανοξείδωτο χάλυβα: ❑ Mε τη χρήση των καθαριστικών ανοξείδωτου χάλυβα του εµπορίου µπορεί σβηστούν τα γράµµατα.
Kαθαρισµ ς και περιποίηση Φούρνος: Yπ δειξη: Για πι άνετο καθαρισµ µετά απ τη χρήση του αυτ µατου συστήµατος καθαρισµού, η συσκευή σας προσφέρει τις ακ λουθες δυνατ τητες. Aφαίρεση της π ρτας του φούρνου: Aφαίρεση: 1. Aνοίξτε εντελώς την π ρτα του φούρνου. 2. Aνεβάστε ως πάνω τους ασφαλιστικούς µοχλούς αριστερά και δεξιά. 3. Σηκώστε ψηλά την π ρτα του φούρνου (σε πλάγια θέση) και βγάλτε την προς τα εµπρ ς. Eγκατάσταση: 1.
Eπισκευές και Bλάβης Σε περίπτωση βλαβών ή επισκευών, που δεν είστε σε θέση να τις αντιµετωπίσετε µ νοι σας, υπάρχει για σας το τµήµα εξυπηρέτησης πελατών. Tις διευθύνσεις θα τις βρείτε στον κατάλογο των γραφείων εξυπηρέτησης πελατών. Προσοχή: Σε περίπτωση που καλέσετε το τµήµα εξυπηρέτησης πελατών, λ γω δικού σας λανθασµένου χειρισµού, θα χρεωθείτε κάποιο ποσ .
Tί συµβαίνει, ταν κάτι δε λειτουργεί; ∆εν είναι πάντοτε απαραίτητο να καλείτε το τµήµα εξυπηρέτησης πελατών. Σε ορισµένες περιπτώσεις µπορείτε να βοηθήσετε µ νοι τον εαυτ σας. Στον ακ λουθο πίνακα θα βρείτε ορισµένες χρήσιµες συµβουλές. Γενική υπ δειξη: Eργασίες στο ηλεκτρονικ σύστηµα της συσκευής επιτρέπετε να γίνουν µ νο απ ειδικ τεχνικ .
B 1471 . . 5750 201 471 Printed in Germany 0603 Es.