Oven [en] User manual and installation instructions B1DCC1A.
en Safety Futher information and explanations are available online: Table of contents INFORMATION FOR USE 1 Safety .................................................................... 2 2 Preventing material damage ............................... 4 3 Environmental protection and saving energy ....................................................................... 5 4 Familiarising yourself with your appliance ........ 5 5 Accessories..........................................................
Safety Loose food remnants, fat and meat juices may catch fire. ▶ Before using the appliance, remove the worst of the food residues and remnants from the cooking compartment, heating elements and accessories. Opening the appliance door creates a draught. Greaseproof paper may come into contact with the heating element and catch fire. ▶ Never place greaseproof paper loosely over accessories when preheating the appliance and while cooking.
en Preventing material damage WARNING ‒ Risk of suffocation! Children may put packaging material over their heads or wrap themselves up in it and suffocate. ▶ Keep packaging material away from children. ▶ Do not let children play with packaging material. Children may breathe in or swallow small parts, causing them to suffocate. ▶ Keep small parts away from children. ▶ Do not let children play with small parts. 1.5 Halogen bulb WARNING ‒ Risk of burns! The bulbs in the cooking compartment get very hot.
Environmental protection and saving energy en 3 Environmental protection and saving energy 3.1 Disposing of packaging The packaging materials are environmentally compatible and can be recycled. ▶ Sort the individual components by type and dispose of them separately. 3.2 Saving energy If you follow these instructions, your appliance will use less power. Only preheat the appliance if the recipe or the recommended settings tell you to do so.
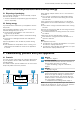
en Familiarising yourself with your appliance 4.2 Buttons The buttons are touch-sensitive surfaces. Press the corresponding button to select a function. Symbol Name Time-setting options Left arrow Use Sets the time, timer, cooking time or end time → "Time-setting options", Page 10 Decreases the adjustment values Right arrow Increases the adjustment values 4.3 Display The display shows the current settings, options or relevant information. The symbol that is lit is active or can be changed.
Accessories en 4.6 Temperature and setting levels There are different settings for the types of heating and functions. Note: For temperature settings above 250 °C, the appliance reduces the temperature to approx. 240 °C after approx. 10 minutes. If your appliance has the top/bottom heating or bottom heating types, this temperature reduction does not take place there. Symbol 50–275 Function Zero setting Temperature range Grill, intensive Use The appliance is not heating up.
en Accessories Accessories Wire rack Use ¡ Cake tins ¡ Ovenproof dishes ¡ Cookware ¡ Meat, e.g. roasting joints or steak ¡ Frozen meals ¡ Moist cakes ¡ Baked items ¡ Bread ¡ Large roasts ¡ Frozen meals ¡ Catching dripping liquids, e.g. fat when grilling food on the wire rack. Universal pan 5.1 Locking function The locking function prevents the accessories from tilting when they are pulled out. You can pull out the accessories approximately halfway without them tipping.
Before using for the first time en 6 Before using for the first time Configure the settings for initial start-up. Clean the appliance and accessories. 6.1 Initial use You need to make settings for initial use before you can use your appliance. Setting the time on the clock 2. Before heating the appliance, wipe the smooth sur- faces in the cooking compartment with a soft, damp cloth. 3. Keep the room ventilated while the appliance is heating. 4. Set the type of heating and temperature.
en Time-setting options a When the rapid heating process ends, an audible signal sounds and the heating indicator goes out. 3. Use the function selector to set a suitable type of heating. 4. Place the food in the cooking compartment. 9 Time-setting options Your appliance has different time-setting options, with which you can control its operation. 9.1 Overview of the time-setting options With the tions.
Childproof lock en 9.4 Setting the end time Changing the end time You can delay the time at which cooking is due to finish by up to 23 hours and 59 minutes. Notes ¡ The end time cannot be set for types of heating with grill function. ¡ In order to achieve a good cooking result, do not delay the end time once the appliance is already in operation. ¡ Food will spoil if you leave it in the cooking compartment too long.
en Cleaning and servicing 11 Cleaning and servicing To keep your appliance working efficiently for a long time, it is important to clean and maintain it carefully. 11.1 Cleaning products In order to avoid damaging the various oven surfaces on the appliance, do not use unsuitable cleaning products. WARNING ‒ Risk of electric shock! An ingress of moisture can cause an electric shock. ▶ Do not use steam- or high-pressure cleaners to clean the appliance.
Cleaning and servicing en Cooking compartment Area Enamel surfaces Suitable cleaning agents ¡ Hot soapy water ¡ Vinegar water ¡ Oven cleaner Self-cleaning surfaces Glass cover for the oven light Rails - Information Soak any heavily soiled areas and use a brush or steel wool. Leave the appliance door open to dry the cooking compartment after cleaning it. Notes ¡ Enamel burns at very high temperatures, causing minor discolouration. The functionality of your appliance is not affected by this.
en Shelf supports Note: Reddish marks may appear on the self-cleaning surfaces. This is residue from food. These spots are not harmful and are not rust. These marks do not impair the cleaning ability of the self-cleaning surfaces. 9. Attach the rails. 12 Shelf supports To clean the rails and the cooking compartment, or to replace the rails, you can remove these. 12.1 Detaching the shelf supports WARNING ‒ Risk of burns! The shelf supports get very hot ▶ Never touch the shelf supports when hot.
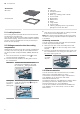
Appliance door 2. WARNING ‒ Risk of injury! When the hinges are not secured, they can snap shut with great force. ▶ Make sure that the locking levers are always either fully closed or (when detaching the oven door) fully open. Open the locking levers on the left- and right-hand hinges. en 1. Slide the appliance door straight onto the two hinges . Slide the appliance door on as far as it will go. 2. Open the appliance door fully. 3. Close the locking levers on the left- and right-hand hinges .
en Appliance door 5. Remove the door cover . 13.4 Fitting the door panes WARNING ‒ Risk of injury! The hinges on the appliance door move when the door is opened and closed, which could trap your fingers. ▶ Keep your hands away from the hinges. Components inside the appliance door may have sharp edges. ▶ Wear protective gloves. 1. Open the appliance door fully. 2. Place the condensate trough vertically in the retainer and turn it downwards. 6.
Troubleshooting 7. Close the locking levers on the left- and right-hand hinges . en 8. Close the appliance door. Note: Do not use the cooking compartment again until the door panes have been correctly fitted. a The locking levers are closed. The appliance door is secured and cannot be detached. 14 Troubleshooting You can rectify minor faults on your appliance yourself. Read the troubleshooting information before contacting after-sales service. This will avoid unnecessary costs.
en Disposal Fault A message with appears in the display, e.g. - . Cause and troubleshooting Electronics fault 1. Press the button. ‒ If required, reset the time. a If the fault was a one-off, the error message disappears. 2. If the error message appears again, call the after-sales service. Quote the exact error message and the E no. of your appliance. → "Customer Service", Page 19 14.2 Replacing the oven light bulb 1.
Customer Service en 16 Customer Service Function-relevant genuine spare parts according to the corresponding Ecodesign Order can be obtained from Customer Service for a period of at least 10 years from the date on which your appliance was placed on the market within the European Economic Area. Note: Under the terms of the manufacturer's warranty the use of Customer Service is free of charge.
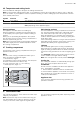
en How it works Roasting and grilling on the wire rack Roasting on the wire rack works particularly well for large poultry or for multiple pieces at the same time. ¡ Depending on the size and type of the food to be roasted, add up to 1/2 litre water to the universal pan. You can make a sauce from the juices that are collected. This also means that less smoke is produced and the cooking compartment does not become as dirty. ¡ Keep the appliance door closed when using the grill.
How it works Food Accessories/cookware Victoria sponge cake, 2 levels 4 pcs Ø 20 cm cake tin Baking sheet on wire rack Cookware without lid Cookware without lid Cookware without lid Biscuits, 2 or 3 levels Beef, top side/top rump Lamb leg (on the bone) Pork belly Chicken, whole Turkey, crown Turkey, whole, 4–8 kg Fish, braised, whole 300 g, e. g.
en How it works 17.6 Test dishes These overviews have been produced for test institutes to facilitate appliance testing in accordance with EN 60350-1. Baking Observe this information when baking test dishes. General information ¡ The settings apply to food that is placed into a cold cooking compartment. ¡ Observe the notes about preheating in the tables. These setting values apply without rapid heating. ¡ When baking, use the lower of the listed temperatures to begin with.
Installation instructions en Recommended settings for grilling Food Accessories/cookware Shelf pos- Type of ition heating Toasting bread Wire rack 4 1 Preheat the appliance for five minutes. Do not use the rapid heating function. Temperature in Cook°C/grill setting ing time in mins 1 0.5-1.5 18 Installation instructions Observe this information when installing the appliance. 18.
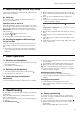
en Installation instructions 18.2 Appliance dimensions You will find the dimensions of the appliance here ¡ If the tall unit has another back panel in addition to the element back panels, this must be removed. ¡ Only fit the appliance up to a height which allows accessories to be easily removed. 18.5 Installing two appliances on top of each other Your appliance can also be installed above or below another appliance.
Installation instructions 18.6 Corner installation Observe the installation dimensions and the installation instructions when installing in a corner. en An all-pole isolating switch must be integrated into the permanent electrical installation according to the installation regulations. 1. Identify the phase and neutral conductors in the socket. The appliance may be damaged if it is not connected correctly. 2. Connect the hob in accordance with the connection diagram. See the rating plate for the voltage.
en Installation instructions 3. For handleless kitchens with vertical bar handle strips: ‒ Attach a suitable filling piece in order to cover any sharp edges and to guarantee a safe installation. ‒ Pre-drill aluminium profiles to establish a screw connection . ‒ Secure the appliance using a suitable screw . Note: The gap between the worktop and the appliance must not be closed by additional battens. Thermal insulation strips must not be fitted to the side panels of the surround unit. 18.
Valid within Great Britain: Imported to Great Britain by BSH Home Appliances Ltd.