
Assembly & Installation Instructions
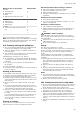

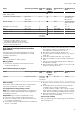
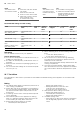
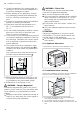
Table Of Contents
- Oven
- en
- Table of contents
- 1 Safety
- 2 Preventing material damage
- 3 Environmental protection and saving energy
- 4 Familiarising yourself with your appliance
- 5 Accessories
- 6 Before using for the first time
- 7 Basic operation
- 7.1 Switching on the appliance
- 7.2 Switching off the appliance
- 7.3 Residual heat indicator
- 7.4 Setting the type of heating and temperature
- 7.5 Changing the temperature
- 7.6 Changing the type of heating
- 7.7 Pausing operation
- 7.8 Cancelling operation
- 7.9 Viewing the current temperature
- 7.10 Displaying information
- 8 Time-setting options
- 9 Childproof lock
- 10 Rapid heat-up
- 11 Sabbath mode
- 12 Basic settings
- 13 Cleaning and servicing
- 14 Cleaning functions
- 15 Rails
- 16 Appliance door
- 17 Troubleshooting
- 18 Disposal
- 19 Customer Service
- 20 How it works
- 21 Installation instructions
- 21.1 General installation instructions
- 21.2 Appliance dimensions
- 21.3 Installation below a worktop
- 21.4 Installation underneath a hob
- 21.5 Installation in a tall unit
- 21.6 Installing two appliances on top of each other
- 21.7 Corner installation
- 21.8 Electrical connection
- 21.9 Installing the appliance
- 21.10 Removing the appliance

en How it works
28
Issue Tip
You want to slow
cook a duck breast.
¡ Place the cold duck breast
into a pan.
¡ Sear the skin side first.
¡ Slow cook the duck breast.
¡ After slow cooking, grill the
duck breast for 3 to
5minutes until crispy.
Issue Tip
You want to serve
your slow-cooked
meat as hot as pos-
sible.
¡ Preheat the serving plate.
¡ Make sure that the sauces
that accompany the duck
breast are very hot when
you serve them.
Recommended settings for slow cooking
Food Accessory/cook-
ware
Shelf pos-
ition
Searing
time in
mins
Heating function
→Page7
Temperature
in °C
Cooking
time in
mins
Duck breast, medium
rare, 300g each
Uncovered cook-
ware
2 6 - 8 90
1
45 - 60
Fillet of pork, whole Uncovered cook-
ware
2 4 - 6 80
1
45 - 70
Fillet of beef, 1kg Uncovered cook-
ware
2 4 - 6 80
1
90 - 120
Veal medallions, 4cm
thick
Uncovered cook-
ware
2 4 80
1
30 - 50
Saddle of lamb, bone-
less, 200g each
Uncovered cook-
ware
2 4 80
1
30 - 45
1
Preheat the appliance.
Defrosting
You can defrost frozen food in your appliance.
Tips for defrosting food
¡ You can use the appliance to defrost frozen fruit, ve-
getables or baked goods.
¡ It is better to defrost poultry, meat and fish in the re-
frigerator.
¡ Remove frozen food from its packaging before you
defrost it.
¡ The recommended settings are for freezer-temperat-
ure food (-18°C).
¡ When defrosting food, use the following shelf posi-
tions:
– 1 wire rack: Shelf position 2
– 2 wire racks: Shelf positions 3+1
¡ Stir or turn the food 1-2times during defrosting.
Turn large items several times. Split the food into
smaller pieces as it defrosts.
Remove pieces that have already defrosted from the
cooking compartment.
¡ Once the food has defrosted, switch off the appli-
ance and leave the food in the appliance for another
10 to 30minutes to allow the temperature to equal-
ise.
20.7 Test dishes
The information in this section is provided for test institutes to facilitate testing of the appliance in accordance with
EN 60350‑1.
Baking
¡ The setting values apply to food that is placed into a
cold cooking compartment.
¡ Please take note of the information on preheating in
the recommended settings tables. These setting val-
ues assume that the rapid heat-up function is not
being used.
¡ For baking, use the lower of the specified temperat-
ures to start with.
¡ Items that are placed in the appliance on baking
trays or in baking tins/dishes at the same time will
not necessarily be ready at the same time.
¡ Shelf positions when baking on 2levels:
– Universal pan: Shelf position3
Baking tray: Shelf position1
– Baking tins/dishes on the wire rack:
First wire rack: Shelf position3
Second wire rack: Shelf position1
¡ Shelf positions when baking on 3levels:
– Baking tray: Shelf position4
– Universal pan: Shelf position3
– Baking tray: Shelf position1
¡ Hot water sponge cake
– When baking on two levels, place the springform
tins at diagonally opposite corners of the wire
racks.