BUILT-IN OVEN [en] INSTRUCTION MANUAL B27CR22G0B
en Table of contents [ en] I NSTRUCTI ON MANUAL 8 Intended use . . . . . . . . . . . . . . . . . . . . . . . . . . . . . 4 ( Important safety information . . . . . . . . . . . . . . . 4 F Sabbath mode . . . . . . . . . . . . . . . . . . . . . . . . . . 16 General information . . . . . . . . . . . . . . . . . . . . . . . . . . . 4 Cleaning function . . . . . . . . . . . . . . . . . . . . . . . . . . . . . 5 D Cleaning agent . . . . . . . . . . . . . . . . . . . . . . . . . . 17 ] Causes of damage . . .
en Intended use 8Intended use Read these instructions carefully. Only then will you be able to operate your appliance safely and correctly. Retain the instruction manual and installation instructions for future use or for subsequent owners. This appliance is only intended to be fully fitted in a kitchen. Observe the special installation instructions. Check the appliance for damage after unpacking it. Do not connect the appliance if it has been damaged in transport.
Important safety information Risk Water of scalding! in a hot cooking compartment may create hot steam. Never pour water into the cooking compartment when the cooking compartment is hot. ■ : Warning – Risk of injury! Scratched glass in the appliance door may develop into a crack. Do not use a glass scraper, sharp or abrasive cleaning aids or detergents. Risk of injury! ■ The hinges on the appliance door move when opening and closing the door, and you may be trapped. Keep your hands away from the hinges.
en Causes of damage ]Causes of damage Causes of damge General information Caution! ■ Accessories, foil, greaseproof paper or ovenware on the cooking compartment floor: do not place accessories on the cooking compartment floor. Do not cover the cooking compartment floor with any sort of foil or greaseproof paper. Do not place ovenware on the cooking compartment floor if a temperature of over 50 ºC has been set. This will cause heat to accumulate.
Environmental protection ■ ■ ■ en Open the appliance door as infrequently as possible when the appliance is in use. It is best to bake several cakes one after the other. The cooking compartment stays warm. This reduces the baking time for the second cake. You can place two cake tins next to each other in the cooking compartment. For longer cooking times, you can switch the appliance off 10 minutes before the end of the cooking time and use the residual heat to finish cooking.
en Getting to know your appliance Note: Depending on the appliance model, individual details and colours may differ. *Getting to know your appliance Control panel In this section, we will explain the indicators and controls. You will also find out about the various functions of your appliance. You can set your appliance's various functions on the control panel. The current settings are shown in the display.
Getting to know your appliance Main menu " Touch the 0 touch button to access the main menu.
en Accessories Cooking compartment functions The features of the cooking compartment make your appliance easier to use. This, for example, enables the cooking compartment to be well lit and a cooling fan to prevent the appliance from overheating. Opening the appliance door If you open the appliance door while the appliance is in operation, this pauses the programme. The operation continues to run when you close the door.
Before using for the first time ■ Always insert the accessories fully into the cooking compartment so they do not touch the appliance door. Locking function The accessories can be pulled out approximately halfway until they lock in place. The locking function prevents the accessories from tilting when they are pulled out. The accessories must be inserted into the cooking compartment correctly for the tilt protection to work properly.
en Operating the appliance Setting the time 1. 2. 3. 4. Use the & button to navigate to the next line. Use the ( or ) button to select the current time. Press the % button. Use the ) button to select the next setting. Setting the date 1. Use 2. Use 3. Use 4. Use 5. Use 6. Use 7. Use 8. Use 9. Use 10. Use 11. Use 12. Use the & button to navigate to the next line. the ( or ) button to select the current day. the % button to return to "Day". the ) button to select the next setting.
Operating the appliance 2. Use the 3. Use the 4. Use the ( or ) button to select the type of heating. & button to navigate to the next line. ( or ) button to select the temperature. CircoTherm 170 °C Note: Depending on the operating mode, different settings are available. For each further setting, use the & button to navigate to the next line. Use the ( or ) button to select the setting. 5. Touch the # touch button to start the appliance operation. The heating bar and run time appear on the display.
en Time-setting options 2. Place the food on a single level in the cooking compartment. 3. Touch the # touch button to start the appliance operation. 4. Touch the ° touch button to activate the "PowerBoost" function. The ° symbol appears on the display. Once the set temperature has been reached, the "PowerBoost" function switches itself off automatically. The ° symbol disappears from the display. Note: When the appliance is switched on, use the % button to navigate to the Timer .
Childproof lock Checking, changing or deleting settings 1. Touch the 0 touch button. The time-setting options are shown on the display. 2. Use the & or % button to navigate through the lines. 3. If necessary, change the setting using the ( or ) button. Set "00:00" to delete a time function. The setting is applied automatically. AChildproof lock Your appliance is equipped with a childproof lock so that children cannot switch it on accidentally or change any settings.
en Sabbath mode Audible signal duration Short Medium Long Button tone Switched off (Exception: The button tone for the # touch button remains switched on) Switched on Display brightness Adjustable across 5 levels Clock display Digital Off Lighting On during operation Off during operation Childproof lock* Only key lock Door lock and key lock Automatic childproof lock Deactivated Activated Action after switching on Main menu Heating types Night-time dimming Switched off Switched on (display dimmed between
Cleaning agent DCleaning agent With good care and cleaning, your appliance will retain its appearance and remain fully functioning for a long time to come. We will explain here how you should correctly care for and clean your appliance. Door panels Cl eani ng agent Door handle Suitable cleaning agents To ensure that the different surfaces are not damaged by using the wrong cleaning agent, observe the information in the table.
en Cleaning function Notes ■ Slight differences in colour on the front of the appliance are caused by the use of different materials, such as glass, plastic and metal. ■ Shadows on the door panels, which look like streaks, are caused by reflections made by the interior lighting. ■ Enamel is baked on at very high temperatures.This can cause some slight colour variation. This is normal and does not affect operation. The edges of thin trays cannot be completely enamelled.
Cleaning function 2. Remove the worst of the food residues from the cooking compartment and accessories. 3. Clean along the edges of the cooking compartment in the area around the seal. Do not scrub the seal. ~ "Cleaning agent" on page 17 4. Clean the inner door panel using hot soapy water and a dish cloth. Dry with a soft cloth. If the cooking compartment is heavily soiled, use oven cleaner. 5. Insert the accessory supports if you wish to clean accessories when the cooking compartment is being cleaned.
en Rails 1. Remove the accessories from the cooking compartment. 2. Mix 0.4 litres of water (not distilled water) with a drop 3. 4. 5. 6. 7. of washing-up liquid and pour into the middle of the cooking compartment floor. Touch the # touch button. Touch the 0 touch button. Use the ( or ) button to select "EasyClean š". Use the & button to navigate to the next line. Touch the # touch button. The appliance starts EasyClean. The remaining time appears on the display.
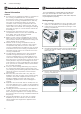
Appliance door qAppliance door With good care and cleaning, your appliance will retain its appearance and remain fully functional for a long time to come. This will tell you how to remove the appliance door and clean it. Ap l i ance do r Removing and fitting the appliance door For cleaning purposes and to remove the door panels, you can detach the appliance door. The appliance door hinges each have a locking lever. When the locking levers are closed (figure !), the appliance door is secured in place.
Appliance door en Removing the door cover Removing and installing the door panels The stainless steel inlay in the door cover may become discoloured. To carry out thorough cleaning, you can remove the cover. To facilitate cleaning, you can remove the glass panels from the appliance door. 1. Open the appliance door slightly. 2. Press on the right and left side of the cover (figure !). 3. Remove the cover (figure "). Close the appliance door carefully.
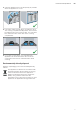
Appliance door en Fitting the door on the appliance When fitting the intermediate panel, make sure that the arrow is in the top right of the panel and that it aligns with the arrow on the metal panel. 1. Insert the intermediate panel at the bottom into the retainer and push it in firmly at the top (figure !). 2. Push both retainers downwards (figure "). 1 2 3. Insert the front panel at the bottom into the retainers (figure #). 4.
en Trouble shooting 3Trouble shooting If a fault occurs, there is often a simple explanation. Before calling the after-sales service, please refer to the fault table and attempt to correct the fault yourself. Tr oubl e sho t i ng Tip: If a meal does not turn out exactly as you wanted, refer to the "Tested for you in our cooking studio" section.Here, you will find plenty of cooking tips and notes. : Warning – Risk of injury! Incorrect repairs are dangerous.
Customer service 4Customer service Our after-sales service is there for you if your appliance needs to be repaired. We will always find an appropriate solution, also in order to avoid after-sales personnel having to make unnecessary visits. Cust omer ser vi ce E number and FD number When calling us, please quote the full product number (E no.) and the production number (FD no.) so that we can provide you with the correct advice.
Tested for you in our cooking studio en ■ ■ Universal pan: Level 3 Baking tray: Level 1 Baking tins/dishes on the wire rack First wire rack: Level 3 Second wire rack: Level 1 By preparing several dishes at the same time, you can make energy savings of up to 45 per cent. Position baking tins/dishes next to one another or offset and vertically stacked in the cooking compartment. Accessories Ensure that you always use suitable accessories and that they are placed in the oven the right way around.
Tested for you in our cooking studio Dish Accessories/cookware Scones baking tray Shelf position 3 Biscuits baking tray 3 Biscuits baking tray 3 Small Cakes 12-cup-tin 3 Small Cakes 12-cup-tin 3 Puff pastry slices baking tray 3 Jam tarts 12-cup-tin 3 Jam tarts 12-cup-tin 3 Meringue baking tray 3 Pavlova baking tray 3 Soufflé 1,2L-soufflé dish 2 Soufflé individual moulds 2 Choux pastry baking tray 3 Meat Pie rectangular pie tin 2 Meat Pie rectangular pie tin 2 Y
en Tested for you in our cooking studio Small baked items stick to one another during baking. The cake is too dry. The cake is generally too light in colour. The cake is too light on top, and too dark underneath. The cake is too dark on top, and too light underneath. Cakes baked in a tray or tin are too brown at the back. The whole cake is too dark. The cake is unevenly browned. You were baking on several levels. The items on the top baking tray are darker than those on the lower baking tray.
Tested for you in our cooking studio The steam evaporates in the cookware when roasting. Carefully pour in more liquid if required. Shiny roasting dishes made from stainless steel or aluminium reflect heat like a mirror and are therefore not particularly suitable. The meat cooks more slowly and will not brown so much. Use a higher temperature and/or a longer cooking time. Observe the manufacturer's instructions for your roasting cookware.
en Tested for you in our cooking studio Dish Accessories/cookware Type of heating wire rack Shelf position 2 Temperature in °C 160-170 Time in min.
Tested for you in our cooking studio Grilling Here, you can find information on grilling poultry, meat and fish, as well as toast. You can find the ideal settings for certain dishes in the settings tables. Grilling with circo-roasting Circo-roasting is very well suited to the preparation of whole poultry and fish, in addition to meat, e.g. roast pork with crackling. Poultry For duck or goose, pierce the skin on the underside of the wings. This allows the fat to run out.
en Tested for you in our cooking studio When grilling, try wherever possible to use pieces of food which are of a similar thickness and weight. This will allow them to brown evenly and remain succulent and juicy. Place the food to be grilled directly onto the wire rack. Use tongs to turn the pieces of food you are grilling. If you pierce the meat with a fork, the juices will run out and it will become dry. Do not add salt until after the meat has been grilled. Salt draws water from the meat.
Tested for you in our cooking studio Dish Accessories Chops, height 2-3 cm en Type of heating wire rack Shelf position 3 ˆ Temperature in °C 275* Time in min.
en Tested for you in our cooking studio If you are using CircoTherm Hot air as the type of heating, you can choose between levels 1, 2, 3 and 4. Baking on two levels Use CircoTherm. Baked items that are placed into the oven on trays or in baking tins/dishes at the same time will not necessarily be ready at the same time. ■ Universal pan: Level 3 Baking tray: Level 1 Accessories Ensure that you always use suitable accessories and that they are placed in the oven the right way around.
Tested for you in our cooking studio en Dish Accessories/cookware Shelf position Type of heating Temperature in °C Cooking time in mins. Food, chilled Lasagna, 500 g ovenproof dish on wire rack 2 190-210 25-35 Lasagna, 1,5 kg ovenproof dish on wire rack 2 „ „ 180-200 30-40 Food, frozen Lasagna, 500 g ovenproof dish on wire rack 2 190-210 30-40 Lasagna, 1,5 kg ovenproof dish on wire rack 2 „ „ 180-200 50-70 * Turn during cooking It is sufficient to heat UHT milk to 40 °C.
en Tested for you in our cooking studio Recommended setting values Here, you can find specifications for the various dishes with CircoTherm Eco and Top/bottom heating Eco. The temperature and baking time depend on the consistency and amount of the dough. Settings ranges are indicated for this reason. Try with the lower values first. A lower temperature results in more even browning. You can increase the temperature next time if necessary.
Tested for you in our cooking studio en Tips for keeping acrylamide to a minimum Biscuits With top/bottom heating at max. 190 °C. With hot air at max. 170 °C. Egg or egg yolk reduces the production of acrylamide. Oven chips Spread out a single layer evenly on the baking tray. Cook at least 400 g at once on a baking tray so that the chips do not dry out. Slow cook Slow cooking is a technique for cooking food over a long period at low temperatures.
en Tested for you in our cooking studio Dish Cookware Shelf posi- Heating tion function Searing time Temperain mins ture in °C Cooking time in mins Veal Joint of veal, 4-5 cm thick, 1.5 kg Cookware, uncovered 2 6-8 80* 80-140 Joint of veal, 7-10 cm thick, 1.
Tested for you in our cooking studio en Wipe the rims of the jars, as they must be clean. Place a damp rubber ring and a lid on each jar. Seal the jars with clamps. Place the jars into the universal pan so that they do not touch each other. Pour 500 ml hot water (approx. 80 °C) into the universal pan. Use the settings indicated in the table. Preserving You can preserve fruit and vegetables using your appliance.
en Tested for you in our cooking studio Allowing the dough to prove at dough proving setting Yeast dough will prove considerably more quickly using the "Dough proving" heating type than at room temperature and does not dry out. Only start operation when the cooking compartment has fully cooled down. Always allow yeast dough to prove twice. Observe the specifications in the settings tables for the 1st and 2nd proving processes (dough fermentation and final fermentation).
Tested for you in our cooking studio en Dish Accessories Shelf posi- Type of tion heating Temperature in °C Cooking time in mins. Cake Cake, moist Baking tray 2 50 70-90 Cake, dry Baking tray 2 60 60-75 Keeping warm ■ You can keep cooked dishes warm using the top/ bottom heating type at 70 °C. This will avoid condensation developing, and means you will not have to wipe out the cooking compartment. Do not keep cooked dishes warm for longer than two hours.
en Tested for you in our cooking studio Dish Accessory Shelf posi- Type of tion heating Temperature in °C Apple pie 2 x black plate tins, diameter 20 cm 2 170-180 Cooking time in mins. 60-80 Apple pie 2 x black plate tins, diameter 20 cm 2 180-200 60-80 Apple pie, 2 levels 2 x black plate tins, diameter 20 cm 3+1 170-190 70-90 „ ƒ ‚ * Preheat for 5 mins, do not use quick heat function ** Preheat, do not use quick heat function Grilling Also slide in the universal pan.
Valid within Great Britain: Imported to Great Britain by BSH Home Appliances Ltd.