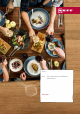
Oven [en] User manual and installation instructions B2ACH7H.
en Safety Table of contents USER MANUAL 1 Safety .................................................................... 2 2 Preventing material damage ............................... 4 3 Environmental protection and saving energy ....................................................................... 5 4 Familiarising yourself with your appliance ........ 6 5 Accessories.......................................................... 8 6 Before using for the first time ...........................
Safety Opening the appliance door creates a draught. Greaseproof paper may come into contact with the heating element and catch fire. ▶ Never place greaseproof paper loosely over accessories when preheating the appliance and while cooking. ▶ Always cut greaseproof paper to size and use a plate or baking tin to hold it down. WARNING ‒ Risk of burns! The appliance and its parts that can be touched become hot during use. ▶ Caution should be exercised here in order to avoid touching heating elements.
en Preventing material damage 1.5 Halogen bulb WARNING ‒ Risk of burns! The bulbs in the cooking compartment get very hot. There is still a risk of burning for some time after they have been switched off. ▶ Do not touch the glass cover. ▶ Avoid contact with your skin when cleaning. WARNING ‒ Risk of electric shock! When changing the bulb, the bulb socket contacts are live. ▶ Before replacing the bulb, ensure that the appliance is switched off in order to prevent a potential electric shock.
Environmental protection and saving energy ▶ Only leave the cooking compartment to dry with the door open if a lot of moisture was produced during operation. Fruit juice dripping from the baking tray leaves stains that cannot be removed. ▶ When baking very juicy fruit flans, do not pack too much on the baking tray. ▶ If possible, use the deeper universal pan. Using oven cleaner in a hot cooking compartment damages the enamel. ▶ Never use oven cleaner in the cooking compartment when it is still warm.
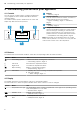
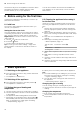
en Familiarising yourself with your appliance 4 Familiarising yourself with your appliance 4.1 Controls 1 You can use the control panel to configure all functions of your appliance and to obtain information about the operating status. On certain models, specific details such as colour and shape may differ from those pictured. 2 3 2 3 4 4 Buttons → "Buttons", Page 6 Function selector You can turn the function selector clockwise or anti-clockwise from the zero setting.
Familiarising yourself with your appliance Symbol Name Door lock Temperature display en Use Appliance door is locked → "Childproof lock", Page 12 → "Pyrolytic self-cleaning ", Page 18 Appliance is heating → "Temperature display", Page 8 4.4 Types of heating Here you can find an overview of the types of heating. You can find recommendations on using the types of heating. Use the function selector to set the types of heating.
en Accessories 4.6 Temperature and setting levels 4.7 Cooking compartment There are different settings for the types of heating and functions. The settings appear in the display. The temperature can be set in 1 degree increments up to 100 °C, and in 5 degree increments thereafter. Note: For temperature settings above 275 °C for the Grill type of heating, the appliance reduces the temperature to approx. 250 °C after approx. 20 minutes.
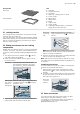
Accessories Accessories Wire rack en Use ¡ Cake tins ¡ Ovenproof dishes ¡ Cookware ¡ Meat, e.g. roasting joints or steak ¡ Frozen meals ¡ Moist cakes ¡ Baked items ¡ Bread ¡ Large roasts ¡ Frozen meals ¡ Catching dripping liquids, e.g. fat when grilling food on the wire rack. Universal pan 5.1 Locking function The locking function prevents the accessories from tilting when they are pulled out. You can pull out the accessories approximately halfway without them tipping.
en Before using for the first time Accessories vary from one appliance to another. When purchasing accessories, always quote the exact product number (E no.) of your appliance. You can find out which accessories are available for your appliance in our online shop or from our aftersales service. 6 Before using for the first time Configure the settings for initial start-up. Clean the appliance and accessories. 6.2 Cleaning the appliance before using it for the first time 6.
Time-setting options en 8 Time-setting options Your appliance has different time-setting options, with which you can control its operation. 8.1 Overview of the time-setting options With the tions. button, select the different time-setting op- Time-setting option Timer Cooking time End time Time Use The timer can be set independently of the appliance when it is in operation. It does not affect the appliance.
en Childproof lock 1. Press the 2. a 3. a a a 4. button repeatedly until is highlighted in the display. Press the or button. The display shows the calculated end time. Use the or button to delay the end time. After a few seconds, the appliance applies the setting and the display shows the set end time. Once the calculated start time has been reached, the appliance starts heating up and the cooking time starts counting down.
Sabbath mode en 10.1 Setting rapid heating To ensure an even cooking result, do not place the food in the cooking compartment until rapid heating has come to an end. Note: Do not set a cooking time until rapid heating has come to an end. 1. Set a suitable type of heating and a temperature of at least 100 °C. Rapid heating automatically switches off at temperatures of 200 °C and above. 2. If rapid heating does not switch off automatically, press the button.
en Home Connect Display Basic setting Childproof lock can be adjusted Interior lighting during operation Cooling fan run-on time Telescopic shelves retrofitted2 Sabbath mode available Automatic rapid heating from 200 °C2 Reset all values to factory settings 1 2 .. Home Connect Settings Factory setting (may vary according to model) Depending on the appliance specifications 12.2 Changing basic settings Requirement: The appliance is switched off. 1.
Home Connect en 2. Open the Home Connect app and scan the follow- ing QR code. 3. Follow the instructions in the Home Connect app. 13.2 Home Connect Settings You can adjust the settings and network settings for Home Connect in the basic settings for your appliance.
en Cleaning and servicing 13.4 Software update 13.6 Data protection Your appliance's software can be updated using the software update function, e.g. for the purposes of optimisation, troubleshooting or security updates. To do this, you must be a registered Home Connect user, have installed the app on your mobile device and be connected to the Home Connect server.
Cleaning and servicing en Appliance front Surface Stainless steel Plastic or painted surfaces E.g. control panel Suitable cleaning agents ¡ Hot soapy water ¡ Special stainless steel cleaning products suitable for hot surfaces ¡ Hot soapy water Information To prevent corrosion, remove any patches of limescale, grease, starch or albumin (e.g. egg white) on stainless steel surfaces immediately. Apply a thin layer of the stainless steel cleaning product with a soft cloth.
en Cleaning function 14.2 Cleaning the appliance In order to avoid damaging the appliance, you must clean your appliance only as specified, and with suitable cleaning products. WARNING ‒ Risk of burns! The appliance and its parts that can be touched become hot during use. ▶ Caution should be exercised here in order to avoid touching heating elements. ▶ Young children under 8 years of age must be kept away from the appliance. WARNING ‒ Risk of fire! Loose food remnants, fat and meat juices may catch fire.
Cleaning function 1. Use the function selector to set Pyrolytic self- en cooking compartment and around the appliance door with a damp cloth. 3. Remove white residues with lemon juice. Note: White residues on the enamel surfaces may be caused by heavy soiling. These food residues are harmless. The deposits do not compromise the functionality of the appliance. 4. Attach the shelf supports.
en Shelf supports 16 Shelf supports To clean the rails and the cooking compartment, or to replace the rails, you can remove these. 16.1 Detaching the shelf supports WARNING ‒ Risk of burns! The shelf supports get very hot ▶ Never touch the shelf supports when hot. ▶ Always allow the appliance to cool down. ▶ Keep children at a safe distance. 1. Lift the rail forwards slightly and detach it . 2. Pull the whole rail to the front and remove it.
Appliance door 4. Remove the pull-out rail. 2. Push the retainer en in between the lower and the upper bar. 5. Clean the pull-out rail. → "Cleaning products", Page 16 16.4 Attaching the pull-out rail Note: The pull-out rails only fit on the right or left. Make sure when you fit them that you can pull them out towards the front. 1. Insert the pull-out rail between the two bars. 3.
en Appliance door 2. WARNING ‒ Risk of injury! When the hinges are not secured, they can snap shut with great force. ▶ Make sure that the locking levers are always either fully closed or (when detaching the oven door) fully open. Open the locking levers on the left- and right-hand hinges. 1. Note: Ensure that the appliance door slides onto the hinges without any resistance. If you feel any resistance, check whether you are sliding it in at the correct opening.
Appliance door 1. Open the appliance door slightly. 2. Push on the left- and right-hand side of the door cover from the outside 3. Remove the door cover until it is released. . en 12. Dry the door panes and refit them. → "Fitting the door panes", Page 23 17.4 Fitting the door panes WARNING ‒ Risk of injury! The hinges on the appliance door move when the door is opened and closed, which could trap your fingers. ▶ Keep your hands away from the hinges.
en Troubleshooting 7. Open the appliance door slightly and remove the tea towel. 8. Screw both screws back in on the left and right of the appliance door. 9. Put the door cover in position and push down on it until you hear it click into place. 10. Close the appliance door. Note: Do not use the cooking compartment again until the door panes have been correctly fitted. 18 Troubleshooting You can rectify minor faults on your appliance yourself.
Troubleshooting Fault The time does not appear in the display when the appliance is switched off. lights up in the display and no settings can be made on the appliance. flashes in the display and the appliance does not start. en Cause and troubleshooting The basic setting has been changed. ▶ Change the basic setting for the time display. → "Basic settings", Page 13 Childproof lock is activated. ▶ Use the button to deactivate the childproof lock.
en Disposal 19 Disposal Find out here how to dispose of old appliances correctly. This appliance is labelled in accordance with European Directive 2012/19/EU concerning used electrical and electronic appliances (waste electrical and electronic equipment - WEEE). The guideline determines the framework for the return and recycling of used appliances as applicable throughout the EU. 19.1 Disposing of old appliance Valuable raw materials can be reused by recycling. 1. Unplug the appliance from the mains. 2.
How it works SE NO CH 5 GHz WLAN (Wi-Fi): For indoor use only. TR AL BA MD 5 GHz WLAN (Wi-Fi): For indoor use only. ME IS en UK (NI) MK RS UK UA 22 How it works Here, you can find the ideal settings for various types of food as well as the best accessories and cookware. We have perfectly tailored these recommendations to your appliance. 22.1 Cooking tips Observe this information when preparing food. ¡ The temperature and cooking time depend on the amount of food and the recipe.
en How it works ¡ Meat, poultry and fish can also become crispy in a covered roasting dish. Use a roasting dish with a glass lid. Set a higher temperature. WARNING ‒ Risk of injury! If hot glass cookware is placed on a wet or cold surface, the glass may shatter. ▶ Place hot glass ovenware on a dry mat after cooking. WARNING ‒ Risk of scalding! Very hot steam may escape when the lid is opened after cooking. Steam may not be visible, depending on the temperature.
How it works Food Accessories/cookware Complete meal with chicken Wire rack + Wire rack + Universal pan Wire rack Bacon rashers en Shelf pos- Type of Temperature Cooking ition heating in °C/grill time in mins setting 4+1 180, then Chicken: 200 (York(25+25) + shire pud20 for Yorkding) shire pudding 9 3 / 1 side 4–5 2 side 3–4 3 / 10 10-1511 2 170-180 25+206 2 170-180 20+207 Sausages, thickness 2–4 cm Wire rack Pork, gammon joint Cookware without lid Chicken, whole Cookware without lid 1 Pre
en Installation instructions Position baking tins/dishes either next to one another or offset on different shelves so that they are not directly one above the other in the cooking compartment.
Installation instructions en ¡ Wear protective gloves so that you do not cut yourself. Parts that are accessible during installation may have sharp edges. ¡ Dimensions of the figures in mm. 23.1 General installation instructions Follow these instructions before you start with the installation of the appliance. ¡ The safe operation of this appliance can only be guaranteed if it has been installed to a professional standard in accordance with these installation instructions.
en Installation instructions ¡ To ventilate the appliance, the intermediate floor must have a ventilation cut-out. ¡ In combination with induction hobs, the gap between the worktop and appliance must not be sealed using additional strips. ¡ The worktop must be secured to the built-in unit. ¡ Observe any available installation instructions for the hob. ¡ Ensure that air exchange is guaranteed in accordance with the diagram. 23.
Installation instructions ¡ Contact protection must be guaranteed by the installation. en 2. Screw the appliance into place. Electrically connect the appliance with the protective contact plug Note: The appliance must only be connected to a protective contact socket that has been correctly installed. ▶ Insert the plug into the protective contact socket. When the appliance is installed, the mains plug of the power cord must be freely accessible.
Valid within Great Britain: Imported to Great Britain by BSH Home Appliances Ltd.