
Assembly & Installation Instructions
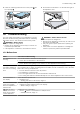
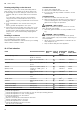
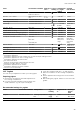
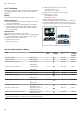
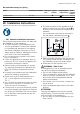
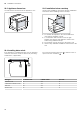
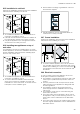
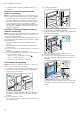
Table Of Contents
- Oven
- en
- Table of contents
- 1 Safety
- 2 Preventing material damage
- 3 Environmental protection and saving energy
- 4 Familiarising yourself with your appliance
- 5 Accessories
- 6 Before using for the first time
- 7 Basic operation
- 8 Time-setting options
- 9 Childproof lock
- 10 Rapid heating
- 11 Basic settings
- 12 Cleaning and servicing
- 13 Cleaning function
- 14 Shelf supports
- 15 Appliance door
- 16 Troubleshooting
- 17 Disposal
- 18 Customer Service
- 19 How it works
- 20 Installation instructions
- 20.1 General installation instructions
- 20.2 Appliance dimensions
- 20.3 Installation below a worktop
- 20.4 Installing below a hob
- 20.5 Installation in a tall unit
- 20.6 Installing two appliances on top of each other
- 20.7 Corner installation
- 20.8 Electrical connection
- 20.9 Installing the appliance
- 20.10 Removing the appliance

en Installation instructions
28
20.2 Appliance dimensions
You will find the dimensions of the appliance here
20.3 Installation below a worktop
Observe the installation dimensions and the installation
instructions when installing below a worktop.
¡ To ventilate the appliance, the intermediate floor
must have a ventilation cut-out.
¡ In combination with induction hobs, the gap
between the worktop and appliance must not be
sealed using additional strips.
¡ The worktop must be secured to the built-in unit.
¡ Observe any available installation instructions for the
hob.
20.4 Installing below a hob
If the appliance is installed below a hob, the following
minimum dimensions must be adhered to (including
substructure, if applicable).
The minimum worktop thickness is based on the re-
quired minimum clearance .
Hob type a raised in mm a flush in mm b in mm
Induction hob 37 38 5
Full-surface induction hob 47 48 5
Gas hob 30 38 5
Electric hob 27 30 2