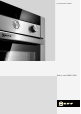
[en] Instruction manual Built-in oven B46E54.
Ú Table of contents e[nuoIrs]ctimanul Important safety information.....................................................4 Causes of damage .............................................................................5 Energy and environment tips ....................................................5 Saving energy......................................................................................5 Environmentally-friendly disposal.....................................................5 Your new appliance ...
: Important safety information Read these instructions carefully. Only then will you be able to operate your appliance safely and correctly. Retain the instruction manual and installation instructions for future use or for subsequent owners. This appliance is only intended to be fully fitted in a kitchen. Observe the special installation instructions. Check the appliance for damage after unpacking it. Do not connect the appliance if it has been damaged in transport.
Risk of injury! Scratched glass in the appliance door may develop into a crack. Do not use a glass scraper, sharp or abrasive cleaning aids or detergents. Risk of electric shock! ■ Incorrect repairs are dangerous. Repairs may only be carried out by one of our trained after-sales engineers. If the appliance is faulty, unplug the mains plug or switch off the fuse in the fuse box. Contact the after-sales service. ■ The cable insulation on electrical appliances may melt when touching hot parts of the appliance.
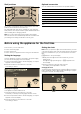
Your new appliance In this section, you will find information on ■ the control panel ■ the operating modes Control panel (OHFWURQLF FORFN 7H[W GLVSOD\ &ORFN IXQFWLRQ 5RWDU\ VHOHFWRU 2SHUDWLQJ PRGH VHOHFWRU EXWWRQ Control element KJ ± 7HPSHUDWXUH GLVSOD\ ,QIR EXWWRQ 7HPSHUDWXUH VHOHFWRU Use Clock function button Selects the required clock function or Rapid heat up (see section: Electronic clock) Rotary selector Makes settings within a clock function or activates Rapid heat up (see section:
Operating mode Application + ( / é Full-surface grill For large amounts of flat, small items for grilling (e.g. steaks, sausages) Centre-area grill For small amounts of flat, small items for grilling (e.g.
Shelf positions Optional accessories You can obtain further accessories from specialist retailers: Accessories Order no. System steamer N8642X3 Grill set Z1240X2 Glass pan Z1262X0 Extra-deep pan, enamelled Z1272X0 Baking tray, non-stick Z1343X0 Roasting tray, enamelled, two-piece Z1512X0 VarioCLOU® telescopic shelf with full exten- Z1785X3 sion The cooking compartment has four shelf positions. The shelf positions are counted from the bottom up.
Cleaning the appliance 4. Heat with % Top/bottom heat at 240 °C for 60 minutes. Clean your appliance before using it for the first time. 1. Remove the accessories from the cooking compartment. 2. Completely remove any residual packaging (e.g. chips of 5. Afterwards, wipe the cooled cooking compartment with hot, soapy water. 6. Clean the outside of the appliance with a soft, damp cloth and soapy water. polystyrene) from the cooking compartment. 3.
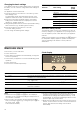
Changing the basic settings Basic settings menu Your appliance has various basic settings, which are preset at the factory. You can, however, change these basic settings as required. The appliance must be switched off. Submenu Basic setting Childproof lock Appliance controls unlocked ™‚‹ Appliance controls locked ™‚‚ Appliance permanently locked ™ƒ‚ Audible signal off ™„‹ Audible signal 30 seconds ™„‚ Audible signal 2 minutes ™„ƒ Audible signal 10 minutes ™„„ 1.
Switching the clock display on and off 1. Press and hold the KJclock function button for 6 seconds. The clock display switches off. If a clock function is active, the associated symbol remains lit. 2. Press the KJclock function button briefly. The clock display switches on. Timer 1. Press the KJclock function button repeatedly until the KJ and Q symbols light up. 2. Set the duration using the rotary selector (e.g. †:‹‹ minutes). End of operation Automatic switch-off at a set time. 1.
Setting the clock You can only change the clock when no other clock function is active. 3. Turn the rotary selector clockwise. Ž is displayed in the clock display and the f symbol lights up. Rapid heat up is activated. 1. Press the KJ clock function button repeatedly until the KJand 3 symbols light up. 2. Set the clock using the rotary selector. The setting is applied automatically. After reaching the set temperature, Rapid heat up switches off. The f symbol goes out.
Interrupting permanent lock Unlocking the appliance permanently 1. Press and hold the ± info button until ™ƒ‚ appears in the 1. Press and hold the ± info button until ™ƒ‚ appears in the 2. Turn the temperature selector until ™ƒ‹ appears on the 2. Turn the temperature selector until ™ƒ‹ appears on the 3. Press and hold the ± info button until the ‚ symbol goes 3. Press and hold the ± info button until the ‚ symbol goes temperature display. temperature display. out.
Baking table If you are baking according to your own recipe, use similar recipes in the table as a guide. The details given in the table are guidelines and apply to dark baking tins. The values may vary depending on the type and amount of the dough/mixture and on the baking tin. Observe the notes in the table about preheating. We recommend that you set the lower of the specified temperatures the first time. Lower temperatures will generally allow more even browning.
Meal Setting Level Temperature in °C Time in minutes 3 1 190 200* 20 30 0 1 180 190* 15 - 20 3 1+3 180 190* 35 45 3 1 160 170 60 70 0 1 160 170 50 - 55 3 1+3 160 170 65 - 75 Home-made pizza Jacket potatoes * Preheat oven ** Preheat the oven to 130 °C Baking table for ready-made products ■ Notes ■ Use the universal pan ■ Do not use frozen products with freezer burn Only use greaseproof paper that is suitable for the selected temperature ■ Do not use fr
Tips and tricks The cake is too light in colour Check the shelf height. Check whether you have used the bakeware that we have recommended. Place your tin on the wire rack and not on the baking tray. The cake is too dark If the shelf height and the bakeware are correct, then you should either extend the baking time or increase the temperature. Check the shelf height. If the shelf height is correct, you should either shorten the baking time or reduce the temperature.
Roasting in the universal pan with roasting sheet The roasting sheet reduces dirt in the cooking compartment. Place the roasting sheet in the universal pan and slide them in together at the same shelf position. Dripping fat and meat juices are caught in the universal pan. Braising For braising, a roasting dish with a lid is used. Ensure that the roasting dish and lid fit together well and close properly. First, sear the meat if required.
Meal Setting Level Temperature in °C Time, min. per 500 g + add. time 3 1 170 - 180* 20 + 25 % 2 190 - 200* 20 + 25 3 1 190* 20 + 25 % 2 200 - 210* 20 + 25 3 1 190* 20 + 25 % 2 200 - 210* 20 + 25 Drumstick 3 1 180* 20 + 20 Crown 3 1 160* 25 + 20 3 4 kg 3 1 160 - 170 15 + 10 4.5 8 kg 3 1 150 - 160 13 + 10 8.
Grilling Radiant grilling In this section, you will find information on ■ Grilling in general ■ Circo-roasting 4 ■ Radiant grilling (Full-surface + and Centre-area grill () ■ The grilling table For grilling large quantities of flat items, use the Full-surface + grill. For grilling small quantities of flat items, use the (Centre-area grill. Place the food to be grilled in the centre of the wire rack. Using the Centre-area grill operating mode will save energy.
Meal Setting Level Temperature in °C Time in minutes Leg 4 2 170 - 190 120 - 150*** Shoulder (bone-in) 4 2 170 - 190 100 - 130*** Shoulder (boned and rolled) 4 2 170 - 190 120 - 150*** Steaks, 2 - 3 cm thick + 4 ‚Ÿ£ 1st side: 5 - 7 Lamb 2nd side: 3 - 5 Chops, 2 - 3 cm thick + 4 ‚Ÿ£ 1st side: 6 - 8 2nd side: 4 - 7 Pork Roast joint Steaks, 1 - 2 cm thick 4 2 180 - 200 120 - 150*** + 4 ‚Ÿ£* 1st side: 8 - 10 2nd side: 5 - 8 Chops, 2 - 3 cm thick + 4 ‚Ÿ£ 1st side: 10 -
Accessories Level Victoria sandwich Wire rack + 2 tins ø 20 cm 1 170 - 180 25 - 35 Light fruit cake Wire rack + high round tin ø 20 1 cm 160 - 170 85 - 95 Rich fruit cake Wire rack + high round ø 23 cm or square tin 20 cm 1 130 - 140 180 - 190 Fruit crumble Wire rack + flat glass dish 1 170 - 190 45 - 50 Swiss roll Wire rack + swiss roll tin 1 180 - 190 10 - 20 Apple tart Wire rack + plate ø 20 cm or pie tin 1 190 - 200 65 - 75 Dishes using CircoTherm® eco “ Temperature in °C
Dough proving In this section, you will find information on ■ Dough proving ê ■ preparing yeast dough and yoghurt The information in the table contains only guide values. You can find information on how to proceed, further instructions and recipes in the accompanying cookbook. Only switch on Dough proving once the cooking compartment has completely cooled down (to room temperature).
1. Place a glass or porcelain plate on a wire rack and insert at shelf height 1 to warm the plate. 2. Switch on / Low-temperature cooking. "Please wait" appears in the text display during the heating up phase (15 - 20 minutes). 3. Remove fat and sinews from the meat. 4. Sear the meat on all sides to seal the meat and to create a roasted flavour. 5. When a signal sounds and "In operation" appears on the text display, place the meat on the glass or porcelain plate in the cooking compartment. 6.
Defrost 3. Defrost frozen food for 25 - 45 minutes, depending on type You can Defrost to defrost delicate pastries particularly well (e. g. cream cakes). 4. Remove the frozen food from the cooking compartment and 1. Switch on 3 CircoTherm® operating mode. 2. Using the temperature selector, turn the default temperature down to 40 °C. Then turn the temperature selector one notch further anti-clockwise. Defrost is now set. A A A appears in the temperature display. and size.
Cleaning and care In this section, you will find information on ■ Caution! Cleaning and care of your appliance Surface damage due to incorrect cleaning: Do not use any harsh or abrasive cleaning agents ■ cleaning agents that contain alcohol ■ abrasive cleaning aids such as steel wool or scourers. ■ ■ Cleaning agents and aids ■ Self-cleaning surfaces in the cooking compartment ■ Oven cleaning z Observe the specifications in the tables.
Keeping the appliance clean To avoid getting the cooking compartment dirty, ■ ■ ■ ■ ■ 2. Turn the temperature selector to set the desired cleaning always remove flecks of limescale, grease, starch and albumin (e.g. egg white) immediately Cleaning setting Temperature display Clock display (operating time in hours) use 3 CircoTherm® whenever possible.
2. Open the appliance door a little (Fig. E). 3. Using a coin, fully turn both the left and right-hand locks on the inside of the appliance at the bottom (Fig. F). Left lock: clockwise Right lock: anti-clockwise ( ) 5. Open the appliance door a little wider and then close it. : Risk of injury from hinge locks which have not been properly closed! The appliance door may detach itself. You may be injured and the appliance door damaged.
Removing the intermediate panel Fitting the door panel Note: Before removing, make a note of the position in which the intermediate panel is fitted, so that you do not refit it the wrong way round later. 1. Insert the door panel at an angle towards the rear into the 1. Remove the seal. Pull the seal outwards and remove it upwards (fig. B). retainers (fig. E). 2. Press down on the side of the door panel until it locks into place (fig. F). ( % ) 3. Refit the appliance door. 2.
Faults and repairs It is not always necessary to call the after-sales service. Sometimes, you can find a remedy yourself. You will find some tips for troubleshooting in the following table. : Risk of electric shock! ■ ■ Problem Work on the appliance electronics may only be performed by a specialist. Always disconnect the appliance from the power supply when work is carried out on the electronics. Switch off the circuit breaker or remove the fuse from your household fuse box.
Replacing the oven light bulb Unhooking the door seal Replace faulty oven light bulbs. The door seal is fixed in nine places. You can obtain replacement light bulbs from customer service or specialist retailers: E14, 220 - 240 V, 40 W, heat resistant to 300 °C. Only use these oven light bulbs. 1. Unhook (Fig. B) the door seal at four points (Fig. A). : Risk of electric shock ! $ % Disconnect the appliance from the power supply.
Test dishes These tables have been produced for test institutes to facilitate the inspection and testing of the various appliances. Please note the information in the tables about preheating. The table values do not include Rapid heat up. Test dishes tested to standard EN 50304/EN 60350 (2009) and IEC 60350. Note: For baking, use the lower of the temperatures indicated first.
Constructa Neff Vertriebs-GmbH Carl-Wery-Straße 34 D-81739 München *9000724789* 9000724789 940313