
Assembly & Installation Instructions
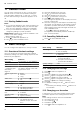

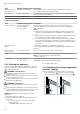


Table Of Contents
- Oven
- en
- Table of contents
- 1 Safety
- 2 Preventing material damage
- 3 Environmental protection and saving energy
- 4 Familiarising yourself with your appliance
- 5 Accessories
- 6 Before using for the first time
- 7 Basic operation
- 7.1 Switching on the appliance
- 7.2 Switching off the appliance
- 7.3 Residual heat indicator
- 7.4 Setting the type of heating and temperature
- 7.5 Changing the temperature
- 7.6 Changing the type of heating
- 7.7 Pausing operation
- 7.8 Cancelling operation
- 7.9 Viewing the current temperature
- 7.10 Displaying information
- 8 Time-setting options
- 9 Childproof lock
- 10 Rapid heat-up
- 11 Sabbath mode
- 12 Basic settings
- 13 Cleaning and servicing
- 14 Cleaning functions
- 15 Rails
- 16 Appliance door
- 17 Troubleshooting
- 18 Disposal
- 19 Customer Service
- 20 How it works
- 21 Installation instructions

en Appliance door
20
2.
Hold the screwdriver horizontally and use it to
push the door lock (black component) on each side
of the door upwards as far as it will go .
Door lock open
Door lock closed
3.
Open the appliance door approx. 45° wide.
4.
Insert the coin in the gap in the lock and rotate as
far as it will go .
‒ Turn the lock on the left-hand side in a clockwise
direction.
‒ Turn the lock on the right-hand side in an anti-
clockwise direction.
Left-hand lock secured
The arrows point to
each other
Left-hand lock released
a The lock audibly engages.
5.
ATTENTION!
Opening and closing the appliance door when it is
in the lock position damages the door hinges.
▶
Never force the appliance door open or closed.
▶
If the door hinge has been damaged, call the
after-sales service.
Move the appliance door up and down until you
hear a quiet click. You can still only move the appli-
ance door slightly.
a The appliance door is in the lock position.