BUILT-IN OVEN [en] INSTRUCTION MANUAL B47VR32.
en Table of contents [ en] I NSTRUCTI ON MANUAL 8 Intended use . . . . . . . . . . . . . . . . . . . . . . . . . . . . . 4 ( Important safety information . . . . . . . . . . . . . . . 5 O Time-setting options . . . . . . . . . . . . . . . . . . . . . 20 General information . . . . . . . . . . . . . . . . . . . . . . . . . . . 5 Steam. . . . . . . . . . . . . . . . . . . . . . . . . . . . . . . . . . . . . . 6 Cleaning function . . . . . . . . . . . . . . . . . . . . . . . . . . . . .
en Intended use 4 Customer service . . . . . . . . . . . . . . . . . . . . . . . . 35 E number and FD number . . . . . . . . . . . . . . . . . . . . . 35 J Tested for you in our cooking studio. . . . . . . . 35 Silicone moulds . . . . . . . . . . . . . . . . . . . . . . . . Baking . . . . . . . . . . . . . . . . . . . . . . . . . . . . . . . Roasting and braising . . . . . . . . . . . . . . . . . . . Grilling . . . . . . . . . . . . . . . . . . . . . . . . . . . . . . . Convenience products . . . . . . .
Important safety information (Important safety information I mpor t ant saf et y i nf or mat i on General information : Warning – Risk of fire! Combustible items stored in the cooking compartment may catch fire. Never store combustible items in the cooking compartment. Never open the appliance door if there is smoke inside. Switch off the appliance and unplug it from the mains or switch off the circuit breaker in the fuse box. Risk of fire! ■ Loose food remnants, fat and meat juices may catch fire.
en Causes of damage Steam : Warning – Risk of scalding! The water in the water tank may become very hot if you continue to operate the appliance. Empty the water tank after every operation with steam. Risk of steam scalding! ■ Hot is generated in the cooking compartment. Do not reach into the cooking compartment during any operation with steam. Risk of liquid scalding! ■ Hot may spill over the sides of the accessory when it is removed from the cooking compartment.
Environmental protection Steam Caution! ■ Baking tins: Ovenware must be heat and steam resistant. Silicone baking tins are not suitable for combined operation with steam. ■ Ovenware with areas of rust: Do not use any ovenware which displays areas of rust. Even the smallest spots of rust can lead to corrosion in the cooking compartment. ■ Dripping liquids: When steaming with a perforated cooking container, always insert the baking tray, the universal pan or the solid cooking container underneath.
en ■ ■ ■ Environmental protection Open the appliance door as infrequently as possible when the appliance is in use. It is best to bake several cakes one after the other. The cooking compartment stays warm. This reduces the baking time for the second cake. You can place two cake tins next to each other in the cooking compartment. For longer cooking times, you can switch the appliance off 10 minutes before the end of the cooking time and use the residual heat to finish cooking.
Getting to know your appliance en Control panel *Getting to know your appliance In the control panel, set the appliance's different functions. The current settings are shown on the display. In this chapter, we will explain the indicators and controls. You will also find out about the various functions of your appliance. Get i ng t o know your ap l i ance Note: Depending on the appliance model, individual details and colours may differ.
en Getting to know your appliance Note: You can also scroll through the settings values quickly by pressing and holding a button. As soon as you release the button, you stop scrolling through the values quickly. ² Main menu Touch the 0 touch button to access the main menu.
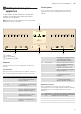
Getting to know your appliance en ‘ Top/bottom heating eco 50-275 °C ž CircoTherm eco 40-200 °C ¨ ª Reheat ** 80-180 °C For gently cooking selected types of food. Heat is emitted from above and below. This heating function is most effective between 150 and 250 °C. This heating function is used to measure the energy consumption in the conventional mode. For gently cooking selected types of food on one level without preheating.
en Accessories _Accessories Your appliance is accompanied by a range of accessories. Here, you can find an overview of the accessories included and information on how to use them correctly. Ac es or i es Accessories included Your appliance is equipped with the following accessories: Wire rack For ovenware, cake tins and ovenproof dishes. For roasts, grilled items and frozen meals. Universal pan For moist cakes, pastries, frozen meals and large roasts.
Before using for the first time Optional accessories You can purchase optional accessories from the aftersales service and specialist retailers, or on the Internet. You will find a comprehensive range of products for your appliance in our brochures and on the Internet. Both availability and whether it is possible to order online differ between countries. Please see your sales documents for more details. Note: Not all optional accessories are suitable for every appliance.
en Before using for the first time Setting the time 1. 2. 3. 4. Use the & button to navigate to the next line. Use the ( or ) button to select the current time. Press the % button. Use the ) button to select the next setting. Setting the date 1. Use 2. Use 3. Use 4. Use 5. Use 6. Use 7. Use 8. Use 9. Use 10. Use 11. Use 12. Use the the the the the the the the the the the the & button to navigate to the next line. ( or ) button to select the current day. % button to return to "Day".
Operating the appliance 1Operating the appliance You have already learnt about the controls and how they work. Now we will explain how to set your appliance. You will learn about what happens when you switch the appliance on and off, and how to select the operating mode. en 4. Use the ( or ) button to select the temperature. CircoTherm Oper at i ng t he ap l i ance Switching the appliance on and off Touch the # touch button to switch the appliance on or off.
en Operating the appliance Changing or cancelling the appliance operation Changing the appliance operation 1. Use the # button to stop the operation. 2. Use the & or % button to navigate to the line for the setting that should be changed. 3. Use the ( or ) button to change the setting. 4. Use the # touch button to start the changed operation. Notes The cooling fan may continue to run while an operation is interrupted. ■ After a temperature change, the paused running time continues to count.
Steam `Steam With some heating modes, you can prepare food with steam assistance. In addition, the Dough proving and Reheat heating modes are available. St eam : Warning – Risk of scalding! When you open the appliance door, hot steam can escape. Steam may not be visible, depending on its temperature. When opening, do not stand too close to the appliance. Open the appliance door carefully. Keep children away.
en Steam Cancelling Press and hold the # touch button until the appliance operation is cancelled. Finishing Touch the # touch button to switch the appliance off. Reheating With the "Reheat ¨" heating mode, you can gently reheat food that has already been cooked or crisp up day-old baked goods. Steam is switched on automatically. Note: If the water tank runs dry during operation with the Reheat setting, operation is interrupted. Fill the water tank. Starting 1. 2. 3. 4. 5. 6. 7. 8.
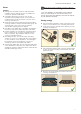
Steam 7. Put the cover ‚ back into the opening on the water tank. 8. Insert the filled water tank (Fig. %). Ensure that the water tank locks into place behind both holders ƒ (Fig. &). I E E 9. Slowly slide the control panel downwards and then push it towards the rear until it is closed completely. The water tank has been filled. You can start using operating modes with steam. Refilling the water tank Notes ■ Steam-assisted operations continue without adding steam.
en Time-setting options OTime-setting options Ti me- set i ng opt i ons Your appliance has different time-setting options. Time-setting option . Timer + Cooking time * Ready at Use The timer functions like an egg timer. The appliance does not switch on and off automatically. Once the set cooking time has elapsed, the appliance switches off automatically. The appliance switches on automatically, and once the set cooking time has elapsed and the end time has passed, it switches off automatically.
Childproof lock AChildproof lock Your appliance is equipped with a childproof lock so that children cannot switch it on accidentally or change any settings. Your appliance has two different locks. Chi l dpr o f l ock Lock Automatic childproof lock One-time childproof lock Activate/deactivate Via the Settings menu ~ "Basic settings" on page 22 Via the 0 touch button en One-time childproof lock The control panel is locked so that the appliance cannot be switched on.
en Basic settings QBasic settings There are various settings available to you in order to help use your appliance effectively and simply. You can change these settings as required. Basi c set i ngs Changing the basic settings 1. 2. 3. 4. 5. 6. 7. 8. 9. Touch the # touch button. Touch the 0 touch button. Use the ( or ) button to select the "" Settings". Use the & button to navigate to the next line. Use the ( or ) button to select the setting. Use the & button to navigate to the next line.
Programmes PProgrammes You can prepare food very easily using the various programmes. You select a programme and enter the weight of your food. The program then applies the most suitable settings. To achieve good results, the cooking compartment must not be too hot for the type of food you have selected. If it is, a message will appear on the display. Allow the cooking compartment to cool down and start again.
en Sabbath mode Continue cooking 1. Use the & button to select "Continue cooking". 2. If necessary, use the ( or ) button to change the recommended setting. 3. Touch the # touch button to start "Continue cooking". Cancelling Press and hold the # touch button until the appliance operation is cancelled. Switching off the appliance Touch the # touch button to switch off the appliance. FSabbath mode You can set a time of up to 74 hours using Sabbath mode.
Cleaning agent DCleaning agent With good care and cleaning, your appliance will retain its appearance and remain fully functioning for a long time to come. We will explain here how you should correctly care for and clean your appliance. Door panels Cl eani ng agent Door handle Suitable cleaning agents To ensure that the different surfaces are not damaged by using the wrong cleaning agent, observe the information in the table.
en Cleaning agent Notes ■ Slight differences in colour on the front of the appliance are caused by the use of different materials, such as glass, plastic and metal. ■ Shadows on the door panels, which look like streaks, are caused by reflections made by the interior lighting. ■ Enamel is baked on at very high temperatures.This can cause some slight colour variation. This is normal and does not affect operation. The edges of thin trays cannot be completely enamelled. As a result, these edges can be rough.
Cleaning function .Cleaning function Your appliance is equipped with EcoClean, the floor cleaning aid and a descaling function. The self-cleaning surfaces in the cooking compartment are cleaned with the "EcoClean" cleaning function. Use the floor cleaning aid for intermediate cleaning of the cooking compartment floor. Dirt is softened beforehand using the floor cleaning aid. It can then be removed more easily. You can use the descaling function to remove limescale from the evaporator.
en Cleaning function Finishing As soon as the cleaning aid has finished, an audible signal sounds and the appliance ends the operation automatically. As soon as you open the appliance door, the interior lighting is switched on so that you can finish cleaning the cooking compartment more easily. The remaining water in the cooking compartment must be removed promptly. Do not leave the remaining water in the cooking compartment for a long time (e.g. overnight).
Rails en 9. Use the & button to navigate to the next line. 10. Touch the # touch button. pRails First wash cycle With good care and cleaning, your appliance will retain its appearance and remain fully functional for a long time to come. This will tell you how to remove the shelves and clean them. 1. Open the control panel. 2. Remove the water tank, rinse thoroughly, fill with Detaching and refitting the rails The appliance is now descaled. The time counts down in the display.
Appliance door en qAppliance door 2. Open the appliance door approx. 45° (fig. %). I With good care and cleaning, your appliance will retain its appearance and remain fully functional for a long time to come. This will tell you how to remove the appliance door and clean it. Ap l i ance do r Removing and fitting the appliance door To clean the door panels, you can detach the appliance door. 3.
Appliance door : Warning en Refitting the appliance door Risk of injury! The door handle may break off. Do not carry the appliance door by the door handle. To carry or remove the appliance door, take hold of it with both hands, one on the left and one on the right. 5. Take hold of the appliance door with both hands, one on the left and one on the right, and rotate the door handle upwards slightly ‚ until you are able to pull up the appliance door and remove it ƒ(fig.°*). 1.
Appliance door en Removing and installing the door panels Installation For cleaning, you can remove the glass panels from the appliance door. To do this, the appliance door must be removed beforehand (see section "Removing and fitting the appliance door"). Note: When fitting the door panels, ensure that they are in the original order. : Warning – Risk of injury! The appliance must not be used again until the door panels and appliance door have been correctly fitted. 1.
Trouble shooting 3Trouble shooting If a fault occurs, there is often a simple explanation. Before calling the after-sales service, please refer to the fault table and attempt to correct the fault yourself. Tr oubl e sho t i ng Tip: If a meal does not turn out exactly as you wanted, refer to the "Tested for you in our cooking studio" section.Here, you will find plenty of cooking tips and notes. en : Warning – Risk of injury! Incorrect repairs are dangerous.
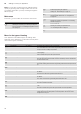
en Trouble shooting The panel for removing the tank does The plug is not plugged into the mains not open Power cut The circuit breaker is faulty Faulty sensor for the ” touch button The appliance cannot be switched on; The automatic childproof lock is activated the 1 symbol is shown on the display The appliance cannot be operated The childproof lock is activated when it is switched on; the 1 symbol is shown on the display The appliance does not heat up; 6 is Demo mode is activated in the basic settings s
Customer service 4Customer service Our after-sales service is there for you if your appliance needs to be repaired. We will always find an appropriate solution, also in order to avoid after-sales personnel having to make unnecessary visits. Cust omer ser vi ce E number and FD number When calling us, please give the full product number (E no.) and the production number (FD no.) so that we can provide you with the correct advice.
en Tested for you in our cooking studio Baking on one level When baking on one level, use the following shelf positions: ■ Tall baked items: Level 2 ■ Flat baked items: Level 3 If you are using CircoTherm Hot air as the type of heating, you can choose between levels 1, 2, 3 and 4. You can also prepare soufflés in a water bath in the universal pan. To do so, slide the universal pan in at level 2. Baking on two levels Use CircoTherm.
Tested for you in our cooking studio Dish Accessories/cookware flat glass dish springform cake tin Ø26 cm springform cake tin Ø26 cm Shelf position 3 2 2 Type of heating ‚ ‚ ‚ Temperature in °C 150-170* 160-170* 150-160 Fruit crumble Sponge Cake (fatless), 3 eggs Sponge Cake (fatless), 3 eggs Sponge flan, 6 eggs Sponge flan, 6 eggs springform cake tin Ø28 cm springform cake tin Ø28 cm 2 2 ‚ ‚ 150-170* 150-160 Swiss roll Swiss roll Fruit Pie Fruit Pie Quiche (White) Bread (White) Bread Scones Scone
en Tested for you in our cooking studio Dish Accessories/cookware Small cakes, 2 levels Puff pastry slices, 2 levels Puff pastry slices, 3 levels Jam tarts, 2 levels Meringues, 2 levels Jacket potatoes, 2 levels (White) Bread, 2 levels Pizza, homemade, 2 levels * Preheat 2x 12-cup-tins 2 baking trays 3 baking trays 2x 12-cup-tins 2 baking trays universal pan + baking tray 4x loaf tins universal pan + baking tray Shelf position 3+1 3+1 4+3+1 3+1 3+1 3+1 3+1 3+1 Type of heating ‚ ‚ ‚ ‚ ‚ ‚ ‚ ‚ Tempera
Tested for you in our cooking studio Meat Baste lean meat with fat as required or cover it with strips of bacon. Score the rind crosswise. If you turn the joint when cooking, ensure that the rind is underneath at first. When the joint is ready, turn off the oven and allow it to rest for another 10 minutes in the cooking compartment. This allows the meat juices to be better distributed. Wrap the joint in aluminium foil if necessary. The recommended resting time is not included in the cooking time indicated.
en Tested for you in our cooking studio Cooking time range (e. g. 10-15): The food is done within the stated minutes. Type of heating used: ■ ‚ CircoTherm The levels of steam intensity are indicated as numbers in the table: 1 = Low 2 = Medium 3 = High ■ ■ ■ Dish Accessories/cookware Shelf position Type of heating Temperature in °C Steam in- Time in min. tensity Beef Slow roasting joint Slow roasting joint, 1.
Tested for you in our cooking studio Dish Accessories/cookware Turkey, whole, 4-8 kg***** Turkey, whole, 7 kg Meat dishes Meat loaf Meat loaf, 1 kg en Type of heating ‚ ‚ Temperature in °C 150-160 140-150 170-180 Steam intensity 2 - Time in min.
en Tested for you in our cooking studio Grilling Here, you can find information on grilling poultry, meat and fish, as well as toast. You can find the ideal settings for certain dishes in the settings tables. Grilling with circo-roasting Circo-roasting is very well suited to the preparation of whole poultry and fish, in addition to meat, e.g. roast pork with crackling. Poultry For duck or goose, pierce the skin on the underside of the wings. This allows the fat to run out.
Tested for you in our cooking studio Grilling flat pieces Flat pieces of poultry, meat and fish, such as steaks, drumsticks and burgers, can be prepared well using the "Grill" heating type. Excellent results are also achieved when grilling toast. Grilling Keep the appliance door closed when using the grill. Never grill with the appliance door open. Place the food to be grilled on the wire rack.
en Tested for you in our cooking studio Dish Accessories wire rack Shelf position 3 Type of heating ˆ Temperature in °C 290 Leg (bone-in) Leg (bone-in), 1.5 kg Shoulder (bone-in) Shoulder (boned and rolled) Rack of lamb wire rack wire rack wire rack wire rack wire rack 2 2 2 2 2 ‡ ‡ ‡ ‡ ‡ 170-180 170-180 170-190 170-180 190-200 Steam in- Time in min.
Tested for you in our cooking studio en Dish Accessories Shelf position Type of heating Temperature in °C Steam in- Time in min.
en Tested for you in our cooking studio Remove unused accessories from the cooking compartment. This will achieve the best possible cooking results and energy savings of up to 20 per cent.
Tested for you in our cooking studio 2. Stir in 150 g (chilled) yoghurt. 3. Pour into cups or small jars and cover with cling film. 4. Place the cups or jars onto the cooking Yogurt You can make your own yogurt using your appliance. compartment floor and use the settings indicated in the table. 5. After making the yoghurt, leave it to cool in the refrigerator. Making yoghurt Remove accessories and shelf supports from the cooking compartment. The cooking compartment must be empty.
en Tested for you in our cooking studio Dish Accessories/cookware high Ø23 cm tin flat glass dish springform cake tin Ø26 cm swiss roll tin plate Ø20 cm or pie tin quiche tin (dark coated) loaf tin (1x 900 g or 2x 450 g) baking tray 12-cup-tin 1,2L-soufflé dish rectangular pie tin baking tray Shelf position 2 3 2 3 2 3 2 3 3 2 2 3 Type of heating ž ž ž ž ž ž ž ž ž ž ž ž Temperature in °C 140-160 160-180 160-170 180-190 170-190 190-210 190-200 190-210 180-200 160-170 190-200 150-170 Cooking time in mi
Tested for you in our cooking studio Note: Delayed-start operation with an end time is not possible for the slow cooking heating type. Cookware Use shallow cookware, e.g. a glass/porcelain serving dish. Place the cookware into the cooking compartment to preheat it. Always place the uncovered cookware onto the wire rack at level 2. You can find additional information in the tips on slow cooking attached to the settings table. Your appliance features the heating type "Slow cook".
en Tested for you in our cooking studio Drying You can achieve outstanding drying results with CircoTherm. With this type of preserving, flavourings are concentrated by the dehydration. Only use unblemished fruit, vegetables and herbs and wash them thoroughly. Line the wire rack with greaseproof paper or parchment paper. Drain the excess water from the fruit and dry it. If necessary, cut it into equal chunks or thin slices. Place unpeeled fruit onto the dish with the sliced surfaces facing upwards.
Tested for you in our cooking studio Vegetables After a short while, small bubbles will form at short intervals. As soon as all preserving jars are bubbling, reduce the temperature to 120 °C and allow the jars to continue to bubble in the closed cooking compartment as indicated in the table. After this time has elapsed, switch off the appliance and make use of the residual heat for several minutes as indicated in the table.
en Tested for you in our cooking studio Dish Accessories/cookware Shelf posi- Type of tion heating Step Yeast dough, savoury E.g.
Tested for you in our cooking studio Reheating Using heating type "Reheating", food is reheated gently using steam. It tastes and looks as though it has been freshly prepared. Even baked items from the day before can be re-crisped. Use containers which are as flat, wide and heatresistant as possible. Cold containers prolong the reheating process. Where possible, only reheat dishes of the same size and type at the same time.
en Tested for you in our cooking studio Test dishes These tables have been produced for test institutes to facilitate appliance testing. As per EN 60350-1. Baking Baked items that are placed into the oven on trays or in baking tins/dishes at the same time will not necessarily be ready at the same time.
Tested for you in our cooking studio Grilling Also slide in the universal pan. The liquid will be caught and the cooking compartment stays cleaner. Dish Grilling Toasting bread* Beefburger, 12 pieces** * Do not preheat ** Turn after 2/3 of the total time en Type of heating used: ■ ˆ Full-surface grill Accessories Shelf posi- Type of tion heating Temperature in °C Cooking time in mins.
Valid within Great Britain: Imported to Great Britain by BSH Home Appliances Ltd.