BUILT-IN OVEN [en] INSTRUCTION MANUAL B57CR22.
en Table of contents [ en] I NSTRUCTI ON MANUAL 8 Intended use . . . . . . . . . . . . . . . . . . . . . . . . . . . . . 4 ( Important safety information . . . . . . . . . . . . . . . 5 F Sabbath mode . . . . . . . . . . . . . . . . . . . . . . . . . . 19 General information . . . . . . . . . . . . . . . . . . . . . . . . . . . 5 Halogen lamp. . . . . . . . . . . . . . . . . . . . . . . . . . . . . . . . 6 Cleaning function . . . . . . . . . . . . . . . . . . . . . . . . . . . . . 6 D Cleaning agent .
en Intended use Produktinfo Additional information on products, accessories, replacement parts and services can be found at www.neff-international.com and in the online shop www.neff-eshop.com 4 8Intended use Read these instructions carefully. Only then will you be able to operate your appliance safely and correctly. Retain the instruction manual and installation instructions for future use or for subsequent owners. This appliance is only intended to be fully fitted in a kitchen.
Important safety information (Important safety information I mpor t ant saf et y i nf or mat i on General information : Warning – Risk of fire! Combustible items stored in the cooking compartment may catch fire. Never store combustible items in the cooking compartment. Never open the appliance door if there is smoke inside. Switch off the appliance and unplug it from the mains or switch off the circuit breaker in the fuse box. Risk of fire! ■ Loose food remnants, fat and meat juices may catch fire.
en Important safety information Halogen lamp : Warning – Risk of burns! The bulbs in the cooking compartment become very hot. There is still a risk of burning your skin for some time after they have been switched off. Do not touch the glass cover. Avoid contact with your skin when cleaning. : Warning – Risk of electric shock! When replacing the cooking compartment bulb, the bulb socket contacts are live.
Causes of damage en ]Causes of damage 7Environmental protection General information Your new appliance is particularly energy-efficient. Here you can find tips on how to save even more energy when using the appliance, and how to dispose of your appliance properly. Causes of damge Caution! ■ Accessories, foil, greaseproof paper or ovenware on the cooking compartment floor: do not place accessories on the cooking compartment floor.
en ■ ■ ■ Environmental protection Open the appliance door as infrequently as possible when the appliance is in use. It is best to bake several cakes one after the other. The cooking compartment stays warm. This reduces the baking time for the second cake. You can place two cake tins next to each other in the cooking compartment. For longer cooking times, you can switch the appliance off 10 minutes before the end of the cooking time and use the residual heat to finish cooking.
Getting to know your appliance en *Getting to know your appliance Note: Depending on the appliance model, individual details and colours may differ. In this section, we will explain the indicators and controls. You will also find out about the various functions of your appliance. You can set your appliance's various functions on the control panel. The current settings are shown in the display.
en Getting to know your appliance Main menu " Touch the 0 touch button to access the main menu.
Accessories Cooking compartment functions The features of the cooking compartment make your appliance easier to use. This, for example, enables the cooking compartment to be well lit and a cooling fan to prevent the appliance from overheating. Opening the appliance door If you open the appliance door while the appliance is in operation, this pauses the programme. The operation continues to run when you close the door.
en Accessories Notes ■ Ensure that you always insert the accessories into the cooking compartment the right way round. ■ Always insert the accessories fully into the cooking compartment so they do not touch the appliance door. Locking function The accessories can be pulled out approximately halfway until they lock in place. The locking function prevents the accessories from tilting when they are pulled out.
Before using for the first time KBefore using for the first time Before you can use your new appliance, you must make some settings. You must also clean the cooking compartment and accessories. Bef or e usi ng f or t he f i r st t i me en Cleaning the cooking compartment To eliminate the new-appliance smell, heat up the cooking compartment without anything in it and with the oven door closed. 1. Remove the accessories from the cooking compartment. 2.
en Operating the appliance 1Operating the appliance You have already learnt about the controls and how they work. Now we will explain how to set your appliance. You will learn about what happens when you switch the appliance on and off, and how to select the operating mode. 4. Use the ( or ) button to select the temperature. &LUFR7KHUP Oper at i ng t he ap l i ance Switching the appliance on and off Touch the # touch button to switch the appliance on or off.
Operating the appliance Notes The cooling fan may continue to run while an operation is interrupted. ■ After a temperature change, the paused running time continues to count. After a change in the type of heating, the running time starts again from zero. ■ Cancelling the appliance operation Press and hold the # touch button until the appliance operation is cancelled. Note: Operating modes such as the cleaning function cannot be cancelled.
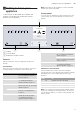
en Time-setting options OTime-setting options Ti me- set i ng opt i ons Your appliance has different time-setting options. Time-setting option . Timer + Cooking time * Ready at Use The timer functions like an egg timer. The appliance does not switch on and off automatically. Once the set cooking time has elapsed, the appliance switches off automatically. The appliance switches on automatically, and once the set cooking time has elapsed and the end time has passed, it switches off automatically.
Childproof lock AChildproof lock Your appliance is equipped with a childproof lock so that children cannot switch it on accidentally or change any settings. Your appliance has two different locks. Chi l dpr o f l ock Lock Automatic childproof lock One-time childproof lock Activate/deactivate Via the Settings menu ~ "Basic settings" on page 18 Via the 0 touch button en One-time childproof lock The control panel is locked so that the appliance cannot be switched on.
en Basic settings QBasic settings There are various settings available to you in order to help use your appliance effectively and simply. You can change these settings as required. Basi c set i ngs Changing the basic settings 1. 2. 3. 4. 5. 6. 7. 8. 9. Touch the # touch button. Touch the 0 touch button. Use the ( or ) button to select the "" Settings". Use the & button to navigate to the next line. Use the ( or ) button to select the setting. Use the & button to navigate to the next line.
Sabbath mode FSabbath mode You can set a time of up to 74 hours using Sabbath mode. The food in the cooking compartment remains warm, without you having to switch the appliance on or off. en DCleaning agent With good care and cleaning, your appliance will retain its appearance and remain fully functioning for a long time to come. We will explain here how you should correctly care for and clean your appliance.
en Cleaning agent Door panels Door handle Hot soapy water: Clean with a dish cloth and then dry with a soft cloth. Do not use a glass scraper or a stainless steel scouring pad. Hot soapy water: Clean with a dish cloth and then dry with a soft cloth. If descaler comes into contact with the door handle, wipe it off immediately. Otherwise, any stains will not be able to be removed.
Cleaning function en .Cleaning function Preparation Your appliance is equipped with a self-cleaning function and EasyClean. You can use the self-cleaning function to clean the cooking compartment. Use the EasyClean cleaning aid for intermediate cleaning of the cooking compartment. Dirt is softened beforehand using EasyClean. It can then be removed more easily. Risk of fire! ■ Loose food residues, grease and meat juices may catch fire during the cleaning function.
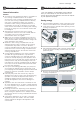
Cleaning function en 6. Insert the rear end of the accessory support as far as it will go into the rear socket ƒ, and push the accessory support back „ (figure "). 7. Then insert the front end of the accessory support as far as it will go into the front socket …, and push the accessory support down † (figure #). 2 Finishing As soon as self-cleaning has run through, a signal sounds. The appliance door cannot be opened until the 5 symbol goes out. Once the cleaning function has ended 1.
Rails Subsequent cleaning 1. Open the appliance door and remove the remaining water with an absorbent sponge cloth. 2. Clean the smooth surfaces in the cooking compartment with a dish cloth or a soft brush. Stubborn residues can be removed using a stainless steel scouring pad. 3. Remove limescale with a cloth soaked in vinegar. Then wipe with clean water and rub dry with a soft cloth (including under the door seal). 4. Use the # touch button to switch off the appliance. 5.
Appliance door en qAppliance door 2. Open the appliance door approx. 45° (fig. %). I With good care and cleaning, your appliance will retain its appearance and remain fully functional for a long time to come. This will tell you how to remove the appliance door and clean it. Ap l i ance do r Removing and fitting the appliance door To clean the door panels, you can detach the appliance door. 3.
Appliance door en 4. Open the appliance door slightly until you hear a : Warning Risk of injury! The door handle may break off. Do not carry the appliance door by the door handle. To carry or remove the appliance door, take hold of it with both hands, one on the left and one on the right. 5. Take hold of the appliance door with both hands, one on the left and one on the right, and rotate the door handle upwards slightly ‚ until you are able to pull up the appliance door and remove it ƒ(fig.°*).
Appliance door en 5. Push down on the intermediate panel around ‚, carefully lift the holder ƒ until it can be pulled out (Fig. #). 1. Insert the intermediate panel so that the ‚ arrow on the right-hand side is pointing upwards (Fig. !). 1 D D E 6. Lift the first and second intermediate panels from below (Fig. $) and remove them in the direction of the arrow (Fig. %). 7. Remove the spacers (Fig. &) and seals (Fig. ') for cleaning if needed. 2.
Trouble shooting 6. Insert the inner glass into the mounting rail … at an angle towards the back (Fig. (). 7. Push the inner glass downwards until it clicks into place (Fig. )). G en 3Trouble shooting If a fault occurs, there is often a simple explanation. Before calling the after-sales service, please refer to the fault table and attempt to correct the fault yourself.
Trouble shooting en The appliance door cannot be opened; the 5 symbol is shown on the display The appliance door is locked until the cooking compartment has cooled down The childproof lock locks the appliance door "D" or "E" appears on the display, e.g. Technical problem D0111 or E0111 4. Screw the glass cover back on. Maximum operating time exceeded Your appliance ends the operation automatically when no cooking time is set and the setting has not been changed for a long time.
Customer service 4Customer service Our after-sales service is there for you if your appliance needs to be repaired. We will always find an appropriate solution, also in order to avoid after-sales personnel having to make unnecessary visits. Cust omer ser vi ce E number and FD number When calling us, please give the full product number (E no.) and the production number (FD no.) so that we can provide you with the correct advice.
en Tested for you in our cooking studio Baking on several levels Use CircoTherm. Baked items that are placed into the oven on trays or in baking tins/dishes at the same time will not necessarily be ready at the same time. Baking on two levels: ■ Universal pan: Level 3 Baking tray: Level 1 ■ Baking tins/dishes on the wire rack First wire rack: Level 3 Second wire rack: Level 1 Tinplate baking tins, ceramic dishes and glass dishes extend baking time and mean that the baked item will not brown evenly.
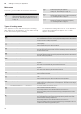
Tested for you in our cooking studio en Dish Accessories/cookware Shelf posi- Heating tion function Temperature in °C Sponge flan base Sponge flan base Fruit tart or cheesecake with shortcrust pastry base Swiss flan Swiss flan Tart Bundt yeast cake Bundt yeast cake Yeast cake Yeast cake Sponge base, 2 eggs Sponge base, 2 eggs Sponge flan, 3 eggs Sponge flan, 3 eggs Sponge flan, 6 eggs Sponge flan, 6 eggs Flan base tin Flan base tin Springform cake tin, Ø 26 cm 3 3 2 ƒ ‚ ƒ 160-180 150-170 170-190
en Tested for you in our cooking studio Dish Accessories/cookware Shelf posi- Heating tion function Temperature in °C Small cakes Small cakes, 2 levels Small cakes, 3 levels Muffins Muffins Muffins, 2 levels Small yeast cakes Small yeast cakes Small yeast cakes, 2 levels Puff pastry Puff pastry Puff pastry, 2 levels Puff pastry, 3 levels Puff pastry, flat, 4 levels Choux pastry Choux pastry Choux pastry, 2 levels Danish pastry Danish pastry Baking tray Universal pan + baking tray Baking trays + unive
Tested for you in our cooking studio The cake is generally too light in colour. The cake is too light on top, and too dark underneath. The cake is too dark on top, and too light underneath. Cakes baked in a tray or tin are too brown at the back. The whole cake is too dark. The cake is unevenly browned. You were baking on several levels. The items on the top baking tray are darker than those on the lower baking tray. The cake looks good, but is not cooked properly in the middle.
en Tested for you in our cooking studio setting ranges. Try using the lower values to start with. A lower temperature will result in more even browning.You can use a higher setting next time if necessary. Note: Baking times cannot be reduced by using higher temperatures. The bread or bread rolls would only be cooked on the outside, but would not be fully baked in the middle.
Tested for you in our cooking studio en Dish Accessories Shelf posi- Type of tion heating Temperature in °C Cooking time in mins. Toast Toast with topping, 4 slices Toast with topping, 12 slices Toasting bread (do not preheat) * Preheat Wire rack Wire rack Wire rack 3 3 4 190-210 230-250 290 10-15 10-15 4-6 Pizza, quiche and savoury cakes Your appliance offers you a range of heating types for preparing pizza, quiche and savoury cakes.
en Tested for you in our cooking studio Remove unused accessories from the cooking compartment. This will ensure that you achieve the best possible cooking results and energy savings of up to 20 per cent. Types of heating used: ■ ‚ CircoTherm ■ ƒ Top/bottom heating ■ „ Circotherm intensive ■ … Bread baking Dish Accessories Shelf posi- Type of tion heating Temperature in °C Cooking time in mins.
Tested for you in our cooking studio Cookware Use wide, shallow cookware for bakes and gratins. In deep, narrow cookware, food requires more time to cook, and the top will be darker. Recommended setting values In the table, you can find the ideal heating type for various bakes and soufflés. The temperature and cooking time are dependent on the quantity of food and the recipe. How well cooked a bake is will depend on the size of the cookware and the depth of the bake.
en Tested for you in our cooking studio Poultry can also become crispy in a covered roasting dish. To do so, use a roasting dish with a glass lid and set a higher temperature. Grilling Keep the appliance door closed when using the grill. Never grill with the appliance door open. Place the food to be grilled on the wire rack. In addition, slide the universal pan in at least one shelf position lower, with the slanted edge facing the appliance door. Any dripping fat will be caught.
Tested for you in our cooking studio Meat Your appliance offers you many heating types for preparing meat. You can find the ideal settings for many dishes in the settings tables. Roasting and braising Baste lean meat with fat as required or cover it with strips of bacon. Score the rind crosswise. If you turn the joint when cooking, ensure that the rind is underneath at first. When the joint is ready, turn off the oven and allow it to rest for another 10 minutes in the cooking compartment.
en Tested for you in our cooking studio of meat, you should definitely use a lower temperature. If roasting several joints, use the weight of the heaviest piece as a basis for determining the cooking time. The individual pieces should be approximately equal in size. As a general rule: the larger a roasting joint is, the lower the cooking temperature and the longer the cooking time. Turn roasting joints and grilled items after approx. ^ to Z of the indicated time.
Tested for you in our cooking studio en Tips on roasting and braising The cooking compartment becomes very dirty. The roast is too dark and the crackling is burned in places, and/or the roast is too dry. The crackling is too thin. The roast looks good but the juices are burnt. The roast looks good but the juices are too clear and watery. The meat gets burned during braising. Prepare your food in an enclosed roasting dish with higher temperature or use the grill tray.
en Tested for you in our cooking studio As a general rule: the larger a fish, the lower the cooking temperature and the longer the cooking time. Turn any fish which is not in swimming position after approx. ^ to Z of the indicated time. Remove unused accessories from the cooking compartment. This will achieve the best possible cooking results and energy savings of up to 20 per cent. Note: Only use greaseproof paper that is suitable for the selected temperature. Always cut greaseproof paper to size.
Tested for you in our cooking studio en Dish Accessories Shelf posi- Type of tion heating Temperature in °C Cooking time in mins.
en Tested for you in our cooking studio Baking tins and cookware Dark- coloured metal baking tins are most suitable. These allow you to make energy savings of up to 35 per cent. Cookware made from stainless steel or aluminium reflects heat like a mirror. Non-reflective cookware made from enamel, heat-resistant glass or coated, diecast aluminium is more suitable. Tinplate baking tins, ceramic dishes or glass dishes prolong baking time, and the cake will not brown so evenly.
Tested for you in our cooking studio en Dish Accessories/cookware Shelf posi- Type of tion heating Temperature in °C Cooking time in mins. Fish Fish, braised, whole 300 g, e.g. trout Fish, braised, whole 1.5 kg, e.g.
en Tested for you in our cooking studio Dish Cookware Shelf posi- Heating tion function Searing time Temperain mins ture in °C Cooking time in mins 2 2 Š Š 6-8 4 90* 120* 45-60 45-60 2 Š 6-8 120* 110-130 Cookware, uncovered 2 Š 6-8 80* 130-180 Cookware, uncovered 2 Š 4-6 80* 45-70 Cookware, uncovered 2 Š 6-8 100* 150-180 Cookware, uncovered Cookware, uncovered Cookware, uncovered 2 2 2 Š Š Š 4-6 6-8 4 80* 80* 80* 90-120 120-180 30-60 Cookware, uncovered Cookware, unc
Tested for you in our cooking studio If you wish to dry additional foodstuffs, you should use similar foodstuffs in the table as a reference.
en Tested for you in our cooking studio Preserving Cookware Vegetables, e.g. cucumbers 1-litre preserving jars Shelf posi- Type of tion heating 1 ‚ Stone fruit, e.g. cherries, damsons 1-litre preserving jars 1 ‚ Pomes, e.g. apples, strawberries 1-litre preserving jars 1 ‚ Allowing the dough to prove at dough proving setting Yeast dough will prove considerably more quickly using the "Dough proving" heating type than at room temperature and does not dry out.
Tested for you in our cooking studio Leave the defrosted food to rest for another 10 to 30 minutes in the appliance whilst it is switched off, so that the temperature balances out. en Type of heating used: ■ ‚ CircoTherm Dish Accessories Shelf posi- Type of tion heating Temperature in °C Cooking time in mins.
en Tested for you in our cooking studio Dish Accessory Small cakes Baking tray Small cakes, 2 levels Universal pan + baking tray Small cakes, 3 levels Baking trays + universal pan Fatless sponge cake Springform cake tin, diameter 26 cm Fatless sponge cake Springform cake tin, diameter 26 cm Fatless sponge cake, 2 levels Springform cake tin, diameter 26 cm Apple pie 2 x black plate tins, diameter 20 cm Apple pie 2 x black plate tins, diameter 20 cm Apple pie, 2 levels 2 x black plate tins, diameter 20 cm
6
*9001126105* 9001126105 990612 en