
Installation Instructions

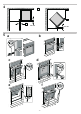
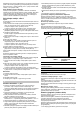

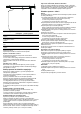

Table Of Contents
- Ò Ръководство за монтаж
- 3. Нивелирайте уреда централно (фиг. 5b).
- 6. Настройте височината на вратата на уреда с винтовете за регулиране вляво и вдясно (фиг. 5d).
- 3. Tsentreerige seade (jonis 5b).
- 6. Seadme ukse kõrgust reguleerige vajaduse korral vasakul ja paremal olevate reguleerimiskruvide abil (joonis 5d).
- 2. Sulgege ahju uks.Seadme ukse kõrgust reguleerige vasakult ja paremalt reguleerimiskruvidega.
- 3. Uređaj izravnajte (slika 5b).
- 6. Po potrebi visinu vrata uređaja namjestite pomoću vijaka za namještanje s lijeve i desne strane (slika 5d).
- 2. Zatvorite vrata uređaja. Visinu vrata uređaja namjestite pomoću vijaka za namještanje s lijeve i desne strane.
- 3. Prietaisą išlygiuokite centre (5b pav.).
- 6. Prireikus prietaiso durelių aukštį nustatykite kairėje ir dešinėje pusėse esančiais nustatymo varžtais (5d pav.).
- 2. Uždarykite prietaiso dureles. Prietaiso durelių aukštį nustatykite kairėje ir dešinėje pusėse esančiais nustatymo varžtais.
- 3. Novietojiet ierīci vidū (5.b attēls).
- 6. Ja nepieciešams, ierīces durvju augstumu var pielāgot ar regulēšanas skrūvēm labajā un kreisajā pusē (5.d attēls).
- 2. Aizveriet ierīces durvis.Ierīces durvju augstumu var pielāgot ar regulēšanas skrūvēm labajā un kreisajā pusē.
- 3. Aparat poravnajte na sredino (slika 5b).
- 6. Po potrebi nastavite višino vrat aparata z nastavitvenimi vijaki na levi in desni strani (slika 5d).
- 2. Zaprite vrata aparata. Višino vrat aparata nastavite z nastavitvenimi vijaki na levi in desni strani.