BUILT-IN OVEN [en] INSTRUCTION MANUAL B57VS22.
en Table of contents [ en] I NSTRUCTI ON MANUAL 8 Intended use . . . . . . . . . . . . . . . . . . . . . . . . . . . . . 4 ( Important safety information . . . . . . . . . . . . . . . 5 O Time-setting options . . . . . . . . . . . . . . . . . . . . . 20 General information . . . . . . . . . . . . . . . . . . . . . . . . . . . 5 Steam. . . . . . . . . . . . . . . . . . . . . . . . . . . . . . . . . . . . . . 6 Cleaning function . . . . . . . . . . . . . . . . . . . . . . . . . . . . .
en Intended use J Tested for you in our cooking studio. . . . . . . . 37 Silicone moulds . . . . . . . . . . . . . . . . . . . . . . . . Cakes and small baked items . . . . . . . . . . . . . Bread and rolls. . . . . . . . . . . . . . . . . . . . . . . . . Pizza, quiche and savoury cakes . . . . . . . . . . . Bakes and soufflés. . . . . . . . . . . . . . . . . . . . . . Poultry . . . . . . . . . . . . . . . . . . . . . . . . . . . . . . . Meat . . . . . . . . . . . . . . . . . . . . . . . . . . . . . . . .
Important safety information (Important safety information I mpor t ant saf et y i nf or mat i on General information : Warning – Risk of fire! Combustible items stored in the cooking compartment may catch fire. Never store combustible items in the cooking compartment. Never open the appliance door if there is smoke inside. Switch off the appliance and unplug it from the mains or switch off the circuit breaker in the fuse box. Risk of fire! ■ Loose food remnants, fat and meat juices may catch fire.
en Important safety information Steam : Warning – Risk of scalding! The water in the water tank may become very hot if you continue to operate the appliance. Empty the water tank after every operation with steam. Risk of steam scalding! ■ Hot is generated in the cooking compartment. Do not reach into the cooking compartment during any operation with steam. Risk of liquid scalding! ■ Hot may spill over the sides of the accessory when it is removed from the cooking compartment.
Causes of damage ]Causes of damage Causes of damge General information Caution! ■ Accessories, foil, greaseproof paper or ovenware on the cooking compartment floor: do not place accessories on the cooking compartment floor. Do not cover the cooking compartment floor with any sort of foil or greaseproof paper. Do not place ovenware on the cooking compartment floor if a temperature of over 50 ºC has been set. This will cause heat to accumulate.
en Environmental protection 7Environmental protection ■ Open the appliance door as infrequently as possible when the appliance is in use. Your new appliance is particularly energy-efficient. Here you can find tips on how to save even more energy when using the appliance, and how to dispose of your appliance properly. Envi r onment al pr ot ect i on Saving energy ■ ■ Only preheat the appliance if this is specified in the recipe or in the tables in the operating instructions.
Getting to know your appliance en Control panel *Getting to know your appliance You can set your appliance's various functions on the control panel. The current settings are shown in the display. In this section, we will explain the indicators and controls. You will also find out about the various functions of your appliance. Get i ng t o know your ap l i ance Note: Depending on the appliance model, individual details and colours may differ.
en Getting to know your appliance Note: You can also scroll through the settings values quickly by pressing and holding a button. As soon as you release the button, you stop scrolling through the values quickly. 4 Main menu Touch the 0 touch button to access the main menu.
Getting to know your appliance en « ‘ Keep warm * 60 - 100 °C For keeping cooked food warm. Top/bottom heating eco 50–275 °C ž CircoTherm eco 40–200 °C ¨ Reheat ** 80 - 180 °C For gently cooking selected types of food. Heat is emitted from above and below. This heating function is most effective between 150 and 250 °C. This type of heating is used to measure the energy consumption in the conventional mode. For gently cooking selected types of food on one level without preheating.
en Accessories _Accessories Your appliance is accompanied by a range of accessories. Here, you can find an overview of the accessories included and information on how to use them correctly. Ac es or i es Accessories included Your appliance is equipped with the following accessories: Wire rack For ovenware, cake tins and ovenproof dishes. For roasts, grilled items and frozen meals. Universal pan For moist cakes, pastries, frozen meals and large roasts.
Before using for the first time Optional accessories You can purchase optional accessories from the aftersales service and specialist retailers, or on the Internet. You will find a comprehensive range of products for your appliance in our brochures and on the Internet. Both availability and whether it is possible to order online differ between countries. Please see your sales documents for more details. Note: Not all optional accessories are suitable for every appliance.
en Before using for the first time Setting the time 1. 2. 3. 4. 5. 6. Use the & button to navigate to the bottom line. Use the ( or ) button to select the current hour. Use the & button to navigate to the next line. Use the ( or ) button to select the current minute. Press the % button repeatedly until "Time" appears. Use the ) button to select the next setting. Setting the date 1. 2. 3. 4. 5. 6. 7. 8. Use the & button to navigate to the bottom line. Use the ( or ) button to select the current day.
Operating the appliance 1Operating the appliance You have already learnt about the controls and how they work. Now we will explain how to set your appliance. You will learn about what happens when you switch the appliance on and off, and how to select the operating mode. en 4. Use the ( or ) button to select the temperature. &LUFR7KHUP Oper at i ng t he ap l i ance Switching the appliance on and off To switch the appliance on or off, touch the # touch button.
en Operating the appliance Changing or cancelling the appliance operation Changing the appliance operation 1. Use the # button to stop the operation. 2. Use the & or % button to navigate to the line for the setting that should be changed. 3. Use the ( or ) button to change the setting. 4. Use the # touch button to start the changed operation. Notes The cooling fan may continue to run while an operation is interrupted. ■ After a temperature change, the paused running time continues to count.
Steam `Steam With some heating modes, you can prepare food with steam assistance. In addition, the Dough proving and Reheat heating modes are available. St eam : Warning – Risk of scalding! When you open the appliance door, hot steam can escape. Steam may not be visible, depending on its temperature. When opening, do not stand too close to the appliance. Open the appliance door carefully. Keep children away.
en Steam Cancelling Press and hold the # touch button until the appliance operation is cancelled. Finishing Touch the # touch button to switch the appliance off. Reheating With the "Reheat ¨" heating mode, you can gently reheat food that has already been cooked or crisp up day-old baked goods. Steam is switched on automatically. Note: If the water tank runs dry during operation with the Reheat setting, operation is interrupted. Fill the water tank. Starting 1. 2. 3. 4. 5. 6. 7. 8.
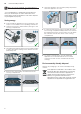
Steam 6. Insert the filled water tank (Fig. $). Ensure that the water tank locks into place behind both holders ‚ (Fig. %). D D 7. Slowly slide the control panel downwards and then push it towards the rear until it is closed completely. The water tank has been filled. You can start using operating modes with steam. Refilling the water tank Notes ■ Steam-assisted operations continue without adding steam.
en Time-setting options OTime-setting options Ti me- set i ng opt i ons Your appliance has different time-setting options. Time-setting option . Timer + Cooking time * Ready at Use The timer functions like an egg timer. The appliance does not switch on and off automatically. Once the set cooking time has elapsed, the appliance switches off automatically. The appliance switches on automatically, and once the set cooking time has elapsed and the end time has passed, it switches off automatically.
Childproof lock AChildproof lock Your appliance is equipped with a childproof lock so that children cannot switch it on accidentally or change any settings. Your appliance has two different locks. Chi l dpr o f l ock Lock Automatic childproof lock One-time childproof lock Activate/deactivate Via the MyProfile menu ~ "Basic settings" on page 22 Via the 0 touch button en One-time childproof lock The control panel is locked so that the appliance cannot be switched on.
en Basic settings QBasic settings There are various settings available to you in order to help use your appliance effectively and simply. If necessary, you can change these settings in MyProfile 4. Basi c set i ngs Changing MyProfile 1. 2. 3. 4. 5. 6. 7. 8. 9. Touch the # touch button. Touch the 0 touch button. Use the ( or ) button to select "MyProfile 4". Use the & button to navigate to the next line. Use the ( or ) button to select the setting. Use the & button to navigate to the selection.
Baking and roasting assistant nBaking and roasting assistant The baking and roasting assistant helps you to prepare meals with ease. The appliance applies the most suitable settings. To achieve good results, the cooking compartment must not be too hot for the type of food you have selected. If it is, a message will appear on the display. Allow the cooking compartment to cool down and start again.
en Programmes PProgrammes You can prepare food very easily using the various programmes. You select a programme and enter the weight of your food. The program then applies the most suitable settings. To achieve good results, the cooking compartment must not be too hot for the type of food you have selected. If it is, a message will appear on the display. Allow the cooking compartment to cool down and start again.
Sabbath mode Continue cooking 1. Use the & button to select "Continue cooking". 2. If necessary, use the ( or ) button to change the en FSabbath mode recommended setting. 3. Touch the # touch button to start "Continue cooking". You can set a time of up to 74 hours using Sabbath mode. The food in the cooking compartment remains warm, without you having to switch the appliance on or off. Cancelling Press and hold the # touch button until the appliance operation is cancelled.
en Cleaning agent DCleaning agent With good care and cleaning, your appliance will retain its appearance and remain fully functioning for a long time to come. We will explain here how you should correctly care for and clean your appliance. Door panels Cl eani ng agent Door handle Suitable cleaning agents To ensure that the different surfaces are not damaged by using the wrong cleaning agent, observe the information in the table.
Cleaning function Water tank Hot soapy water: Clean with a dish cloth and rinse thoroughly to remove residual detergent. Then dry with a soft cloth. Leave the water tank to dry with the lid open. Rub the seal on the lid until dry. Do not clean in the dishwasher. -------- Notes ■ Slight differences in colour on the front of the appliance are caused by the use of different materials, such as glass, plastic and metal.
Cleaning function en 7. Insert the rear end of the accessory support as far Preparation : Warning Risk of fire! ■ Loose food residues, grease and meat juices may catch fire during the cleaning function. Before starting the cleaning function, remove coarse dirt from the cooking compartment and from the accessories. ■ The appliance will become very hot on the outside during the cleaning function. Never hang combustible objects, e.g. tea towels, on the door handle.
Cleaning function Finishing As soon as self-cleaning has run through, a signal sounds. The appliance door cannot be opened until the 5 symbol goes out. Once the cleaning function has ended 1. Allow the cooking compartment to cool down. 2. Wipe off any ash that has been left behind in the cooking compartment and around the appliance door with a damp cloth. 3. If you have left an accessory inside the cooking compartment to be cleaned, remove it and wipe it down with a damp cloth. 4.
en Cleaning function The frequency with which the appliance must be descaled depends on the hardness of the water used. When only another five or fewer steam-assisted operations are possible, the appliance reminds you to descale it with a message on the display. The number of remaining operations is displayed after the appliance is switched on. You can therefore prepare for the descaling in good time.
Rails en qAppliance door pRails With good care and cleaning, your appliance will retain its appearance and remain fully functional for a long time to come. This will tell you how to remove the shelves and clean them. With good care and cleaning, your appliance will retain its appearance and remain fully functional for a long time to come. This will tell you how to remove the appliance door and clean it.
Appliance door en 2. Open the appliance door approx. 45° (fig. %). : Warning Risk of injury! The door handle may break off. Do not carry the appliance door by the door handle. To carry or remove the appliance door, take hold of it with both hands, one on the left and one on the right. 5. Take hold of the appliance door with both hands, one on the left and one on the right, and rotate the door handle upwards slightly ‚ until you are able to pull up the appliance door and remove it ƒ(fig.°*).
Appliance door 4. Open the appliance door slightly until you hear a quiet click. Close the appliance door. : Warning Risk of injury if the door locks are not closed! The appliance door may become detached. You may be injured and the appliance door damaged. After refitting the door, always close the left- and right-hand door locks. 5. Close the left- and right-hand door locks (fig. %).
Appliance door en 5. Push down on the intermediate panel around ƒ, slide Fitting Note: When fitting the door panels, make sure that they are in the original order. 1. Insert the intermediate panel so that the ‚ arrow on the right-hand side is pointing upwards (Fig. !). the holder „ in at an angle and push down until it clicks into place (Fig. &). The holder has been inserted (Fig. '). E 1 D F 2.
Trouble shooting 3Trouble shooting If a fault occurs, there is often a simple explanation. Before calling the after-sales service, please refer to the fault table and attempt to correct the fault yourself. Tr oubl e sho t i ng Tip: If a meal does not turn out exactly as you wanted, refer to the "Tested for you in our cooking studio" section.Here, you will find plenty of cooking tips and notes. : Warning – Risk of injury! Incorrect repairs are dangerous. Do not attempt to repair the appliance yourself.
en Trouble shooting The panel for removing the tank does The plug is not plugged into the mains not open Power cut The circuit breaker is faulty Faulty sensor for the ” touch button The appliance cannot be switched on; The automatic childproof lock is activated the 1 symbol is shown on the display The appliance cannot be operated The childproof lock is activated when it is switched on; the 1 symbol is shown on the display The appliance does not heat up; 6 is Demo mode is activated in the basic settings s
Customer service 4Customer service Our after-sales service is there for you if your appliance needs to be repaired. We will always find an appropriate solution, also in order to avoid after-sales personnel having to make unnecessary visits. Cust omer ser vi ce E number and FD number When calling us, please give the full product number (E no.) and the production number (FD no.) so that we can provide you with the correct advice.
en Tested for you in our cooking studio Shelf positions Use the indicated shelf positions. Baking on one level When baking on one level, use the following shelf positions: ■ Tall baked items: Level 2 ■ Flat baked items: Level 3 If you are using CircoTherm Hot air as the type of heating, you can choose between levels 1, 2, 3 and 4. Baking on several levels Use CircoTherm.
Tested for you in our cooking studio Dish Cakes in tins Sponge cake, simple Sponge cake, simple Sponge cake, simple, 2 levels Sponge cake, delicate Fruit flan made from sponge mixture, delicate Fruit flan made from sponge mixture, delicate Sponge flan base Sponge flan base Fruit tart or cheesecake with shortcrust pastry base Swiss flan Swiss flan Tart Tart Bundt yeast cake Bundt yeast cake Yeast cake Yeast cake Sponge base, 2 eggs Sponge base, 2 eggs Sponge flan, 3 eggs Sponge flan, 3 eggs Sponge flan, 6 e
en Tested for you in our cooking studio Dish Accessories/cookware Shelf posi- Heating tion function Temperature in °C Yeast cake with moist topping, 2 levels Plaited loaf, savarin Plaited loaf, savarin Swiss roll Swiss roll Stollen with 500 g flour Stollen with 500 g flour Strudel, sweet Strudel, sweet Strudel, frozen Strudel, frozen Universal pan + baking tray Baking tray Baking tray Baking tray Baking tray Baking tray Universal pan Universal pan Universal pan Universal pan Universal pan 3+1 2 2 3
Tested for you in our cooking studio Dish Accessories/cookware Macaroons, 2 levels Universal pan + baking tray Macaroons, 3 levels Baking trays + universal pan * Preheat ** Preheat for 5 mins., do not use quick heat function Shelf posi- Heating tion function Temperature in °C 3+1 4+3+1 90-110 90-110 ‚ ‚ en Steam in- Cooking tensity time in mins. 25-45 30-50 Tips on baking You want to find out whether the cake Push a cocktail stick into the highest point on the cake.
en Tested for you in our cooking studio If you are using CircoTherm Hot air as the type of heating, you can choose between levels 1, 2, 3 and 4. Baking on two levels Use CircoTherm. Baked items that are placed into the oven on trays or in baking tins/dishes at the same time will not necessarily be ready at the same time.
Tested for you in our cooking studio en Dish Accessories Shelf posi- Type of tion heating Temperature in °C White bread, 750 g Universal pan or cake tin 2 … Multigrain bread, 1.5 kg Universal pan or cake tin 2 … Multigrain bread, 1.
en Tested for you in our cooking studio Steam-assisted baking is only possible on one level. Shelf positions Use the indicated shelf positions. Baking on one level When baking on one level, use the following shelf positions: ■ Tall baked items: Level 2 ■ Flat baked items: Level 3 If you are using CircoTherm Hot air as the type of heating, you can choose between levels 1, 2, 3 and 4. Baking on several levels Use CircoTherm.
Tested for you in our cooking studio en Dish Accessories Shelf posi- Type of tion heating Temperature in °C Steam in- Cooking tensity time in mins.
en Tested for you in our cooking studio Recommended setting values In the table, you can find the ideal heating type for various bakes and soufflés. The temperature and cooking time are dependent on the quantity of food and the recipe. How well cooked a bake is will depend on the size of the cookware and the depth of the bake. Settings ranges are indicated for this reason. Try using the lower values at first. A lower temperature results in more even browning.
Tested for you in our cooking studio Observe the manufacturer's instructions for your roasting cookware. Uncovered cookware It is best to use a deep roasting tin/dish for roasting poultry. Place the tin/dish onto the wire rack. If you do not have any suitable cookware, use the universal pan. Covered cookware When cooking with covered cookware, the cooking compartment remains considerably cleaner. Ensure that the lid fits well and closes properly. Place the cookware onto the wire rack.
en Tested for you in our cooking studio Dish Accessories/cookware Shelf posi- Type of tion heating Temperature in °C Chicken, 1 kg Chicken breast fillet, 150 g each (grilling) Small chicken portions, 250 g each Small chicken portions, 250 g each Chicken goujons, nuggets, frozen Poulard, 1.5 kg Poulard, 1.5 kg Wire rack Wire rack 2 4 ‡ ˆ 190-210 275* Steam in- Cooking tensity time in mins.
Tested for you in our cooking studio Glass cookware is most suitable. Place hot glass cookware onto a dry mat after cooking. If the surface is damp or cold, the glass may crack. Add in a little liquid for roasting if the meat is lean. A covering of approx. ^ cm depth should be applied to the base of any glass cookware. The amount of liquid is dependent on the type of meat, the cookware material and also on whether or not a lid is used.
en Tested for you in our cooking studio Dish Accessories/cookware Shelf posi- Type of tion heating Temperature in °C Steam in- Cooking tensity time in mins.
Tested for you in our cooking studio Dish Accessories/cookware Meat dishes Meat loaf, 1 kg Cookware, uncovered Meat loaf, 1 kg Cookware, uncovered * Preheat ** Slide the universal pan in underneath at shelf position 2 *** Do not turn en Shelf posi- Type of tion heating Temperature in °C Steam in- Cooking tensity time in mins. 2 2 170-180 190-200 1 ‡ ‚ 60-70 70-80 Tips on roasting and braising The cooking compartment becomes very dirty.
en Tested for you in our cooking studio Very hot steam may escape when opening the lid after cooking. Lift the lid at the rear, so that the hot steam can escape away from you. Fish can also become crispy in a covered roasting dish. Here, use a roasting dish with a glass lid and set a higher temperature. Steam- assisted roasting Certain dishes become crispier if cooked using steam, and do not dry out as much. Use uncovered cookware. Cookware must be heat- and steam-resistant.
Tested for you in our cooking studio Vegetables and side dishes Here, you can find information for preparing grilled vegetables, potatoes and frozen potato products. Remove unused accessories from the cooking compartment. This will allow you to achieve ideal cooking results and save energy. Shelf positions Use the indicated shelf positions. Cooking on one level Adhere to the specifications in the table. Cooking on two levels Use CircoTherm.
en Tested for you in our cooking studio Type of heating used: ■ Œ Dough proving Dish Accessories Shelf position Yogurt Individual moulds Cooking compart- Œ ment floor Eco heating functions CircoTherm eco and Top/bottom heating eco are intelligent heating functions that allow you to gently cook meat, fish and baked items. The appliance optimally controls the supply of energy to the cooking compartment. The food is cooked in phases using residual heat.
Tested for you in our cooking studio en Dish Accessories/cookware Shelf posi- Type of tion heating Temperature in °C Cooking time in mins.
en Tested for you in our cooking studio Slow cook Slow cooking is a technique for cooking food over a long period at low temperatures. For this reason, it is also called "low-temperature cooking". Slow cooking is ideal for all prime cuts (e.g. tender portions of beef, veal, pork, lamb or poultry) which are to be cooked "à point". The meat will remain succulent and tender. The benefit of this cooking method is that it allows lots of scope for menu planning because slow-cooked meat is easy to keep warm.
Tested for you in our cooking studio Dish Cookware Lamb Saddle of lamb, boneless, 200 g each Cookware, uncovered Leg of lamb, boned, medium, 1 kg, tied Cookware, uncovered * Preheat en Shelf posi- Heating tion function Searing time Temperain mins ture in °C Cooking time in mins 2 2 4 6-8 30-45 120-180 Š Š 80* 95* Tips for slow cooking Slow-cooking duck breast. Place the cold duck breast into a pan and fry the skin side first. After slow cooking, grill for 3 to 5 minutes until crispy.
en Tested for you in our cooking studio Preserving jars must not touch one another in the cooking compartment during the preserving process. jars are bubbling. Remove the jars from the cooking compartment after the indicated cooling time. Vegetables After a short while, small bubbles will form at short intervals. As soon as all preserving jars are bubbling, reduce the temperature to 120 °C and allow the jars to continue to bubble in the closed cooking compartment as indicated in the table.
Tested for you in our cooking studio en Dish Accessories/cookware Shelf posi- Type of tion heating Step Dough proving Cooking time in mins. Yeast dough, sweet E.g.
en Tested for you in our cooking studio Dish Accessories Shelf posi- Type of tion heating Temperature in °C Cooking time in mins. Cake Cake, moist Cake, dry Baking tray Baking tray 2 2 50 60 70-90 60-75 Reheating Using heating type "Reheating", food is reheated gently using steam. It tastes and looks as though it has been freshly prepared. Even baked items from the day before can be re-crisped. Use containers which are as flat, wide and heatresistant as possible.
Tested for you in our cooking studio Test dishes These tables have been produced for test institutes to facilitate appliance testing. As per EN 60350-1. Baking Baked items that are placed into the oven on trays or in baking tins/dishes at the same time will not necessarily be ready at the same time. en Cakes in tinplate springform cake tins: bake on one level with top/bottom heating. Place the springform cake tin onto the universal pan instead of onto the wire rack.
en Tested for you in our cooking studio Grilling Also slide in the universal pan. The liquid will be caught and the cooking compartment stays cleaner. Dish Grilling Toasting bread* Beefburger, 12 pieces** * Do not preheat ** Turn after 2/3 of the total time 62 Type of heating used: ■ ˆ Full-surface grill Accessories Shelf posi- Type of tion heating Temperature in °C Cooking time in mins.
6
*9001331669* 9001331669 990715 en