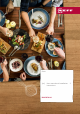
Oven [en] User manual and installation instructions B6ACH7A.
en Safety Table of contents USER MANUAL 1 Safety .................................................................... 2 2 Preventing material damage ............................... 4 3 Environmental protection and saving energy ....................................................................... 5 4 Familiarising yourself with your appliance ........ 6 5 Accessories.......................................................... 8 6 Before using for the first time ...........................
Safety Opening the appliance door creates a draught. Greaseproof paper may come into contact with the heating element and catch fire. ▶ Never place greaseproof paper loosely over accessories when preheating the appliance and while cooking. ▶ Always cut greaseproof paper to size and use a plate or baking tin to hold it down. WARNING ‒ Risk of burns! The appliance and its parts that can be touched become hot during use. ▶ Caution should be exercised here in order to avoid touching heating elements.
en Preventing material damage Children may breathe in or swallow small parts, causing them to suffocate. ▶ Keep small parts away from children. ▶ Do not let children play with small parts. 1.5 Halogen bulb WARNING ‒ Risk of burns! The bulbs in the cooking compartment get very hot. There is still a risk of burning for some time after they have been switched off. ▶ Do not touch the glass cover. ▶ Avoid contact with your skin when cleaning.
Environmental protection and saving energy Leaving the appliance to cool down with the door open will damage the front of neighbouring kitchen units over time. ▶ Always allow the cooking compartment to cool down with the door closed after cooking at high temperatures. ▶ Take care not to trap anything in the appliance door. ▶ Only leave the cooking compartment to dry with the door open if a lot of moisture was produced during operation.
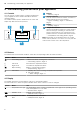
en Familiarising yourself with your appliance 4 Familiarising yourself with your appliance 4.1 Controls 1 You can use the control panel to configure all functions of your appliance and to obtain information about the operating status. On certain models, specific details such as colour and shape may differ from those pictured. 2 3 2 3 4 4 Buttons → "Buttons", Page 6 Function selector You can turn the function selector clockwise or anti-clockwise from the zero setting.
Familiarising yourself with your appliance Symbol Name Door lock Temperature display en Use Appliance door is locked → "Childproof lock", Page 12 → "Pyrolytic self-cleaning ", Page 16 Appliance is heating → "Temperature display", Page 8 4.4 Types of heating Here you can find an overview of the types of heating. You can find recommendations on using the types of heating. Use the function selector to set the types of heating.
en Accessories 4.6 Temperature and setting levels 4.7 Cooking compartment There are different settings for the types of heating and functions. The settings appear in the display. The temperature can be set in 1 degree increments up to 100 °C, and in 5 degree increments thereafter. Note: For temperature settings above 275 °C for the Grill type of heating, the appliance reduces the temperature to approx. 250 °C after approx. 20 minutes.
Accessories Accessories Wire rack Use ¡ Cake tins ¡ Ovenproof dishes ¡ Cookware ¡ Meat, e.g. roasting joints or steak ¡ Frozen meals ¡ Moist cakes ¡ Baked items ¡ Bread ¡ Large roasts ¡ Frozen meals ¡ Catching dripping liquids, e.g. fat when grilling food on the wire rack. Universal pan 5.1 Locking function The locking function prevents the accessories from tilting when they are pulled out. You can pull out the accessories approximately halfway without them tipping.
en Before using for the first time 6 Before using for the first time Configure the settings for initial start-up. Clean the appliance and accessories. 6.2 Cleaning the appliance before using it for the first time 6.1 Initial use Clean the cooking compartment and accessories before using the appliance to prepare food for the first time. 1. Remove any accessories and leftover packaging, such as polystyrene pellets, from the cooking compartment. 2.
Time-setting options en 8 Time-setting options Your appliance has different time-setting options, with which you can control its operation. 8.1 Overview of the time-setting options With the tions. button, select the different time-setting op- Time-setting option Timer Cooking time End time Time Use The timer can be set independently of the appliance when it is in operation. It does not affect the appliance.
en Childproof lock Requirements ¡ The type of heating and temperature or setting are set. ¡ A cooking time is set. 1. Press the button repeatedly until is highlighted in the display. 2. Press the or button. a The display shows the calculated end time. 3. Use the or button to delay the end time. a After a few seconds, the appliance applies the setting and the display shows the set end time.
Rapid heating en 10 Rapid heating To save time, rapid heating can shorten the preheating time for set temperatures over 100 °C. Rapid heating is possible for the following types of heating: ¡ CircoTherm hot air ¡ Bread baking setting ¡ Top/bottom heating 10.1 Setting rapid heating To ensure an even cooking result, do not place the food in the cooking compartment until rapid heating has come to an end. Note: Do not set a cooking time until rapid heating has come to an end. 1.
en Cleaning and servicing Display 1 2 Basic setting Button tone when pressing a button Brightness of the display illumination Time display Childproof lock can be adjusted → "Childproof lock", Page 12 Interior lighting during operation Cooling fan run-on time Telescopic shelves retrofitted2 Sabbath mode available → "Sabbath mode", Page 13 Automatic rapid heating from 200 °C2 Reset all values to factor
Cleaning and servicing en Suitable cleaning agents Only use cleaning products that are suitable for the different surfaces on your appliance. Follow the instructions on cleaning the appliance. → "Cleaning the appliance", Page 16 Appliance front Surface Stainless steel Plastic or painted surfaces E.g.
en Cleaning functions 13.2 Cleaning the appliance In order to avoid damaging the appliance, you must clean your appliance only as specified, and with suitable cleaning products. WARNING ‒ Risk of burns! The appliance and its parts that can be touched become hot during use. ▶ Caution should be exercised here in order to avoid touching heating elements. ▶ Young children under 8 years of age must be kept away from the appliance. WARNING ‒ Risk of fire! Loose food remnants, fat and meat juices may catch fire.
Cleaning functions 1. Use the function selector to set the cleaning a 2. a 3. functions . The symbol and the cleaning functions appear in the display. The first cleaning function is highlighted. Press the or button repeatedly until the symbol is highlighted. appears in the display. Use the temperature selector to set the cleaning setting. Cleaning setting 1 2 3 a a a 4. 5. Cleaning level Low Medium High Duration in hours Approx. 1:15 Approx. 1:30 Approx.
en Shelf supports 6. Lower the appliance door and leave it open for ap- prox. one hour to allow the surfaces in the cooking compartment to dry thoroughly. ‒ To dry the cooking compartment quickly, heat up the appliance for approx. five minutes at CircoTherm hot air and 50 °C while the door is open. 15 Shelf supports To clean the rails and the cooking compartment, or to replace the rails, you can remove these. 15.
Appliance door 2. Hold the screwdriver horizontally and use it to push the door lock (black component) on each side of the door upwards as far as it will go . en 4. Insert the coin in the gap in the lock and rotate as far as it will go . ‒ Turn the lock on the left-hand side in a clockwise direction. ‒ Turn the lock on the right-hand side in an anticlockwise direction. Door lock open Left-hand lock secured The arrows point to each other Door lock closed Left-hand lock released 3.
en Appliance door 6. WARNING ‒ Risk of injury! The appliance door has a weight of 7–10 kg and may fall if it is not handled carefully. ▶ Handle the appliance door carefully. 3. Use a coin to release both locks on the appliance door. Insert the coin in the gap in the lock and rotate as far as it will go . ‒ Turn the lock on the left-hand side in an anticlockwise direction. ‒ Turn the lock on the right-hand side in a clockwise direction.
Appliance door 2. Undo and remove the left- and right-hand screws on 7. Remove the spacers the appliance door. and seals en for cleaning, if required. 3. Carefully lift the inner pane upwards at an angle and remove the holder . 4. Carefully lift the inner pane upwards at an angle and remove it in the direction of the arrow . 8. WARNING ‒ Risk of injury! Scratched glass in the appliance door may develop into a crack.
en Appliance door 2. Check the fit of the four spacers and two seals. ‒ ‒ Place the spacers on the centre of the lines Secure the seals at the corners . 5. Push down on the intermediate pane around . 3. Insert the intermediate pane with spacers and seals , slide the retainer in at an angle and push down until it clicks into place. a The retainer has been inserted. in the direction of the arrow . The arrow on the intermediate pane must line up with the arrow on the frame . 4.
Troubleshooting 8. Insert the inner pane with the holder into the opening. en 9. Screw both screws back in on the left and right of the appliance door. 17 Troubleshooting You can rectify minor faults on your appliance yourself. Read the troubleshooting information before contacting after-sales service. This will avoid unnecessary costs. WARNING ‒ Risk of injury! Improper repairs are dangerous. ▶ Repairs to the appliance should only be carried out by trained specialist staff.
en Disposal Fault flashes in the display and the appliance does not start. appears in the display. A message with appears in the display, e.g. - . Cause and troubleshooting The cooking compartment is too hot for the selected operation. 1. Switch off the appliance and allow it to cool down. 2. Restart the operation. The maximum cooking time has been reached.
Customer Service en This appliance is labelled in accordance with European Directive 2012/19/EU concerning used electrical and electronic appliances (waste electrical and electronic equipment - WEEE). The guideline determines the framework for the return and recycling of used appliances as applicable throughout the EU. 19 Customer Service If you have any queries on use, are unable to rectify faults on the appliance yourself or if your appliance needs to be repaired, contact Customer Service.
en How it works 20.3 Notes on roasting and grilling The setting values are based on the assumption that unstuffed, chilled, ready-to-roast poultry, meat or fish is placed into a cold cooking compartment. ¡ The larger the poultry, meat or fish, the lower the cooking temperature and the longer the cooking time. ¡ Turn the poultry, meat or fish after approx. 1/2 to 2/3 of the time listed. ¡ Add a little liquid to the poultry in the cookware. Cover the bottom of the cookware with approx. 1– 2 cm of liquid.
How it works Food Accessories/cookware Scones Baking sheet on wire rack Baking sheet on wire rack 12-cup tin Baking sheet on wire rack 12-cup tin Baking tray Round pizza tray 4 pcs Ø 20 cm cake tin Baking sheet on wire rack Cookware without lid Cookware without lid Cookware without lid Biscuits Small cakes Pavlova Yorkshire pudding Pizza, home-made Pizza, home-made, thin base Victoria sponge cake, 2 levels Biscuits, 2 or 3 levels Beef, top side/top rump Lamb leg (on the bone) Pork belly Chicken, whole
en How it works Recommended settings for yoghurt Food Accessories/cookware Shelf position Yoghurt Individual moulds Type of heating Cooking compartment floor 20.6 Test dishes These overviews have been produced for test institutes to facilitate appliance testing in accordance with EN 60350-1. Baking Observe this information when baking test dishes. General information ¡ The settings apply to food that is placed into a cold cooking compartment. ¡ Observe the notes about preheating in the tables.
Installation instructions Food Accessories/cookware Shelf pos- Type of ition heating Hot water sponge cake Springform cake tin, 2 diameter 26 cm Hot water sponge cake, 2 levels Springform cake tin, 3+1 diameter 26 cm 1 Preheat the appliance for five minutes. Do not use the rapid heating function. 2 Preheat the appliance. Do not use the rapid heating function.
en Installation instructions WARNING ‒ Risk of fire! It is dangerous to use an extended power cord and non-approved adapters. ▶ Do not use multiple socket strips. ▶ Only use extension cables that are certified, have a minimum cross section of 1.5 mm² and comply with the applicable national safety requirements. ▶ If the power cord is too short, contact customer service. ▶ Only use adapters approved by the manufacturer. ATTENTION! Carrying the appliance by the door handle could break it.
Installation instructions Hob type Full-surface induction hob Gas hob Electric hob a raised in mm 47 30 27 21.5 Installation in a tall unit Observe the installation dimensions and the installation instructions when installing in a tall unit. ¡ To ventilate the appliance, the intermediate floors must have a ventilation cut-out. ¡ If the tall unit has another back panel in addition to the element back panels, this must be removed.
en Installation instructions ¡ The power cable must be plugged in at the rear of the appliance until you hear a clicking sound. A 3 m power cable can be obtained from the after-sales service. ¡ The power cable must only be replaced with a cable from the original manufacturer. This is available from after-sales service. ¡ Contact protection must be guaranteed by the installation. 1.
Installation instructions 6. If required, you can adjust the height of the appli- ance door using the adjustment screws on the left and right. Turning the screws clockwise makes the gap smaller Turning the screws anti-clockwise makes the gap larger 7. Screw the appliance into place. en 9. Open the appliance door slightly, then refit the pan- els and screw them in place, first at the top and then at the bottom.
*9001629159* BSH Hausgeräte GmbH Carl-Wery-Straße 34 81739 München, GERMANY 9001629159 020217 en