Oven [en] User manual and installation instructions C17MR02G0
en Safety Futher information and explanations are available online: Table of contents USER MANUAL 1 Safety .................................................................... 2 2 Preventing material damage ............................... 6 3 Environmental protection and saving energy ....................................................................... 7 4 Familiarising yourself with your appliance ........ 7 5 Accessories........................................................
Safety 1.4 Safe use Always place accessories in the cooking compartment the right way round. → "Accessories", Page 10 WARNING ‒ Risk of fire! Combustible objects that are left in the cooking compartment may catch fire. ▶ Never store combustible objects in the cooking compartment. ▶ If smoke is emitted, the appliance must be switched off or the plug must be pulled out and the door must be held closed in order to stifle any flames. Loose food remnants, fat and meat juices may catch fire.
en Safety ▶ Never pull on the power cord to unplug the appliance. Always unplug the appliance at the mains. ▶ If the appliance or the power cord is damaged, immediately unplug the power cord or switch off the fuse in the fuse box. ▶ Call customer services. → Page 24 WARNING ‒ Danger: Magnetism! Permanent magnets are used in the control panel or in the controls. These may affect electronic implants, e.g. heart pacemakers or insulin pumps.
Safety switch on an additional heating element to heat the cooking compartment. ▶ Never touch the inside surfaces of the cooking compartment or the heating elements while they are hot. ▶ Keep children at a safe distance. Using the appliance for anything other than its intended purpose is dangerous. This is because, for instance, overheated slippers, pillows filled with grain or cereal, sponges and damp cleaning cloths, etc., may cause burns to the skin. ▶ Never dry food or clothing with the appliance.
en Preventing material damage 2 Preventing material damage 2.1 General ATTENTION! Objects on the cooking compartment floor at over 50 °C will cause heat to build up. The baking and roasting times will no longer be correct and the enamel will be damaged. ▶ Do not place any accessories, greaseproof paper or foil of any kind on the cooking compartment floor. ▶ Only place cookware on the cooking compartment floor if a temperature above 50 °C has been set.
Environmental protection and saving energy en 3 Environmental protection and saving energy 3.1 Disposing of packaging When baking multiple dishes, do so in succession or in parallel. ¡ The cooking compartment is heated after baking the first dish. This reduces the baking time for the second cake. If the cooking time is relatively long, you can switch the appliance off 10 minutes before the cooking time ends. ¡ There will be enough residual heat to finish cooking the dish.
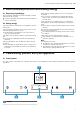
en Familiarising yourself with your appliance 2 Buttons 3 Control element 4.2 Buttons The buttons are touch-sensitive areas. To select a function, press the corresponding button.
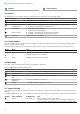
Familiarising yourself with your appliance Symbol Type of heating Circo-roasting Temperature 50 - 250 °C Grill, large area 50 - 290 °C Grill, small area 50 - 290 °C Preheat cookware 30 - 70 °C Hot air eco 40 - 200 °C Dry appliance 150 ºC en Use Roast poultry, whole fish or larger pieces of meat. The grill element and the fan switch on and off alternately. The fan circulates the hot air around the food. For grilling flat items such as steaks, sausages or bread, and for cooking au gratin.
en Accessories 5 Accessories Use original accessories. These have been made especially for your appliance. Note: Accessories may become deformed if they get hot. Deformation has no effect on function. As the accessory cools down, it will regain its original shape. Accessories Wire rack Universal pan 5.1 Information on accessories Some accessories are only suitable for certain types of heating. Microwave accessories The wire rack that is supplied is only suitable for operation solely using the microwave.
Before using for the first time en 6 Before using for the first time Configure the settings for initial start-up. Clean the appliance and accessories. 5. Use the button to select the next setting. 6.1 Initial use 1. 2. 3. 4. When the appliance is connected to the power supply for the first time or following a lengthy power failure, the settings that you will need to configure before you can use it will appear. Note: You can change these settings at any time by going to the basic settings.
en Time-setting options 7.8 Cancelling operation 7.9 Viewing the current temperature Note: Some functions, e.g. cleaning functions, cannot be cancelled. ▶ Press and hold the button until the function that is currently in progress is cancelled. a Operation will stop and all the settings will be reset. a The cooling fan will continue to run until the cooking compartment has cooled down. You can view the current temperature while the appliance is heating up. ▶ Press .
Microwave time (duration) and specify when you want your food to be ready. You can only use the delayed start function in conjunction with a heating function. Setting the Ready at time for delayed starts Notes ¡ Do not leave food that spoils easily in the cooking compartment for too long. ¡ You cannot use the delayed start function with every heating function. 1. Place the food into the cooking compartment and close the appliance door. 2. Set a heating function and a temperature. 3. Press . 4.
en Microwave Cookware and acInformation cessories Metal cookware and Metal can be used with Microbakeware Combi. Note: Metal must be kept at least 2 cm from the cooking compartment walls and the inside of the door. Accessories supThe supplied accessory is suitplied: able for MicroCombi. No ¡ Wire rack sparks are created. ¡ Universal pan Testing cookware for microwave suitability If you are unsure whether your cookware is suitable for use in the microwave, carry out a cookware test.
Microwave Drying the cooking compartment with the Dry appliance function The "Dry appliance function" heats up the cooking compartment so that the moisture in the cooking compartment evaporates. You will then need to open the appliance door to allow the steam to escape. WARNING ‒ Risk of burns! The appliance becomes hot during operation. ▶ Allow the appliance to cool down before cleaning.
en Microwave programmes 10 Microwave programmes The microwave programmes help you to use your appliance to prepare different dishes by selecting the optimum settings automatically. This significantly reduces the cooking time. ¡ Chicken portions ¡ Meat loaf made from fresh mince ¡ Baked potatoes, whole 10.3 Setting the microwave programme 10.1 Cookware The cooking result depends on the composition of the meat and the size of cookware.
Rapid heating en 4. Use the or button to select "Automatic childproof 5. 6. 7. 8. a lock". Use the button to select the required settings. Use the button to set the lock to "Activated". Press . Use the button to save your settings. When you switch off the appliance, will appear on the display. 11.3 Interrupting the automatic childproof lock 1. Press and hold the button until "Childproof lock deactivated" appears on the display. 2. Press to switch the appliance on and then start it up. 11.
en Cleaning and servicing Basic setting Operation after switch-on Night-time dimming Warning: Baking tray in MW Brand logo Dry microwave Fan run-on time Factory settings Selection ¡ Main menu ¡ Types of heating ¡ Microwave ¡ Microwave combination ¡ Microwave programs ¡ Switched off ¡ On (display dimmed between 10 p.m. and 5.59 a.m.) ¡ Indicators/symbols ¡ Do not display ¡ Indicators/symbols ¡ Do not display ¡ On ¡ Off ¡ Recommended ¡ Minimum Load 13.2 Changing basic settings 1. 2. 3. 4. 5. 6. 7. 8. 9.
Cleaning and servicing en Appliance front Surface Stainless steel Plastic or painted surfaces E.g. control panel Suitable cleaning agents ¡ Hot soapy water ¡ Special stainless steel cleaning products suitable for hot surfaces ¡ Hot soapy water Information To prevent corrosion, remove any limescale, grease, starch or albumin (e.g. egg white) stains on stainless steel fronts immediately. Apply a thin layer of the stainless steel cleaning product with a soft cloth.
en Rails 14.2 Cleaning the appliance In order to avoid damaging the appliance, you must clean your appliance only as specified, and with suitable cleaning products. WARNING ‒ Risk of burns! The appliance and its parts that can be touched become hot during use. ▶ Caution should be exercised here in order to avoid touching heating elements. ▶ Young children under 8 years of age must be kept away from the appliance. WARNING ‒ Risk of fire! Loose food remnants, fat and meat juices may catch fire.
Appliance door 3. Hook the rear retainers with the hook into the top hole and push them into the bottom hole . en ¡ The rails fit both the left- and right-hand sides. 1. Set the rear rail at an angle, hooking it into the re- tainers at the top and bottom 2. Pull the rail forwards . 3. Hook in the rail at the front . and press it down . 15.3 Attaching the rails Notes ¡ When hanging the rails, ensure that the sloping edge is at the top of the rail.
en Troubleshooting 6. WARNING ‒ Risk of serious harm to health! If the screws are undone, the safety of the appliance can no longer be guaranteed. Microwave energy may escape. ▶ Never undo the screws. Never unscrew the four black screws on the frame. 2. Push the front pane to the appliance until the left- and right-hand hook is opposite the support . 3. Push the front pane in at the bottom 16.3 Fitting the door panes until you hear it click into place. 4.
Troubleshooting en Fault The appliance is not working. Cause and troubleshooting There has been a power cut. ▶ Check whether the lighting in your kitchen or other appliances are working. "Language English" There has been a power cut. appears on the dis▶ Configure the initial configuration settings. play. → "Initial use", Page 11 "-H-" or "-h-" appears Cooking compartment too hot for operating mode. on the display. 1. Wait until the appliance has cooled down. 2. Start the operating mode again.
en Disposal Fault The cooking result is not satisfactory. Cause and troubleshooting Settings were unsuitable. Setting values, e.g. temperature or cooking time, depend on the recipe, quantity and food. ▶ Next time, set lower or higher values. Tip: A lot of information about the food preparation and corresponding setting values can be found on our website www.neff-international.com. 18 Disposal Find out here how to dispose of old appliances correctly. 18.
How it works en ¡ If you are cooking bakes directly in the universal pan, place the universal pan into the cooking compartment at level 1. ¡ The setting values for bread dough apply to both dough placed on a baking tray and dough placed in a loaf tin. General information about roasting in cookware ¡ Use heat-resistant, ovenproof cookware. ¡ Place the cookware on the wire rack. ¡ Glass cookware is best. ¡ Follow the manufacturer's instructions for your roasting dishes.
en How it works ¡ Use salt and seasoning sparingly. When cooking food using the microwave mode, most of the food's natural flavour will be retained. ¡ Turn or stir the food 2-3 times during cooking. ¡ After cooking, leave the food to rest for 2-3 minutes. Cooking, braising or steaming using the microwave mode ¡ Use microwave-safe cookware with a lid. Alternatively, you can use a plate or special microwaveable film to cover the dish. ¡ For cereal products, e.g. rice, use deep cookware with a lid.
How it works Food Bread, without a tin, 1500 g Accessory/cookware Shelf pos- Heating ition function → Page 8 1 Universal pan or Loaf tin Flatbread Universal pan 1 Bread rolls, fresh Baking tray 1 Pizza, fresh Baking tray 1 Pizza, fresh, on 2 levels Universal pan 3+1 + Baking tray Pizza, fresh, thin-crust, on Pizza tray 1 a pizza tray Quiche Tart dish or tin 1 , Black tray Tarte flambée Universal pan 1 Bake, savoury, cooked Ovenproof dish 1 ingredients Bake, savoury, cooked Ovenproof dish 1 ingredients
en How it works Food Accessory/cookware Shelf pos- Heating ition function → Page 8 1 Peeled boiled potatoes, Covered cookware quartered, 500 g Long-grain rice, 250 g,+ Covered cookware 1 500 ml water Millet, whole, 250 g, + Covered cookware 1 600 ml water Polenta or maize semoCovered cookware 1 lina, 125 g, + 500 ml water 1 Preheat the appliance. 2 Turn the dish 2/3 of the way through the cooking time. 3 Stir the food one or two times during cooking.
How it works 20.8 Special cooking methods and other applications Information and recommended settings for special cooking methods and other applications, e.g. slow cooking or preserving. Defrosting You can defrost frozen food in your appliance. Tips for defrosting food ¡ You can use the "microwave" mode to defrost frozen fruit, vegetables, poultry, meat, fish or baked goods. ¡ Remove frozen food from its packaging before you defrost it. en ¡ Use heat-resistant, microwave-safe cookware.
en How it works surface. Even if the container only vibrates a little, the hot liquid may suddenly boil over and spatter. ▶ Always place a spoon in the container when heating liquids. This will prevent delayed boiling. ATTENTION! Metal touching the wall of the cooking compartment will cause sparks, which may damage the appliance or the inner door pane. ▶ Metal (e.g. a spoon in a glass) must be kept at least 2 cm from the cooking compartment walls and the inside of the door.
Installation instructions en Recommended settings for baking Food Accessory/cookware Shelf posi- Heating tion function → Page 8 Viennese whirls Baking tray 1 Small cakes Baking tray 1 Small cakes, 2 levels Universal pan 3+1 + Baking tray Hot water sponge cake Springform cake tin, 1 diameter 26 cm 1 Preheat the appliance for five minutes. Do not use the rapid heating function. 2 Preheat the appliance. Do not use the rapid heating function.
en Installation instructions 21.1 General installation instructions Follow these instructions before you start with the installation of the appliance. ¡ The installation cabinet must not have a back panel behind the appliance. There should be a gap of at least 35 mm between the wall and the cabinet base as well as the rear panel of the cabinet situated above. ¡ Ventilation slots and intake openings must not be covered.
Installation instructions en 21.2 Appliance dimensions 21.3 Installation below a worktop You will find the dimensions of the appliance here Observe the installation dimensions and the installation instructions when installing below a worktop. ¡ To ventilate the appliance, the intermediate floor must have a ventilation cut-out. ¡ The worktop must be secured to the built-in unit. ¡ Observe any available installation instructions for the hob. 21.
en Installation instructions 21.5 Installation in a tall unit Observe the installation dimensions and the installation instructions when installing in a tall unit. ¡ To ensure that the appliance door can be opened, you must take the minimum dimensions into consideration when installing in a corner. The dimension is dependent on the thickness of the unit front and the handle. 21.7 Electrical connection ¡ To ventilate the appliance, the intermediate floors must have a ventilation cut-out.
Installation instructions 21.8 Installing the appliance Note: Do not use a cordless screwdriver to secure the panels. This may damage the panels. 1. Push the appliance in fully. Do not kink or trap the connection cable, or route it over sharp edges. 2. Centre the appliance. There must be an air gap of at least 4 mm between the appliance and adjacent unit fronts. 3. Open the appliance door and unscrew the left and right-hand panels. en 6.
Valid within Great Britain: Imported to Great Britain by BSH Home Appliances Ltd.