BUILT-IN OVEN [en] INSTRUCTION MANUAL C17MR02.
en Table of contents [ en] I NSTRUCTI ON MANUAL 8 Intended use . . . . . . . . . . . . . . . . . . . . . . . . . . . . . 4 ( Important safety information . . . . . . . . . . . . . . . 5 General information . . . . . . . . . . . . . . . . . . . . . . . . . . . 5 Microwave . . . . . . . . . . . . . . . . . . . . . . . . . . . . . . . . . . 6 ] Causes of damage . . . . . . . . . . . . . . . . . . . . . . . . 7 General information . . . . . . . . . . . . . . . . . . . . . . . . . . . 7 Microwave . . . . . .
en Intended use Additional information on products, accessories, replacement parts and services can be found at www.neff-international.com and in the online shop www.neff-eshop.com 4 8Intended use Read these instructions carefully. Only then will you be able to operate your appliance safely and correctly. Retain the instruction manual and installation instructions for future use or for subsequent owners. This appliance is only intended to be fully fitted in a kitchen.
Important safety information (Important safety information I mpor t ant saf et y i nf or mat i on General information : Warning – Risk of fire! Combustible items stored in the cooking compartment may catch fire. Never store combustible items in the cooking compartment. Never open the appliance door if there is smoke inside. Switch off the appliance and unplug it from the mains or switch off the circuit breaker in the fuse box. Risk of fire! ■ Loose food remnants, fat and meat juices may catch fire.
en Important safety information Microwave : Warning – Risk of fire! Using the appliance for anything other than its intended purpose is dangerous and may cause damage. The following is not permitted: drying out food or clothing, heating slippers, grain or cereal pillows, sponges, damp cleaning cloths or similar. For example, heated slippers and grain or cereal pillows may catch fire, even several hours after they have been heated.The appliance must only be used for the preparation of food and drinks.
Causes of damage ■ If using the appliance in microwave mode only, placing cookware and containers made of metal or featuring metal detailing inside the appliance may cause sparks when the appliance is operating. This may damage the appliance. Never use metal containers when using the appliance in microwave mode only. ■ ■ : Warning – Risk of electric shock! The appliance is a high-voltage appliance. Never remove the casing.
en ■ Environmental protection Operating the microwave without food: Operating the appliance without food in the cooking compartment may lead to overloading. Never switch on the microwave unless there is food inside. The short crockery test is the exception to this rule. ~ "Microwave" on page 16 Microwave popcorn: Never set the microwave output too high. Use a maximum microwave output of 600 watts. Always place the popcorn bag on a glass plate. The door panels may crack if overloaded.
Getting to know your appliance Environmentally-friendly disposal en *Getting to know your appliance Dispose of packaging in an environmentally-friendly manner. This appliance is labelled in accordance with European Directive 2012/19/EU concerning used electrical and electronic appliances (waste electrical and electronic equipment WEEE). The guideline determines the framework for the return and recycling of used appliances as applicable throughout the EU.
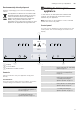
en Getting to know your appliance ShiftControl control element Use the ShiftControl control element to navigate through the lines on the display and select the settings. Settings that you can change have left and right arrows '.
Accessories Interior lighting When you open the appliance door, the interior lighting switches on. If the door remains open for longer than around 15 minutes, the lighting switches off again. In most operating modes, the interior lighting will switch on as soon as the appliance is started. Once the program is complete, the lighting switches off. Note: You can set the interior lighting to not come on during the operation in the basic settings.
en Before using for the first time Example in the picture: universal pan KBefore using for the first time D E Optional accessories You can purchase optional accessories from the aftersales service and specialist retailers, or on the Internet. You will find a comprehensive range of products for your appliance in our brochures and on the Internet. Both availability and whether it is possible to order online differ between countries. Please see your sales documents for more details.
Operating the appliance 4. Use the # touch button to switch on the appliance. 5. Set the specified type of heating and temperature, then start the appliance operation. ~ "Setting and starting the appliance operation" on page 13 Settings Type of heating Circo-roasting ‡ Temperature 250 °C Cooking time 1 hour 6. Keep the kitchen ventilated while the appliance is heating up. 7. Use the # touch button to switch off the appliance after the indicated cooking time. 8.
en Time-setting options Displaying the current temperature To show the current temperature on the display, press the ! touch button. 4. Once the set temperature has been reached, the "Rapid heating" function switches off automatically. The ° symbol disappears from the display. Place the food in the cooking compartment. The current temperature is shown briefly only when heating up. Further information If the ! touch button lights up, information can be displayed. Touch the ! touch button to do this.
Childproof lock Note: As soon as the set time has elapsed, a signal sounds. To cancel the signal tone, touch the 0 touch button. en 3. If necessary, change the setting using the ( or ) button. Set "00:00" to delete a time function. The setting is applied automatically. Setting the cooking time Once the set cooking time has elapsed, the appliance switches off automatically. The function can only be used in combination with a type of heating. 1. Touch the # touch button. 2.
en Microwave 8. Use the ( or ) button to select "Deactivated". 9. Touch the 0 touch button. 10. Use the & button to navigate to the next line to save the setting. The "Automatic childproof lock" is deactivated. 11. Touch the ± touch button. One-time childproof lock The control panel is locked so that the appliance cannot be switched on. To switch it on, the one-time childproof lock must be deactivated. After the appliance is switched off, the control panel is no longer locked.
Microwave Setting the microwave To achieve optimum results with the microwave, always insert the wire rack at shelf position 1. Note: If you use the microwave function very regularly, you can change the "Operation after switch-on" option in the microwave's basic settings. 1. Touch the 2. 3. 4. 5. 6. 7. 8. # touch button to switch on the appliance. Touch the 0 touch button. The main menu appears. Use the ( or ) button to select "Microwave •". Use the & button to open the microwave menu.
en Basic settings 5. Use the ( or ) touch button to set the required combination operation. 6. Use the & button to navigate to the next line. Set the desired temperature using the ( or ) button. 7. Use the & button to navigate to the next line. Use the ( or ) button to set the required cooking time. 8. Touch the # touch button. The appliance starts the operation. The cooking time counts down on the display. You can change the temperature and cooking time at any time.
Cleaning agent Setting favourites You can set which types of heating are shown in the "Types of heating" menu. Note: The "Hot air", "Circo-roasting" and "Grill, large area" types of heating are always shown in the "Types of heating" menu. They cannot be deactivated. Touch the # touch button. Touch the 0 touch button. Use the ( or ) button to select "" Basic settings". Use the & button to navigate to the next line. Use the ( or ) button to select "Favourites". Use the & button to navigate to the next line.
en Rails Glass cover for the interior lighting Door seal Do not remove. Door cover Stainless steel interior door frame Rails Pull-out system Accessories Hot soapy water: Clean with a dish cloth and then dry with a soft cloth. If the cooking compartment is heavily soiled, use oven cleaner. Hot soapy water: Clean with a dish cloth. Do not scour. made from stainless steel: Use stainless steel cleaner. Follow the manufacturers' instructions. Do not use stainless steel care products.
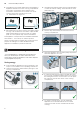
Appliance door Inserting the holders If the holders fall out when you remove the rails, these must be re-inserted. en 3. Then fold it forwards and insert it (fig. #) 4. and push it downwards (fig. $). 1. The holders at the front differ from those at the rear (fig. !). 2. Use the hook to mount the front holder at the top into the round hole ‚, set it at a slight incline, attach it at the bottom, and straighten it ƒ (fig. ").
Appliance door en Removing and fitting the door panels To facilitate cleaning, you can remove the glass panels from the appliance door. : Warning Risk of injury! ■ Scratched glass in the appliance door may develop into a crack. Do not use a glass scraper, sharp or abrasive cleaning aids or detergents. ■ The hinges on the appliance door move when opening and closing the door, and you may be trapped. Keep your hands away from the hinges. ■ Components inside the appliance door may have sharp edges.
Trouble shooting en 3Trouble shooting mains or switch off the circuit breaker in the fuse box. Contact the after-sales service. Tr oubl e sho t i ng If a fault occurs, there is often a simple explanation. Before calling the after-sales service, please refer to the fault table and attempt to correct the fault yourself. : Warning – Risk of injury! Tip: If a meal does not turn out exactly as you wanted, refer to the "Tested for you in our cooking studio" section.
en Customer service Cooking compartment bulbs To light the interior of your cooking compartment, your appliance has one or more long-life LED bulbs. However, if ever an LED bulb or the bulb's glass cover is defective, call the after-sales service. The lamp cover must not be removed. 4Customer service Our after-sales service is there for you if your appliance needs to be repaired. We will always find an appropriate solution, also in order to avoid after-sales personnel having to make unnecessary visits.
Tested for you in our cooking studio en Selecting a dish Cancelling The following table shows the corresponding setting values for the listed dishes. Press and hold the # touch button until the appliance operation is cancelled.
en Tested for you in our cooking studio In combined operation, you can use conventional baking tins made from metal. If sparks form between the baking tin and the wire rack, check whether the baking tin is clean on the outside. Change the position of the baking tin on the wire rack. If this does not help, continue baking without the microwave. The baking time will be extended.
Tested for you in our cooking studio Dish Accessories/cookware en Shelf posi- Heating tion function Temperature in °C Fruit flan made from sponge mixture, Ring/springform cake tin delicate Sponge flan base Flan base tin 1 ‚ 170-190 MW power in Cooking watts time in mins.
en Tested for you in our cooking studio Dish Accessories/cookware Shelf posi- Heating tion function Temperature in °C MW power in Cooking watts time in mins.
Tested for you in our cooking studio Bread and rolls Your appliance offers you a range of heating types for baking bread and rolls. You can find the ideal settings for many dishes in the settings tables. Also refer to the notes in the section on allowing dough to rise. Only use original accessories supplied with your appliance. These have been tailored to the cooking compartment and the operating modes of your appliance. Shelf positions Use the indicated shelf positions.
en Tested for you in our cooking studio Types of heating used: ■ ‚ Hot air ■ ‡ Circo-roasting ■ ■ ˆ Full-surface grill ‰ Centre-area grill Dish Accessories Shelf posi- Heating tion function Temperature in °C Cooking time in mins. Bread White bread, 750 g Universal pan or cake tin 1 ‚ Multigrain bread, 1.
Tested for you in our cooking studio ■ ■ Universal pan: Level 3 Baking tray: Level 1 Baking tins/dishes on the wire rack First wire rack: Level 3 Second wire rack: Level 1 By preparing several dishes at the same time, you can make energy savings of up to 45 per cent. Position baking tins/dishes next to one another or offset and vertically stacked in the cooking compartment. Accessories Ensure that you always use suitable accessories and that they are placed in the oven the right way around.
en Tested for you in our cooking studio Dish Accessories Shelf posi- Type of tion heating Savoury cakes and quiches Savoury cakes in a tin Springform cake tin, diameter 28 cm 1 Quiche Flan-base cake tin, black 1 Tarte flambée Universal pan 1 Pierogi Ovenproof dish 1 Empanada de atún Universal pan 1 Börek Universal pan 1 ‚ ‚ ‚ ‚ ‚ ‚ Temperature in °C MW power in Cooking watts time in mins.
Tested for you in our cooking studio Types of heating used: ■ ‚ Hot air ■ en ‡ Circo-roasting Dish Accessories/cookware Shelf posi- Type of tion heating Temperature in °C Bake, savoury, cooked ingredients Ovenproof dish 1 170-190 Bake, savoury, cooked ingredients Ovenproof dish 1 140-160 360 20-30 Bake, sweet Ovenproof dish 1 160-180 - 40-50 Bake, sweet Ovenproof dish 1 140-160 360 25-35 Lasagne, fresh, 1 kg Ovenproof dish 1 160-180 - 50-60 Lasagne, fresh, 1 kg Ovenproof
en Tested for you in our cooking studio the slanted edge facing the appliance door. Any dripping fat will be caught. When grilling, try wherever possible to use pieces of food which are of a similar thickness and weight. This will allow them to brown evenly and remain succulent and juicy. Place the food to be grilled directly onto the wire rack. Use tongs to turn the pieces of food you are grilling. If you pierce the meat with a fork, the juices will run out and it will become dry.
Tested for you in our cooking studio en Dish Accessories/cookware Shelf posi- Type of tion heating Temperature in °C Duck breast, 300 g each Wire rack 2 230-250 Goose, 3 kg Cookware, uncovered 1 160-170 - 120-150 Goose, 3 kg Cookware, uncovered 1 170-190 180 80-90 Goose legs, 350 g each Wire rack 2 210-230 - 40-50 Goose legs, 350 g each Universal pan 1 ‡ ‡ ‡ ‡ ‡ MW power in Cooking watts time in mins. 25-30 170-190 180 30-40 Turkey Small turkey, 2.
en Tested for you in our cooking studio The steam evaporates in the cookware when roasting. Carefully pour in more liquid if required. Meat can also become crispy in a covered roasting dish. To do so, use a roasting dish with a glass lid and set a higher temperature. Roasting in combination with a microwave Certain foodstuffs can be prepared in combination with a microwave. The cooking time is considerably reduced by doing so.
Tested for you in our cooking studio en Dish Accessories/cookware Shelf posi- Type of tion heating Temperature in °C Joint of pork with rind, e.g. shoulder, 2 kg Pork tenderloin steak, 1.5 kg Cookware, uncovered 1 ‡ 190-200 MW power in Cooking watts time in mins. 130-140 Cookware, uncovered 1 220-230 - 70-80 Pork tenderloin steak, 1.
en Tested for you in our cooking studio The roast looks good but the juices are burnt. The roast looks good but the juices are too clear and watery. The meat gets burned during braising. The roast is not well-done enough. Next time, use a smaller roasting dish and add more liquid if necessary. Next time, use a larger roasting dish and add less liquid if necessary. The roasting dish and lid must fit together well and close properly. Reduce the temperature and add more liquid when braising if necessary.
Tested for you in our cooking studio cooking several fish, you should use the weight of the heaviest fish as a reference for determining the cooking time. The individual fish should be approximately the same size. As a general rule: the larger a fish, the lower the cooking temperature and the longer the cooking time. Turn any fish which is not in swimming position after approx. ^ to Z of the indicated time. Note: Only use greaseproof paper that is suitable for the selected temperature.
en Tested for you in our cooking studio Vegetables and side dishes Here, you can find information for preparing grilled vegetables, potatoes and frozen potato products. Remove unused accessories from the cooking compartment. This will allow you to achieve ideal cooking results and save energy. Preparing food in combination with a microwave If you wish to cook in combination with a microwave, you should always use enclosed cookware which is suitable for use in microwaves.
Tested for you in our cooking studio en Dish Accessories/cookware Shelf posi- Type of tion heating Temperature in °C MW power in Cooking watts time in mins.
Tested for you in our cooking studio en 4. Place the cups or jars onto the cooking and spices according to taste. Cover the container and use the settings indicated in the table. Stir two to three times during the cooking time. compartment floor and use the settings indicated in the table. 5. After making the yoghurt, leave it to cool in the refrigerator. Microwave popcorn Use flat, heat-resistant glass cookware, e.g. the lid of an ovenproof dish. Do not use porcelain or heavily curved plates.
Tested for you in our cooking studio downwards. Always place ovenware, tins and dishes on the wire rack. Universal pan or baking tray Slide the universal pan or the baking tray in carefully as far as the limit stop with the bevelled edge facing the appliance door. Baking tins and cookware Dark- coloured metal baking tins are most suitable. These allow you to make energy savings of up to 35 per cent. Cookware made from stainless steel or aluminium reflects heat like a mirror.
en Tested for you in our cooking studio Tips for keeping acrylamide to a minimum Biscuits With top/bottom heating at max. 190 °C. With hot air at max. 170 °C. Egg or egg yolk reduces the production of acrylamide. Oven chips Spread out a single layer evenly on the baking tray. Cook at least 400 g at once on a baking tray so that the chips do not dry out. Drying ■ You can achieve outstanding drying results with Hot air. With this type of preserving, flavourings are concentrated by the dehydration.
Tested for you in our cooking studio en Wipe the rims of the jars, as they must be clean. Place a damp rubber ring and a lid on each jar. Seal the jars with clamps. Place the jars into the universal pan so that they do not touch each other. Pour 500 ml hot water (approx. 80 °C) into the universal pan. Use the settings indicated in the table. After preserving, remove the jars from the cooking compartment and place them onto a clean cloth.
en Tested for you in our cooking studio Type of heating used: Dish ■ • Microwave Accessories/cookware Shelf posi- Type of tion heating Temperature MW power in in °C watts Cooking time in mins. Bread, bread rolls Bread, 500 g Cookware, uncovered 1 • Bread rolls Wire rack 1 ‚ 140-160 180 90 90 3 10-15 2-4 Cake Cake, moist, 500 g Cookware, uncovered 1 • Cake, dry, 750 g Cookware, uncovered 1 • - 180 90 90 2 10-15 10-15 Meat and poultry Chicken, whole, 1.
Tested for you in our cooking studio en Heating food in a microwave Using the microwave, you can heat food, or defrost and heat it in a single step. Take ready-to-eat meals out of the packaging. The food will heat up more quickly and evenly in cookware that is suitable for microwaves. The various components of a dish may require different times to heat up. Food which lies flat will cook more quickly than food which is piled high. Arrange the food as flat as possible in the cookware for this reason.
en Tested for you in our cooking studio Dish Cookware Shelf posi- Type of tion heating Temperature MW power in Cooking in °C watts time in mins. 600 5-10 Bakes, 400 g, e.g. lasagne, potato gratin Cookware, uncovered 1 • Dishes, frozen Plated meal, 1 portion Cookware, covered 1 - 600 11-15 Soup, stew, 200 ml (stir well) Cookware, covered 1 - 600 4-6 - 600 7-10 180-200 180 20-25 Side dishes, 500 g, e.g. pasta, dumplings, pota- Cookware, covered toes, rice Bakes, 400 g, e.g.
Tested for you in our cooking studio Preparing food with a microwave When preparing food in a microwave, always use heatresistant cookware that is suitable for microwave use. Observe the notes on cookware suitable for microwaves. ~ "Microwave" on page 16 When you place your cookware onto the wire rack, slide the wire rack in with the embossed "microwave" facing the appliance door, and the curved lip pointing downwards.
6
*9001574297* 9001574297 000708 en