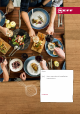
Oven [en] User manual and installation instructions C17MS22G0
en Safety Table of contents USER MANUAL 1 Safety .................................................................... 2 2 Preventing material damage ............................... 6 3 Environmental protection and saving energy ....................................................................... 7 4 Familiarising yourself with your appliance ........ 8 5 Accessories........................................................ 11 6 Before using for the first time ...........................
Safety 1.4 Safe use Always place accessories in the cooking compartment the right way round. → "Accessories", Page 11 WARNING ‒ Risk of fire! Combustible objects that are left in the cooking compartment may catch fire. ▶ Never store combustible objects in the cooking compartment. ▶ If smoke is emitted, the appliance must be switched off or the plug must be pulled out and the door must be held closed in order to stifle any flames. Loose food remnants, fat and meat juices may catch fire.
en Safety ▶ Never operate an appliance with a cracked or fractured surface. ▶ Never pull on the power cord to unplug the appliance. Always unplug the appliance at the mains. ▶ If the appliance or the power cord is damaged, immediately unplug the power cord or switch off the fuse in the fuse box. ▶ Call customer services. → Page 30 WARNING ‒ Danger: Magnetism! Permanent magnets are used in the control panel or in the controls. These may affect electronic implants, e.g. heart pacemakers or insulin pumps.
Safety The accessible parts of the appliance become hot during operation. ▶ Never touch these hot parts. ▶ Keep children at a safe distance. At the highest settings in microwave only mode, the drying function will automatically switch on an additional heating element to heat the cooking compartment. ▶ Never touch the inside surfaces of the cooking compartment or the heating elements while they are hot. ▶ Keep children at a safe distance.
en Preventing material damage 2 Preventing material damage 2.1 General ATTENTION! Objects on the cooking compartment floor at over 50 °C will cause heat to build up. The baking and roasting times will no longer be correct and the enamel will be damaged. ▶ Do not place any accessories, greaseproof paper or foil of any kind on the cooking compartment floor. ▶ Only place cookware on the cooking compartment floor if a temperature above 50 °C has been set.
Environmental protection and saving energy en 3 Environmental protection and saving energy 3.1 Disposing of packaging The packaging materials are environmentally compatible and can be recycled. ▶ Sort the individual components by type and dispose of them separately. 3.2 Saving energy If you follow these instructions, your appliance will use less power. Only preheat the appliance if the recipe or the recommended settings tell you to do so.
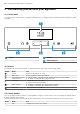
en Familiarising yourself with your appliance 4 Familiarising yourself with your appliance 4.1 Control panel You can use the control panel to configure all functions of your appliance and to obtain information about the operating status. 1 2 1 Display 3 2 2 3 Buttons Control element 4.2 Buttons The buttons are touch-sensitive areas. To select a function, press the corresponding button.
Familiarising yourself with your appliance Button Name Right Use Navigate to the right on the display Up Navigate upwards on the display Down Navigate downwards on the display en 4.4 Main menu The main menu provides an overview of your appliance's functions. Press the button to open the main menu.
en Familiarising yourself with your appliance Symbol Type of heating Slow cooking Temperature 70 - 120 °C Dough proving 35 - 55 °C Preheat cookware 30 - 70 °C Top/bottom heating eco 50 - 275 °C Hot air eco 40 - 200 °C Use For gentle, slow cooking of seared, tender pieces of meat in cookware without a lid. The heat is emitted evenly from above and below at a low temperature. For proving dough and culturing yoghurt. Dough will prove more quickly than at room temperature.
Accessories Appliance door If you open the appliance door during operation, the operation stops. When you close the appliance door, the operation continues automatically. en In microwave mode, when you close the appliance door, you have to press to continue. 5 Accessories Use original accessories. These have been made especially for your appliance. Note: Accessories may become deformed if they get hot. Deformation has no effect on function. As the accessory cools down, it will regain its original shape.
en Before using for the first time 6 Before using for the first time Configure the settings for initial start-up. Clean the appliance and accessories. 3. Use the or button to select the language. 4. Use the button to navigate back to the top row. 5. Use the button to select the next setting. 6.
Time-setting options 4. Use the or button to select the required temperat- ure. 5. Press en a The cooling fan will continue to run until the cooking compartment has cooled down. to start. 7.9 Viewing the current temperature 7.7 Pausing operation 7.8 Cancelling operation You can view the current temperature while the appliance is heating up. ▶ Press . a The temperature will be displayed for a few seconds. Note: Some functions, e.g. cleaning functions, cannot be cancelled. 7.
en Microwave 8.4 Delayed start/"Ready at" time With this function, the appliance automatically switches itself on, and then switches itself off at the preselected end time. To enable it to do this, you set the cooking time (duration) and specify when you want your food to be ready. You can only use the delayed start function in conjunction with a heating function. Setting the Ready at time for delayed starts Notes ¡ Do not leave food that spoils easily in the cooking compartment for too long.
Microwave Cookware and acInformation cessories Metal cookware and Metal can be used with Microbakeware Combi. Note: Metal must be kept at least 2 cm from the cooking compartment walls and the inside of the door. Accessories supThe supplied accessory is suitplied: able for MicroCombi. No ¡ Wire rack sparks are created. ¡ Universal pan Testing cookware for microwave suitability If you are unsure whether your cookware is suitable for use in the microwave, carry out a cookware test.
en Microwave Drying the cooking compartment with the Dry function The "Dry" function heats up the cooking compartment so that the moisture in the cooking compartment evaporates. You will then need to open the appliance door to allow the steam to escape. WARNING ‒ Risk of burns! The appliance becomes hot during operation. ▶ Allow the appliance to cool down before cleaning.
Microwave programmes en 10 Microwave programmes The microwave programmes help you to use your appliance to prepare different dishes by selecting the optimum settings automatically. This significantly reduces the cooking time. 10.1 Cookware The cooking result depends on the composition of the meat and the size of cookware. You should therefore use heat-resistant cookware that is suitable for temperatures up to 300 °C. Glass or glass ceramic cookware is best. The joint should cover approx.
en Childproof lock ¡ Goose, whole (3-4 kg) 10. Use the button to navigate back to the recommen- 11.2 Configuring the baking and roasting assistant Note: Use fresh and, ideally, chilled food. Use frozen food straight from the freezer. Requirement: The cooking compartment must have cooled down. 1. Press to switch the appliance on. 2. Press . 3. Use the or button to select the "Baking and roasting assistant" . 4. Use the button to navigate to the next row. 5.
Rapid heating en one-time childproof lock. After you have switched off the appliance, the control panel will no longer be disabled. Note: When you activate the automatic childproof lock, the appliance will immediately disable the control panel. The and buttons will not be disabled. ▶ Press and hold the button until "Childproof lock activated" appears on the display. 12.6 Deactivating the one-time childproof lock ▶ Press and hold the button until "Childproof lock deactivated" appears on the display.
en Home Connect Basic setting Audible signal Selection ¡ Short duration ¡ Medium duration ¡ Long duration Button tone ¡ Off (except for ) ¡ On Display brightness 5 settings Clock display ¡ Digital ¡ Off Lighting ¡ On during operation ¡ Off during operation Auto resume ¡ When you close the door ¡ No auto resume Automatic childproof ¡ Deactivated lock ¡ Activated Operation after ¡ Main menu switch-on ¡ Types of heating ¡ Microwave ¡ Microwave combination ¡ Baking and roasting assistant ¡ Microwave programs
Home Connect en 2. Open the Home Connect app and scan the follow- 16.1 Setting up Home Connect Requirements ¡ The appliance is connected to the power supply and is switched on. ¡ You have a smartphone or tablet with a current version of the iOS or Android operating system. ¡ The smartphone and the appliance are within range of your home network's Wi-Fi signal. 1. Download the Home Connect app. ing QR code. 3. Follow the instructions in the Home Connect app. 16.
en Cleaning and servicing 16.4 Software update 16.6 Data protection Your appliance's software can be updated using the software update function, e.g. for the purposes of optimisation, troubleshooting or security updates. To do this, you must be a registered Home Connect user, have installed the app on your mobile device and be connected to the Home Connect server.
Cleaning and servicing ▶ Remove all food remnants from the cooking com- partment and the appliance door before you next heat up the appliance. en New sponge cloths contain residues from production. ▶ Wash new sponge cloths thoroughly before use. Suitable cleaning agents Only use cleaning agents that are suitable for the different surfaces on your appliance. Follow the instructions on cleaning the appliance.
en Cleaning functions Area Rails Accessories Suitable cleaning agents Information ¡ Hot soapy water Soak any heavily soiled areas and use a brush or steel wool. Note: To clean thoroughly, detach the rails. → "Rails", Page 26 ¡ Hot soapy water Soak any heavily soiled areas and use a brush or steel wool. Enamelled accessories are dishwasher-safe. ¡ Oven cleaner 17.
Cleaning functions Requirements ¡ Prepare the appliance for the cleaning function. → Page 24 ¡ Do not open the appliance door while the appliance is in operation, as this will abort the cleaning function. 1. Press to switch the appliance on. 2. Press . 3. Use the or button to set "EcoClean" . 4. Use the button to navigate to the next row. a The duration of the cleaning function will appear on the display. 5. Use the button to navigate to the next row. 6.
en Rails 19 Rails To thoroughly clean the rails and the cooking compartment, or to replace the rails, you can remove the rails. 2. Hook the front retainers in at the bottom and straighten them . 19.1 Detaching the rails WARNING ‒ Risk of burns! The shelf supports get very hot ▶ Never touch the shelf supports when hot. ▶ Always allow the appliance to cool down. ▶ Keep children at a safe distance. 1. Lift the rail forwards slightly and detach it . 2.
Appliance door en 20 Appliance door To clean the appliance door thoroughly, you can disassemble the appliance door. 20.1 Removing the door cover The stainless steel inlay in the door cover may discolour. Remove the door cover in order to clean it and the stainless steel inlay, or to remove the door panes. 1. Open the appliance door slightly. 2. Press down on the left- and right-hand sides of the door cover. 3. Remove the door cover and carefully close the appliance door. 6.
en Troubleshooting 6. Put the door cover in position and push down on it until you hear it click into place. 7. Close the appliance door. Note: Do not use the cooking compartment again until the door panes have been correctly fitted. 21 Troubleshooting You can rectify minor faults on your appliance yourself. Read the troubleshooting information before contacting after-sales service. This will avoid unnecessary costs. WARNING ‒ Risk of injury! Improper repairs are dangerous.
Disposal en Fault Time not displayed when appliance switched off. Cause and troubleshooting Basic setting has been changed. ▶ Change the basic setting for the clock display. → "Basic settings", Page 19 HomeConnect is not working cor- Different causes are possible. rectly. ▶ Go to www.home-connect.com. During simple microwave opera- The drying function is switched on. tion, the cooking compartment becomes hot. The interior lighting does not The LED light is defective. work.
en Customer Service 23 Customer Service If you have any queries on use, are unable to rectify faults on the appliance yourself or if your appliance needs to be repaired, contact Customer Service. Detailed information on the warranty period and terms of warranty in your country is available from our aftersales service, your retailer or on our website. If you contact Customer Service, you will require the product number (E-Nr.) and the production number (FD) of your appliance.
How it works ¡ Add up to ½ litre of water to the universal pan, depending on the size and type of food that you want to roast. You can make a sauce from the juices that are collected. This also means that less smoke is produced and the cooking compartment does not become as dirty. Roasting in cookware If you cover the cookware when you cook your food, this will keep the cooking compartment cleaner. General information about roasting in cookware ¡ Use heat-resistant, ovenproof cookware.
en How it works 24.7 List of foods Recommended settings for a variety of foods, sorted into food categories.
How it works Food Accessory/cookware Shelf pos- Heating Temperature in ition function °C → Page 9 1 210 - 230 Pizza, fresh, thin-crust, on Pizza tray a pizza tray Quiche Tart dish or tin 1 , Black tray Quiche Tart dish or tin 1 , Black tray Tarte flambée Universal pan 1 Bake, savoury, cooked Ovenproof dish 1 ingredients Bake, savoury, cooked Ovenproof dish 1 ingredients Lasagne, frozen, 400 g Uncovered cook1 ware Potato gratin, raw inOvenproof dish 1 gredients, 4 cm deep Potato gratin, raw inOvenproof d
en How it works Food Accessory/cookware Shelf pos- Heating Temperature in ition function °C → Page 9 2 250 Fish, grilled, whole, Wire rack 300 g, e.g.
How it works Food Accessory/cookware Fruit compote, 500 g Covered cookware Microwave popcorn, 1 x Uncovered cook100 g bag 2 ware 1 Stir the food one or two times during cooking. 2 Place the sealed bag on the cookware. Shelf pos- Heating ition function → Page 9 1 1 Temperature in °C - Microwave power setting in W 600 600 en Cooking time in mins 9 - 12 4-6 Requirement: The cooking compartment must be cold. 1. Use fresh, clean, hygienic meat without bones. 2.
en How it works Recommended settings for defrosting Food Accessory/cookware Bread, 500 g Uncovered ware Uncovered ware Wire rack Wire rack Uncovered ware Uncovered ware Uncovered ware Bread, 500 g Bread rolls Bread rolls Cakes, moist, 500 g Cakes, dry, 750 g Meat, whole, e.g. joint, raw meat, 1 kg Minced meat, mixed, 500 g Chicken, whole, 1.
How it works en Recommended settings for warming up food using the microwave mode Food Accessory/cookware Shelf pos- Heating Temperature in ition function °C → Page 9 1 - Microwave power setting in W 1000 Cooking time in mins 1-31 Drinks, warming up, 200 ml Baby food, heating up, e.g. baby bottle, 150 ml Vegetables, chilled, 250 g Side dishes, e.g. pasta, dumplings, potatoes, rice Chilled Soup, stew, 400 ml Chilled Plated meal, 1 portion Chilled Bakes, 400 g, e.g.
en How it works Recommended settings for baking Food Accessory/cookware Shelf posi- Heating tion function → Page 9 Viennese whirls Baking tray 1 Viennese whirls Baking tray 1 Small cakes Baking tray 1 Small cakes Baking tray 1 Small cakes Baking tray 1 Small cakes, 2 levels Universal pan 3+1 + Baking tray Hot water sponge cake Springform cake tin, 1 diameter 26 cm Hot water sponge cake Springform cake tin, 1 diameter 26 cm 1 Preheat the appliance for five minutes.
Installation instructions en Recommended settings for cooking in combination with the microwave mode Food Potato gratin Accessory/cookware Shelf pos- Heating Temperature in ition function °C → Page 9 1 150 - 170 Uncovered cookware Cakes Uncovered cook1 ware Chicken Uncovered cook1 ware 1 Turn the dish 2/3 of the way through the cooking time.
en Installation instructions WARNING ‒ Risk of fire! It is dangerous to use an extended power cord and non-approved adapters. ▶ Do not use extension cables or multiple socket strips. ▶ If the power cord is too short, contact Customer Service. ▶ Only use adapters approved by the manufacturer. ATTENTION! Carrying the appliance by the door handle could break it. The door handle cannot support the weight of the appliance. ▶ Do not carry or hold the appliance by the door handle. 25.
Installation instructions Hob type Gas hob Electric hob a raised in mm 32 32 a flush in mm 43 35 en b in mm 5 2 25.5 Installation in a tall unit 25.6 Corner installation Observe the installation dimensions and the installation instructions when installing in a tall unit. Observe the installation dimensions and the installation instructions when installing in a corner. ¡ To ventilate the appliance, the intermediate floors must have a ventilation cut-out.
en Installation instructions Electrically connecting an appliance without a protective contact plug 5. Screw the appliance into place. Note: Only a licensed professional may connect the appliance. Damage caused by incorrect connection is not covered under the warranty. An all-pole isolating switch must be integrated into the permanent electrical installation according to the installation regulations. 1. Identify the phase and neutral conductors in the socket.
Valid within Great Britain: Imported to Great Britain by BSH Home Appliances Ltd.