BUILT-IN OVEN [en] INSTRUCTION MANUAL C17MS22.
en Table of contents [ en] I NSTRUCTI ON MANUAL 8 Intended use . . . . . . . . . . . . . . . . . . . . . . . . . . . . . 4 ( Important safety information . . . . . . . . . . . . . . . 5 General information . . . . . . . . . . . . . . . . . . . . . . . . . . . 5 Microwave . . . . . . . . . . . . . . . . . . . . . . . . . . . . . . . . . . 6 ] Causes of damage . . . . . . . . . . . . . . . . . . . . . . . . 8 General information . . . . . . . . . . . . . . . . . . . . . . . . . . . 8 Microwave . . . . . .
en Intended use J Tested for you in our cooking studio. . . . . . . . 31 Silicone moulds . . . . . . . . . . . . . . . . . . . . . . . . . . . . . 31 Cakes and small baked items . . . . . . . . . . . . . . . . . . 31 Bread and rolls. . . . . . . . . . . . . . . . . . . . . . . . . . . . . . 35 Pizza, quiche and savoury cakes . . . . . . . . . . . . . . . . 37 Bakes and soufflés. . . . . . . . . . . . . . . . . . . . . . . . . . . 38 Poultry . . . . . . . . . . . . . . . . . . . . . . . . . . . . . . . . .
Important safety information (Important safety information I mpor t ant saf et y i nf or mat i on General information : Warning – Risk of fire! Combustible items stored in the cooking compartment may catch fire. Never store combustible items in the cooking compartment. Never open the appliance door if there is smoke inside. Switch off the appliance and unplug it from the mains or switch off the circuit breaker in the fuse box. Risk of fire! ■ Loose food remnants, fat and meat juices may catch fire.
en Important safety information Microwave : Warning – Risk of burns! : Warning – Risk of fire! ■ Using the appliance for anything other than its intended purpose is dangerous and may cause damage. The following is not permitted: drying out food or clothing, heating slippers, grain or cereal pillows, sponges, damp cleaning cloths or similar. For example, heated slippers and grain or cereal pillows may catch fire, even several hours after they have been heated.
Important safety information : Warning – Risk of scalding! ■ There is a possibility of delayed boiling when a liquid is heated. This means that the liquid reaches boiling temperature without the usual steam bubbles rising to the surface. Even if the container only vibrates a little, the hot liquid may suddenly boil over and spatter. When heating, always place a spoon in the container. This will prevent delayed boiling.
en Causes of damage ]Causes of damage Causes of damge General information Caution! ■ Accessories, foil, greaseproof paper or ovenware on the cooking compartment floor: do not place accessories on the cooking compartment floor. Do not cover the cooking compartment floor with any sort of foil or greaseproof paper. Do not place ovenware on the cooking compartment floor if a temperature of over 50 ºC has been set. This will cause heat to accumulate.
Environmental protection 7Environmental protection ■ en Open the appliance door as infrequently as possible when the appliance is in use. Your new appliance is particularly energy-efficient. Here you can find tips on how to save even more energy when using the appliance, and how to dispose of your appliance properly. Envi r onment al pr ot ect i on Saving energy ■ ■ Only preheat the appliance if this is specified in the recipe or in the tables in the operating instructions.
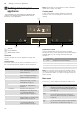
en Getting to know your appliance Note: Depending on the appliance model, individual details and colours may differ. *Getting to know your appliance Control panel In this chapter, we will explain the indicators and controls. You will also find out about the various functions of your appliance. In the control panel, set the appliance's different functions. The current settings are shown on the display.
Getting to know your appliance £ ± 4 Baking and roasting assistant Recommended settings for baking and roasting ~ "Baking and roasting assistant" on page 29 Microwave programmes You can use these to prepare food using the microwave.
en Accessories Cooking compartment functions The functions in the cooking compartment make your appliance easier to use. This, for example, enables the cooking compartment to be well lit and a cooling fan to prevent the appliance from overheating. Opening the appliance door If you open the appliance door during an operation, the operation is paused. The operation continues to run when you close the door. Interior lighting If you open the appliance door, the interior lighting switches on.
Accessories en Inserting accessories Optional accessories The cooking compartment has three shelf positions. The shelf positions are counted from the bottom up. You can purchase optional accessories from the aftersales service and specialist retailers, or on the Internet. You will find a comprehensive range of products for your appliance in our brochures and on the Internet. Both availability and whether it is possible to order online differ between countries.
en Before using for the first time KBefore using for the first time Before you can use your new appliance, you must make some settings. You must also clean the cooking compartment and accessories. Bef or e usi ng f or t he f i r st t i me Cleaning the cooking compartment To eliminate the new-appliance smell, heat up the cooking compartment without anything in it and with the oven door closed. 1. Remove the accessories from the cooking compartment. 2.
Operating the appliance 1Operating the appliance 4. Use the ( or ) button to select the temperature. +RW DLU You have already learnt about the controls and how they work. Now we will explain how to set your appliance. You will learn about what happens when you switch the appliance on and off, and how to select the operating mode. Oper at i ng t he ap l i ance Switching the appliance on and off To switch the appliance on or off, touch the # touch button.
en Time-setting options Changing or cancelling the appliance operation Changing the appliance operation 1. Use the # button to stop the operation. 2. Use the & or % button to navigate to the line for the setting that should be changed. 3. Use the ( or ) button to change the setting. 4. Use the # touch button to start the changed operation. Notes ■ The cooling fan may continue to run while an operation is interrupted. ■ After a temperature change, the paused running time continues to count.
Childproof lock Setting the cooking time Once the set cooking time has elapsed, the appliance switches off automatically. The function can only be used in combination with a type of heating. 1. Touch the # touch button. 2. Set the type of heating and temperature. 3. Touch the 0 touch button. The time-setting options are shown in the display. 4. Use the ( or ) button to set the cooking time. – Default value for the ( button = 10 minutes – Default value for the ) button = 30 minutes 5.
en Microwave One-time childproof lock The control panel is locked so that the appliance cannot be switched on. To switch it on, the one-time childproof lock must be deactivated. After the appliance is switched off, the control panel is no longer locked. Activating and deactivating 1. Press and hold the 0 touch button until "Childproof lock activated" appears on the display. The childproof lock is activated. 2. Press and hold the 0 touch button until "Childproof lock deactivated" appears on the display.
Microwave Accessories included Only the wire rack provided is suitable when using the microwave only. If you use the universal pan or the baking tray, this may create sparks, which may damage the cooking compartment. When using the appliance in combination with the microwave or "Dishes" mode, you can use the universal pan, baking tray or any other accessories that have been included with the appliance. When using the microwave, it is best to insert accessories at level 1, unless otherwise specified.
Microwave en Starting drying To dry the cooking compartment, it is heated up so that the moisture in the cooking compartment evaporates. You will then need to open the appliance door to allow the steam to escape from the cooking compartment. Caution! Enamel damage: Do not start any operations when there is water on the cooking compartment floor. Before operation, wipe away the water from the cooking compartment floor. 1. Leave the appliance to cool down. 2. Remove the worst dirt from the cooking 3. 4. 5.
Basic settings QBasic settings There are various settings available to you in order to help use your appliance effectively and simply. If necessary, you can change these settings in MyProfile 4. Basi c set i ngs Changing MyProfile 1. 2. 3. 4. 5. 6. 7. 8. 9. Touch the # touch button. Touch the 0 touch button. Use the ( or ) button to select "MyProfile 4". Use the & button to navigate to the next line. Use the ( or ) button to select the setting. Use the & button to navigate to the selection.
en Sabbath mode FSabbath mode You can set a time of up to 74 hours using Sabbath mode. The food in the cooking compartment remains warm, without you having to switch the appliance on or off. Sab at h mode Starting Sabbath mode Before you can use Sabbath mode, you must activate it under "Favourites" in the basic settings. ~ "Setting favourites" on page 21 Once the Sabbath mode has been activated, you can select it under the menu for the types of heating. The appliance heats up with top/bottom heating.
Cleaning agent Door handle Hot soapy water: Clean with a dish cloth and then dry with a soft cloth. If descaler comes into contact with the door handle, wipe it off immediately. Otherwise, any stains will not be able to be removed. Appliance interior Enamel surfaces Observe the instructions for the surfaces of the and self-cleaning cooking compartment that follow the table. surfaces Glass cover for Hot soapy water: the interior light- Clean with a dish cloth and then dry with a soft ing cloth.
en Cleaning function Keeping the appliance clean Always keep the appliance clean and remove dirt immediately so that stubborn deposits of dirt do not build up. : Warning – Risk of fire! Loose food remnants, fat and meat juices may catch fire. Before using the appliance, remove the worst of the food remnants from the cooking compartment, heating elements and accessories. Tips ■ Clean the cooking compartment after each use. This will ensure that dirt cannot be baked on.
Rails Subsequent cleaning 1. Open the appliance door and remove the remaining water with an absorbent sponge cloth. 2. Clean the smooth surfaces in the cooking compartment with a dish cloth or a soft brush. Stubborn residues can be removed using a stainless steel scouring pad. 3. Remove limescale with a cloth soaked in vinegar. Then wipe with clean water and rub dry with a soft cloth (including under the door seal). 4. Use the # touch button to switch off the appliance. 5.
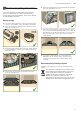
en Appliance door 3. Use the hook to attach the rear holder into the upper hole ‚ and push it into the lower hole ƒ (fig. #). qAppliance door With good care and cleaning, your appliance will retain its appearance and remain fully functional for a long time to come. This will tell you how to clean the appliance door. Ap l i ance do r D Removing the door cover E The stainless-steel inlay in the door cover may become discoloured. To carry out thorough cleaning, you can remove the cover.
Appliance door Removing and fitting the door panels To facilitate cleaning, you can remove the glass panels from the appliance door. Removing the door panels from the appliance 1. Open the appliance door slightly. 2. Press on the right and left side of the cover (fig. !). 3. Remove the cover (fig. "). 1 2 en : Warning Risk of injury! ■ Scratched glass in the appliance door may develop into a crack. Do not use a glass scraper, sharp or abrasive cleaning aids or detergents.
en Trouble shooting 3Trouble shooting mains or switch off the circuit breaker in the fuse box. Contact the after-sales service. If a fault occurs, there is often a simple explanation. Before calling the after-sales service, please refer to the fault table and attempt to correct the fault yourself. : Warning – Risk of injury! Tr oubl e sho t i ng Tip: If a meal does not turn out exactly as you wanted, refer to the "Tested for you in our cooking studio" section.
Customer service 4Customer service Our after-sales service is there for you if your appliance needs to be repaired. We will always find an appropriate solution, also in order to avoid after-sales personnel having to make unnecessary visits. Cust omer ser vi ce E number and FD number When calling us, please quote the full product number (E no.) and the production number (FD no.) so that we can provide you with the correct advice.
en Programmes Dishes Leg of lamb, boned Chicken, whole Chicken legs Goose, whole (3-4 kg) Setting the food You will be guided through the entire setting process for your chosen food. 1. Touch the # touch button to switch on the appliance. 2. Touch the 0 touch button. 3. Use the ( or ) button to select the "Baking and roasting assistant". 4. Use the & button to navigate to the next line. 5. Use the ( or ) button to select the required category. 6. Use the & button to navigate to the next line. 7.
Tested for you in our cooking studio Dishes Vegetables, frozen Boiled potatoes Long grain rice Steam fish fillet Frozen pizza with thin base, 1 piece Lasagne, frozen Chicken, unstuffed Chicken portions Meat loaf made from fresh minced meat Baked potatoes, whole Setting the programme You will be guided through the entire setting process for your chosen food. 1. Touch the # touch button to switch on the appliance. 2. Touch the 0 touch button. 3. Use the ( or ) button to select "Microwave programmes". 4.
en Tested for you in our cooking studio settings tables will be reduced. The cake will not brown as much underneath. Baking in combination with a microwave is only possible on one level. Shelf positions Use the indicated shelf positions. Baking on one level When baking on one level, use the following shelf position: ■ Level 1 Baking on two levels Use Hot air. Baked items that are placed into the oven on trays or in baking tins/dishes at the same time will not necessarily be ready at the same time.
Tested for you in our cooking studio en Dish Accessories/cookware Shelf posi- Heating tion function Temperature in °C Sponge flan base Flan base tin 1 150-170 Fruit tart or cheesecake with shortcrust pastry base Fruit tart or cheesecake with shortcrust pastry base Springform cake tin, Ø 26 cm 1 ƒ ‚ MW power in Cooking watts time in mins.
en Tested for you in our cooking studio Dish Accessories/cookware Shelf posi- Heating tion function Temperature in °C Strudel, frozen Universal pan 1 ‚ 200-220 MW power in Cooking watts time in mins.
Tested for you in our cooking studio The whole cake is too dark. The cake is unevenly browned. You were baking on several levels. The items on the top baking tray are darker than those on the lower baking tray. The cake looks good, but is not cooked properly in the middle. The cake cannot be turned out of the dish when it is turned upside down. en Select a lower temperature next time and extend the baking time if necessary. Select a slightly lower temperature.
en Tested for you in our cooking studio The setting values for bread dough apply to both dough placed on a baking tray and dough placed in a loaf tin. If you wish to follow one of your own recipes when baking, you should use the setting values listed for similar baked items in the table as reference. Remove unused accessories from the cooking compartment. This will ensure that you achieve the best possible cooking results and energy savings of up to 20 per cent.
Tested for you in our cooking studio Pizza, quiche and savoury cakes Your appliance offers you a range of heating types for preparing pizza, quiche and savoury cakes. You can find the ideal settings for many dishes in the settings tables. Also refer to the notes in the section on allowing dough to rise. Only use original accessories supplied with your appliance. These have been tailored to the cooking compartment and the operating modes of your appliance.
en Tested for you in our cooking studio Dish Accessories Shelf posi- Type of tion heating Temperature in °C MW power in Cooking watts time in mins.
Tested for you in our cooking studio Accessories Ensure that you always use suitable accessories and that they are placed in the oven the right way around. Wire rack Slide the wire rack in with the embossed "microwave" facing the appliance door, and the curved lip pointing downwards. Always place ovenware, tins and dishes on the wire rack. Universal pan Slide in the universal pan carefully as far as the limit stop, with the bevelled edge facing the appliance door.
en Tested for you in our cooking studio Glass cookware is most suitable. Place hot glass cookware onto a dry mat after cooking. If the surface is damp or cold, the glass may crack. Shiny roasting dishes made from stainless steel or aluminium reflect heat like a mirror and are therefore not particularly suitable. The poultry cooks slower and does not brown so well. Use a higher temperature and/ or a longer cooking time. Observe the manufacturer's instructions for your roasting cookware.
Tested for you in our cooking studio en Dish Accessories/cookware Shelf posi- Type of tion heating Temperature in °C MW power in Cooking watts time in mins.
en Tested for you in our cooking studio universal pan in at the shelf position underneath with the slanted edge facing the appliance door. Roasting and braising in cookware It is more convenient to roast and braise meat in cookware. You can take the joint out of the cooking compartment more easily in the cookware, and prepare the sauce in the cookware itself. Only use cookware which is suitable for use in an oven. Check whether the cookware fits in the cooking compartment. Glass cookware is most suitable.
Tested for you in our cooking studio As a general rule: the larger a roasting joint is, the lower the cooking temperature and the longer the cooking time. Turn roasting joints and grilled items after approx. ^ to Z of the indicated time. If you wish to follow one of your own recipes, you should use similar dishes as a reference. You can find additional information in the tips on roasting, braising and grilling attached to the settings table. Dish en Remove unused accessories from the cooking compartment.
en Tested for you in our cooking studio Dish Accessories/cookware Shelf posi- Type of tion heating Temperature in °C Leg of lamb, boned, medium, 1.5 kg Cookware, covered 1 ‚ 240-260 Saddle of lamb on the bone** Cookware, uncovered 1 180-190 Saddle of lamb on the bone** Cookware, uncovered 1 190-210 90 30-40 Lamb cutlet*** Wire rack 2 ‡ ‡ ˆ MW power in Cooking watts time in mins.
Tested for you in our cooking studio Glass cookware is most suitable. Place hot glass cookware onto a dry mat after cooking. If the surface is damp or cold, the glass may crack. Shiny roasting dishes made from stainless steel or aluminium reflect heat like a mirror and are therefore not particularly suitable. The fish cooks more slowly and browns less. Use a higher temperature and/or a longer cooking time. Observe the manufacturer's instructions for your roasting cookware.
en Tested for you in our cooking studio Dish Accessories/cookware Shelf posi- Type of tion heating Temperature in °C MW power in Cooking watts time in mins. 600 4 360 5-15 Fish fillet, plain, braised, 400 g Cookware, covered 1 • - Fish steaks Fish steak, 3 cm thick** Wire rack 2 ˆ 290 - 18-22 Fish, frozen Fish, whole 300 g, e.g.
Tested for you in our cooking studio indicated cooking times will be reduced by several minutes. If you wish to follow one of your own recipes when cooking, you can use similar dishes in the table as a reference. ■ ■ ■ ■ ■ ■ Types of heating used: en ‚ Hot air ƒ Top/bottom heating ‡ Circo-roasting „ Circotherm intensive ˆ Full-surface grill • Microwave Dish Accessories/cookware Shelf posi- Type of tion heating Temperature in °C MW power in Cooking watts time in mins.
Tested for you in our cooking studio en Dish Accessories/cookware Shelf posi- Type of tion heating Temperature in °C Polenta/corn semolina, 125 g + 500 ml water* Pearl barley, 250 g + 750 ml water Cookware, covered 1 • - Cookware, covered 1 • - 600 180 11-13 15-20 Cookware, covered 1 • - 360 6-8 Egg Egg custard with 2 eggs MW power in Cooking watts time in mins. 600 6-8 * Stir once or twice while cooking Dessert You can prepare yogurt and various desserts using your appliance.
Tested for you in our cooking studio en Dish Accessories/cookware Shelf position Type of heating Temperature in °C Custard made from custard powder* Yogurt Cookware, covered 1 • - MW power in Cooking watts time in mins.
en Tested for you in our cooking studio Dish Accessories/cookware Shelf posi- Type of tion heating Temperature in °C Cooking time in mins.
Tested for you in our cooking studio Acrylamide in foodstuffs Acrylamide is mainly produced in grain and potato products prepared at high temperatures, such as potato en crisps, chips, sliced bread, bread rolls, bread or fine baked goods (biscuits, gingerbread, spiced biscuit). Tips for keeping acrylamide to a minimum General ■ Keep cooking times as short as possible. ■ Cook food until it is golden brown, but not too dark. ■ Large, thick pieces of food contain less acrylamide.
en Tested for you in our cooking studio Dish Cookware Shelf posi- Heating tion function Searing time Temperain mins ture in °C Fillet of pork, whole Cookware, uncovered 1 Š 4-6 85* Cooking time in mins 45-70 Cookware, uncovered 1 Š 6-8 100* 150-190 Cookware, uncovered 1 4-6 85* 90-120 Sirloin, 5-6 cm thick Cookware, uncovered 1 6-8 85* 120-180 Beef medallions/rump steak, 4 cm thick Cookware, uncovered 1 Š Š Š 4 85* 40-60 Veal Joint of veal, 4-5 cm thick, 1.
Tested for you in our cooking studio en Dish Accessories Shelf posi- Type of tion heating Temperature in °C Pomes (apple rings, 3 mm thick, 200 g per wire rack) Stone fruit (plums) Wire rack 2 ‚ 80 Cooking time in hours 4-7 Wire rack 2 80 8-10 Root vegetables (carrots), grated, blanched Wire rack 2 80 4-7 Sliced mushrooms Wire rack 2 60 6-8 Herbs, washed 1-2 wire racks - ‚ ‚ ‚ ‚ 60 2-6 Wipe the rims of the jars, as they must be clean.
en Tested for you in our cooking studio Dish Cookware Vegetables, e.g. cucumbers 1-litre preserving jars Shelf posi- Type of tion heating 1 ‚ Stone fruit, e.g. cherries, damsons 1-litre preserving jars 1 ‚ Pomes, e.g. apples, strawberries 1 ‚ 1-litre preserving jars Allowing the dough to prove at dough proving setting Yeast dough will prove considerably more quickly using the "Dough proving" heating type than at room temperature and does not dry out.
Tested for you in our cooking studio Leave the defrosted food to rest for another 10 to 30 minutes in the appliance whilst it is switched off, so that the temperature balances out. en Tip: If you have quantities other than those indicated in the settings table, this basic rule will help: double the quantity equates to roughly double the cooking time. Type of heating used: ■ • Microwave Dish Accessories/cookware Shelf posi- Type of tion heating Temperature MW power in in °C watts Cooking time in mins.
en Tested for you in our cooking studio Dish Miscellaneous Defrosting butter, 125 g Accessories/cookware Shelf posi- Type of tion heating Temperature MW power in in °C watts Cooking time in mins. Cookware, uncovered - 7-9 1 • 90 * Turn halfway through cooking time Heating food in a microwave Using the microwave, you can heat food, or defrost and heat it in a single step. Take ready-to-eat meals out of the packaging.
Tested for you in our cooking studio Dish Cookware Shelf posi- Type of tion heating loose, 250 g Cookware, covered 1 Creamed spinach, frozen block, 450 g Cookware, covered 1 Dishes, chilled Plated meal, 1 portion Cookware, covered 1 Soup, stew, 400 ml Cookware, covered 1 Side dishes, e.g. pasta, dumplings, potatoes, rice Bakes, 400 g, e.g. lasagne, potato gratin Cookware, covered • • Temperature MW power in Cooking in °C watts time in mins.
en Tested for you in our cooking studio Test dishes These tables have been produced for test institutes to facilitate the inspection of the appliance. As per EN 60350-1:2013 and IEC 60350-1:2011 and as per standard EN 60705:2012, IEC 60705:2010. Baking Baked items that are placed into the oven on trays or in baking tins/dishes at the same time will not necessarily be ready at the same time.
Tested for you in our cooking studio Grilling Also slide in the universal pan. The liquid will be caught and the cooking compartment stays cleaner. en Type of heating used: ■ ˆ Full-surface grill Dish Accessories Shelf posi- Type of tion heating Temperature in °C Cooking time in mins.
*9001309332* 9001309332 980412 en