
Instruction manual
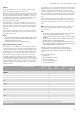
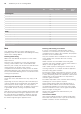
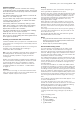


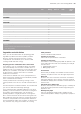


Table Of Contents
- [en] Instruction manual
- Table of contents
- [en] Instruction manual
- ( Important safety information 5
- ] Causes of damage 7
- 7 Environmental protection 8
- * Getting to know your appliance 9
- _ Accessories 11
- K Before using for the first time 13
- 1 Operating the appliance 14
- O Time-setting options 15
- A Childproof lock 16
- ^ Microwave 17
- Q Basic settings 19
- F Sabbath mode 20
- D Cleaning agent 21
- . Cleaning function 23
- p Rails 24
- q Appliance door 25
- 3 Trouble shooting 28
- 4 Customer service 29
- n Baking and roasting assistant 29
- P Programmes 30
- J Tested for you in our cooking studio 31
- 8 Intended use
- ( Important safety information
- ] Causes of damage
- 7 Environmental protection
- * Getting to know your appliance
- _ Accessories
- K Before using for the first time
- Before using for the first time
- Initial use
- 2. Use the ( or ) button to select the language.
- 3. Use the % button to return to "Language".
- 4. Use the ) button to select the next setting.
- 2. Use the ( or ) button to select the current hour.
- 3. Use the & button to navigate to the next line.
- 4. Use the ( or ) button to select the current minute.
- 5. Press the % button repeatedly until "Time" appears.
- 6. Use the ) button to select the next setting.
- 2. Use the ( or ) button to select the current day.
- 3. Use the & button to navigate to the next line.
- 4. Use the ( or ) button to select the current month.
- 5. Use the & button to navigate to the next line.
- 6. Use the ( or ) button to select the current year.
- 7. Press the % button repeatedly until "Date" appears.
- 8. Use the ) button to apply the settings.
- 2. Remove leftover packaging, such as polystyrene pellets, from the cooking compartment.
- 3. Before heating the appliance, wipe the smooth surfaces in the cooking compartment with a soft, wet cloth.
- 4. Use the # touch button to switch on the appliance.
- 5. Set the heating type and temperature, then start the appliance operation. ~ "Setting and starting the appliance operation" on page 14
- 6. Keep the kitchen ventilated while the appliance is heating up.
- 7. Use the # touch button to switch off the appliance after the indicated cooking time.
- 8. Wait until the cooking compartment has cooled down.
- 9. Clean the smooth surfaces with soapy water and a dish cloth.
- 1 Operating the appliance
- Operating the appliance
- Switching the appliance on and off
- Setting and starting the appliance operation
- 2. Use the ( or ) button to select the type of heating.
- 3. Use the & button to navigate to the next line.
- 4. Use the ( or ) button to select the temperature.
- 5. Touch the # touch button to start the appliance operation.
- 2. Use the & or % button to navigate to the line for the setting that should be changed.
- 3. Use the ( or ) button to change the setting.
- 4. Use the # touch button to start the changed operation.
- 2. Touch the # touch button to start the appliance operation.
- 3. Touch the ° touch button to activate the "Rapid heating" function.
- 4. Once the set temperature has been reached, the "Rapid heating" function switches off automatically. The ° symbol disappears from the display. Place the food in the cooking compartment.
- O Time-setting options
- Time-setting options
- Time-setting option
- Use
- Note:
- Showing and hiding the time-setting options
- Setting the timer
- 2. Select the cooking time using the ) button.
- 3. Touch the 0 touch button to start the timer.
- 2. Set the type of heating and temperature.
- 3. Touch the 0 touch button.
- 4. Use the ( or ) button to set the cooking time.
- 5. Touch the # touch button to start the set cooking time.
- 2. Touch the # touch button.
- 3. Set the type of heating and temperature.
- 4. Touch the 0 touch button.
- 5. Select the cooking time using the ) button.
- 6. Use the & button to navigate to the "* Ready at" line.
- 7. Select the end time using the ) button.
- 8. Touch the # touch button.
- 2. Use the & or % button to navigate through the lines.
- 3. If necessary, change the setting using the ( or ) button. Set "00:00" to delete a time function.
- A Childproof lock
- Childproof lock
- Lock
- Activate/deactivate
- Note:
- Automatic childproof lock
- 2. Touch the 0 touch button.
- 3. Use the ( or ) button to select "MyProfile".
- 4. Use the & button to navigate to the next line.
- 5. Use the ( or ) button to select "Automatic childproof lock".
- 6. Use the & button to navigate to the bottom line.
- 7. Use the ) button to select "Activated".
- 8. Touch the 0 touch button.
- 9. Use the & button to navigate to the next line to save the setting.
- 2. Touch the ± touch button.
- 3. Switch on the required appliance operation.
- 2. Touch the ± touch button.
- 3. Touch the 0 touch button.
- 4. Use the ( or ) button to select "MyProfile".
- 5. Use the & button to navigate to the next line.
- 6. Use the ( or ) button to select "Automatic childproof lock".
- 7. Use the & button to navigate to the bottom line.
- 8. Use the ( button to select "Deactivated".
- 9. Touch the 0 touch button.
- 10. Use the & button to navigate to the next line to save the setting.
- 11. Touch the ± touch button.
- 2. Press and hold the 0 touch button until "Childproof lock deactivated" appears on the display.
- ^ Microwave
- Microwave
- Cookware
- 2. Check the temperature of the cookware during this time.
- : Warning
- Risk of burns!
- Accessories included
- Microwave power settings
- Setting the microwave
- 2. Touch the 0 touch button.
- 3. Use the ( or ) button to select "Microwave •".
- 4. Use the & button to open the microwave menu.
- 5. Use the ( or ) button to set the required microwave output setting.
- 6. Use the & button to navigate to the next line.
- 7. Use the ( or ) button to set the required cooking time.
- 8. Touch the # touch button to start the appliance operation.
- 2. Touch the # touch button to start the appliance operation.
- 2. Remove the worst dirt from the cooking compartment immediately and wipe away moisture from the cooking compartment floor.
- 3. If necessary, touch the # touch button to switch the appliance on.
- 4. Touch the 0 touch button to display the operating modes.
- 5. Use the ( or ) button to select "Drying ª".
- 6. Use the & button to navigate to the next line.
- 7. Use the & button to navigate to the next line.
- 8. Touch the # touch button.
- 9. Open the appliance door and leave it open for 1 to 2 minutes so that the moisture in the cooking compartment can escape.
- 2. Touch the 0 touch button.
- 3. Use the ( or ) button to select "Microwave combination operation ¡".
- 4. Touch the & touch button.
- 5. Use the ( or ) touch button to set the required type of heating.
- 6. Use the & button to navigate to the next line.
- 7. Use the & button to navigate to the next line.
- 8. Use the & button to navigate to the next line.
- 9. Touch the # touch button.
- Q Basic settings
- Basic settings
- Changing MyProfile
- 2. Touch the 0 touch button.
- 3. Use the ( or ) button to select "MyProfile 4".
- 4. Use the & button to navigate to the next line.
- 5. Use the ( or ) button to select the setting.
- 6. Use the & button to navigate to the selection.
- 7. Use the ( or ) button to select the setting.
- 8. Touch the 0 touch button.
- 9. To save the setting, use the & button to select "Save".
- 2. Touch the 0 touch button.
- 3. Use the ( or ) button to select "MyProfile 4".
- 4. Use the & button to navigate to the next line.
- 5. Use the ( or ) button to select "Favourites".
- 6. Use the & button to select "Setting favourites".
- 7. Use the ( or ) button to select the heating type.
- 8. Use the & button to navigate to the next line.
- 9. Use the ( or ) button to select "Activated" or "Deactivated".
- 10. Touch the 0 touch button.
- 11. To save the setting, use the & button to select "Save".
- F Sabbath mode
- Sabbath mode
- Starting Sabbath mode
- 2. Use the ( or ) button to select "Sabbath mode".
- 3. Use the & button to navigate to the next line.
- 4. Use the ( or ) button to select the temperature.
- 5. Use the & button to navigate to the next line.
- 6. Use the ( or ) button to select the cooking time.
- 7. Touch the # touch button.
- D Cleaning agent
- . Cleaning function
- Cleaning function
- : Warning
- Risk of scalding!
- Starting
- 2. Mix 0.4 litres of water (not distilled water) with a drop of washing-up liquid and pour into the middle of the cooking compartment floor.
- 3. Touch the # touch button.
- 4. Touch the 0 touch button.
- 5. Use the ( or ) button to select "EasyClean š".
- 6. Use the & button to navigate to the next line.
- 7. Touch the # touch button.
- 2. Clean the smooth surfaces in the cooking compartment with a dish cloth or a soft brush. Stubborn residues can be removed using a stainless steel scouring pad.
- 3. Remove limescale with a cloth soaked in vinegar. Then wipe with clean water and rub dry with a soft cloth (including under the door seal).
- 4. Use the # touch button to switch off the appliance.
- 5. Leave the appliance door ajar in the stop position (approx. 30°) for approx. 1 hour to allow the enamel surfaces in the cooking compartment to dry thoroughly.
- p Rails
- Rails
- Detaching and refitting the rails
- : Warning
- Risk of burns!
- Detaching the rails
- 2. and detach it (fig. ").
- 3. Then swing the entire rail outwards ‚ and detach it at the rear ƒ (fig. #).
- 2. Use the hook to mount the front holder at the top into the round hole ‚, set it at a slight incline, attach it at the bottom, and straighten it ƒ (fig. ").
- 3. Use the hook to attach the rear holder into the upper hole ‚ and push it into the lower hole ƒ (fig. #).
- 2. Pull the rail forwards (fig. ").
- 3. Then fold it forwards and insert it (fig. #)
- 4. and push it downwards (fig. $).
- q Appliance door
- Appliance door
- Removing the door cover
- 2. Press on the right and left side of the cover (fig. !).
- 3. Remove the cover (fig. "). Close the appliance door carefully
- 4. Open the appliance door again slightly. Put the cover back in place and press on it until it clicks audibly into place (fig. #).
- 5. Close the appliance door.
- 2. Press on the right and left side of the cover (fig. !).
- 3. Remove the cover (fig. ").
- 4. Undo and remove the screws on the left and right of the appliance door (fig. #).
- 5. Before closing the door again, trap a tea towel that has been folded several times in the door (fig. $).
- 6. Push both retainers at the top of the intermediate panel upwards, but do not remove them (fig. %). Hold the panel with one hand. Take out the panel.
- : Warning
- : Warning
- Risk of injury!
- Fitting the door panels on the appliance
- 2. Push both retainers downwards (fig. ").
- 3. Insert the front panel downwards into the retainers (fig. #).
- 4. Close the front panel until both upper hooks are opposite the opening (fig. $).
- 5. Press the front panel down until it clicks audibly into place (fig. %).
- 6. Open the appliance door again slightly and remove the tea towel.
- 7. Screw both screws back in on the left and right.
- 8. Put the cover back in place and press on it until it clicks audibly into place (fig. &).
- 9. Close the appliance door.
- 3 Trouble shooting
- 4 Customer service
- n Baking and roasting assistant
- Baking and roasting assistant
- Information on the settings
- Selecting a meal
- Setting the food
- 2. Touch the 0 touch button.
- 3. Use the ( or ) button to select the "Baking and roasting assistant".
- 4. Use the & button to navigate to the next line.
- 5. Use the ( or ) button to select the required category.
- 6. Use the & button to navigate to the next line.
- 7. Use the ( or ) button to select the required meal.
- 8. Use the & button to navigate to the next line.
- 9. If required, you can change the recommended settings. Touch the & button to do this.
- 10. Touch the # touch button to start the appliance operation.
- 2. If necessary, use the ( or ) button to change the recommended setting.
- 3. Touch the # touch button to start "Continue cooking".
- P Programmes
- Programmes
- Information on the settings
- Selecting a dish
- Setting the programme
- 2. Touch the 0 touch button.
- 3. Use the ( or ) button to select "Microwave programmes".
- 4. Use the & button to navigate to the next line.
- 5. Use the ( or ) button to select the required microwave programme.
- 6. Use the & button to navigate to the next line.
- 7. Use the ( or ) button to set the weight.
- 8. Firstly touch the % n button to navigate upwards and then touch the ) button to navigate to the next line.
- 9. Touch the # touch button to start the appliance operation.
- 2. If necessary, use the ( or ) button to change the recommended setting.
- 3. Touch the # touch button to start "Continue cooking".
- J Tested for you in our cooking studio
- Tested for you in our cooking studio
- Note:
- Silicone moulds
- Cakes and small baked items
- Bread and rolls
- Pizza, quiche and savoury cakes
- Bakes and soufflés
- Poultry
- Meat
- Fish
- Vegetables and side dishes
- Dessert
- 2. Stir in 150 g (chilled) yogurt.
- 3. Pour into cups or small jars and cover with cling film.
- 4. Place the cups or jars onto the cooking compartment floor and use the settings indicated in the table.
- 5. After preparation, leave the yogurt to cool in the refrigerator.
- 2. Pour the rice and milk into a tall container which is suitable for microwave use.
- 3. Use the settings indicated in the table.
- 4. As soon as the milk starts to rise, stir thoroughly and reduce the microwave power as indicated in the table.
- : Warning
- : Warning
- : Warning
- Risk of scalding!
- Caution!
- Recommended setting values
- Dish
- Cookware
- Shelf position
- Type of heating
- Temperature in °C
- MW power in watts
- Cooking time in mins.
- Keeping warm
- Test dishes
- Baking
- Notes
- Dish
- Accessories/cookware
- Shelf position
- Type of heating
- Temperature in °C
- Cooking time in mins.
- Grilling
- Dish
- Accessories
- Shelf position
- Type of heating
- Temperature in °C
- Cooking time in mins.
- Preparing food with a microwave
- Dish
- Accessories/cookware
- Shelf position
- Type of heating
- Temperature in °C
- MW power in watts
- Cooking time in mins.
- [en] Instruction manual

en Tested for you in our cooking studio
42
Meat
Your appliance offers you many heating types for
preparing meat. You can find the ideal settings for many
dishes in the settings tables.
Roasting and braising
Baste lean meat with fat as required or cover it with
strips of bacon.
Score the rind crosswise. If you turn the joint when
cooking, ensure that the rind is underneath at first.
When the joint is ready, turn off the oven and allow it to
rest for another 10 minutes in the cooking
compartment. This allows the meat juices to be better
distributed. Wrap the joint in aluminium foil if necessary.
The recommended standing time is not included in the
cooking time specified.
Roasting on the wire rack
On the wire rack, meat will become very crispy on all
sides.
Depending on the size and type of the meat, add up to
^ litres of water to the universal pan. Any dripping fat
and meat juices will be caught. You can prepare a
sauce using these meat juices. In addition, less smoke
is generated, and the cooking compartment stays
cleaner.
Slide the wire rack in at the indicated shelf position with
the imprint "Microwave" facing the appliance door and
the outer rail facing downwards. In addition, slide the
universal pan in at the shelf position underneath with
the slanted edge facing the appliance door.
Roasting and braising in cookware
It is more convenient to roast and braise meat in
cookware. You can take the joint out of the cooking
compartment more easily in the cookware, and prepare
the sauce in the cookware itself.
Only use cookware which is suitable for use in an oven.
Check whether the cookware fits in the cooking
compartment.
Glass cookware is most suitable. Place hot glass
cookware onto a dry mat after cooking. If the surface is
damp or cold, the glass may crack.
Add in a little liquid for roasting if the meat is lean. A
covering of approx. ^ cm depth should be applied to
the base of any glass cookware.
The amount of liquid is dependent on the type of meat,
the cookware material and also on whether or not a lid
is used. If preparing meat in an enamelled or dark metal
roasting dish, it will need a little more liquid than if
cooked in glass cookware.
The steam evaporates in the cookware when roasting.
Carefully pour in more liquid if required.
Shiny roasting dishes made from stainless steel or
aluminium reflect heat like a mirror and are therefore
not particularly suitable. The meat cooks more slowly
and will not brown so much. Use a higher temperature
and/or a longer cooking time.
Observe the manufacturer's instructions for your
roasting cookware.
Uncovered cookware
Use a deep roasting tin/dish for roasting meat. Place
the tin/dish onto the wire rack. If you do not have any
suitable cookware, use the universal pan.
Duck and goose
Duck, 2 kg Cookware, uncovered 1
‡
180-200 - 90-110
Duck, 2 kg Universal pan 1
‡
170-190 180 60-80
Duck breast, 300 g each Wire rack 2
‡
230-250 - 25-30
Goose, 3 kg Cookware, uncovered 1
‡
160-170 - 120-150
Goose, 3 kg Cookware, uncovered 1
‡
170-190 180 80-90
Goose legs, 350 g each Wire rack 2
‡
210-230 - 40-50
Goose legs, 350 g each Universal pan 1
‚
170-190 180 30-40
Turkey
Small turkey, 2.5 kg Cookware, uncovered 1
‡
180-190 - 70-90
Small turkey, 2.5 kg Cookware, covered 1
‡
210-230 360 45-50
Turkey breast, boned, 1 kg Cookware, covered 1
ƒ
240-260 - 80-100
Turkey thigh, with bone, 1 kg Cookware, uncovered 1
‡
180-200 - 80-100
Turkey thigh, with bone, 1 kg Cookware, covered 1
‡
210-230 360 45-50
Dish Accessories/cookware Shelf posi-
tion
Type of
heating
Tempera-
ture in °C
MW power in
watts
Cooking
time in
mins.
* Preheat for 5 mins